1973 starcraft ss restore in progress

crankbait cowboy

Chief Petty Officer
Joined
Mar 25, 2013
Messages
570
No Title

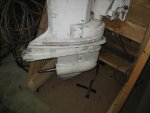
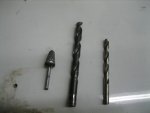
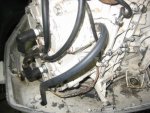
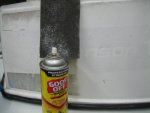
well i took some time and put lower unit on (pic 1) and had a buddy help, we got tubes in right place and lo and behold after snugging it got linkage hooked up and it shifts as supposed to. then i went ahead and put a tell tale in. drilled a 11/32 inch hole in cylinder wall and tapped with 1/2 inch and screwed in fitting ( pic 2) then drilled 1/2in hole in cowling and bored out with a drill and tapered grinder bit ( pic 3 ) then used 3/16 fuel hose to connect the 2 (pic 4). it went real well and gonna be nice to have for my spring test. by the way , the goof off worked great for removing decals on cowling with a scotch pad(pic5). plan now is to wait for spring, put on muffs and run and shift it hoping al works as planned, if so i may just run it and see what happens. thasnks for stopping by
 

Attachments

  • photo215440.jpg
    photo215440.jpg
    30.4 KB · Views: 0
  • photo215441.jpg
    photo215441.jpg
    17.5 KB · Views: 0
  • photo215442.jpg
    photo215442.jpg
    16.2 KB · Views: 0
  • photo215443.jpg
    photo215443.jpg
    37.7 KB · Views: 0
  • photo215444.jpg
    photo215444.jpg
    22.4 KB · Views: 0

dozerII

Admiral
Joined
Oct 25, 2009
Messages
6,527
Looking good CC, it's always nice to have that pee stream as sign of good water flow. The install is not to bad once you get over the thought of drilling into the motor, right.:eek:
 

crankbait cowboy

Chief Petty Officer
Joined
Mar 25, 2013
Messages
570
thanks doz, yeah i actually did the drilling with head off, so i could watch how i was progressing with a shop vac sucking from jacket side and grease on bit and tap tips as suggested. really a pretty easy project, and a simple fix for a way to check the h20 flow .. drilling thru the motor seemed a bit scary till i had the head off, and then really a no brainer when you look into the jacket space itself.
 

Watermann

Starmada Splash of the Year 2014
Joined
Jan 12, 2013
Messages
13,753
Looking good CC, so you planning on restoring the motor with fresh paint and decals too?
 

crankbait cowboy

Chief Petty Officer
Joined
Mar 25, 2013
Messages
570
thats the plan h20 , if i am happy with it this spring after a 6 pack test in water checking cooling and shift system. i will put off carb kits, paint and decals until i test in spring and make a decision then.
 

crankbait cowboy

Chief Petty Officer
Joined
Mar 25, 2013
Messages
570
just got back from visiting my sister and dad in arizona for a week. good time and very relaxing. thinking of getting started on the consoles. i am going to put a couple coats epoxy resin on the ply wood then cover with a carbon fiber vinyl with self adhesive. thinking i should use some other adhesive also, anybody got any suggestions?
 

dozerII

Admiral
Joined
Oct 25, 2009
Messages
6,527
just got back from visiting my sister and dad in arizona for a week. good time and very relaxing. thinking of getting started on the consoles. i am going to put a couple coats epoxy resin on the ply wood then cover with a carbon fiber vinyl with self adhesive. thinking i should use some other adhesive also, anybody got any suggestions?

You will have to do some experimenting, the C/F vinyl I used did not like contact cement it made it curl up. The dash on the Holiday has a mechanical fastener around the edges and the gauges hold the center down, but the glove box the vinyl pieces I put on it all lifted. The surface you stick the vinyl to has to be real smooth for it to work. I think if you made a thin aluminum cover for the dash and glued them on then the vinyl would grab real good to it.
 

crankbait cowboy

Chief Petty Officer
Joined
Mar 25, 2013
Messages
570
thanks doz ,just the kind of input i am looking for, am a bit concerned that sanded epoxy may not get smooth enough, my dash also has the aluminum trim around edge and the gauges , thinking wrapping around and stainless steel staples on back side with trim and gauges may hold up. how did your trim and gauges work out (did it hold well?)
 

dozerII

Admiral
Joined
Oct 25, 2009
Messages
6,527
Yup no problems at all where the edges were held by a piece of trim.Y
 

crankbait cowboy

Chief Petty Officer
Joined
Mar 25, 2013
Messages
570
No Title

got some bling in the mail while i was on vacation
 

Attachments

  • photo216333.JPG
    photo216333.JPG
    175.4 KB · Views: 1

jvanhees

Petty Officer 1st Class
Joined
Mar 20, 2013
Messages
284
flipped! and not bad at all, 4 guys from work on lunch break ( no wobbly pops this time around ) some mattresses from hunting shack. we rolled her slowly and then used a bar thru the bow eye and one thru transom eyes so we could lift bar evenly on 4 corners, and then walked her onto trailer. next step is to set the trailer up correctly. she isn.t right , as i could only guess when i redid it ( bunks wrong angle and short i think and gotta move the bow support forward a bit as i got a foot hanging off the bunks in back)


Looking real good CC
 

crankbait cowboy

Chief Petty Officer
Joined
Mar 25, 2013
Messages
570
thanks jvan, hoping to get back at er this summer. lots of irons in fire right now . been building a toy box for grand daughter, and now of all things work got in the way with spring planting going full guns in our country. be nice if you all dont snub me when i get back on track and am looking for advice from you all later on. thanks for checking on me
 

crankbait cowboy

Chief Petty Officer
Joined
Mar 25, 2013
Messages
570
so i am thinking of getting back at it here in a few weeks and had a little time to post a question to those that have gone before me. thinking my next step is to get the fuel tank installed , insulation, and below deck work. also got to prep and paint the top rail and splashwell. my dumb question is would i be better off getting my below deck work and deck installed before paiting top rail and splashwell. thinking i would not have to worry about scarring up paint if i do it first. any disadvantages to my order of steps? how did you all go about it.
 

Watermann

Starmada Splash of the Year 2014
Joined
Jan 12, 2013
Messages
13,753
On the Chief the deck went in last after paint but I tore everything apart and painted it in pieces and then reinstalled it. On my SN I also painted first and then the deck in last but I didn't do any painting on the inside, it's bare AL.
 

crankbait cowboy

Chief Petty Officer
Joined
Mar 25, 2013
Messages
570
well i got some family stuff going on , but plan to get back at it off and on sttarting about july. thinking of doing my below deck work , then deck and some interioir stuff before painting gunnels / splashwell/ and rails . boat is still sitting in storage but hope to get back at er and involved in this great starmada.
 

Watermann

Starmada Splash of the Year 2014
Joined
Jan 12, 2013
Messages
13,753
We'll be here when you get back, take care buddy.
 

dozerII

Admiral
Joined
Oct 25, 2009
Messages
6,527
Good to see you back CC, I usually install the under deck and deck before paint as well, just cuz new paint and my clutzyness don't get along.;)
 

crankbait cowboy

Chief Petty Officer
Joined
Mar 25, 2013
Messages
570
looking for a bit of advice from ya all. if you have followed my thread you know that my 115 johnson could have some issues and no tilt / trim . got an oppertunity to trade for a 1988 evinrude 90 v4 or an 88 sp evinrude with tilt and trim and could come out pretty good on it with moving what i got. the question is will i be happy with power and top end with 90 hp on my 18 ft ss? thanks and let the discussion begin
 

hayko1971

Starmada Splash of the Year 2015
Joined
May 24, 2013
Messages
448
My 89 Johnson v4 90 pushes my 16ss to 45 mph. I don't know how much the extra 2 feet of drag and extra weight of your boat would affect it, but I'm very happy with mine. If I had to guess, and this is JUST a guess, I think you'd see 30-35 mph top end, maybe more.
I can't troll at idle with mine, it's too much on my little boat for that, but maybe it would work out perfect for your 18.
 
Top