1968 Starcraft Jupiter - Rebuild

Status
Not open for further replies.

InMotion

Commander
Joined
Nov 3, 2011
Messages
2,080
Hi Folks,

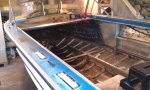
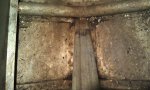
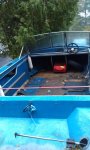
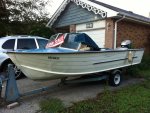
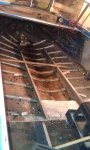
I am new to the Starcraft forum. I have a late 60's 16' Starcraft Juniper that I have decided to restore. Please see attached pictures of the beast! I have run across a couple of issues (shocking I know! :) )... one of which is seen in the attached picture entitled "Hull Holes". After gutting the boat, and scrubbing the inside hull of the boat, I ran across some pitting. I poked and scraped at the pitting and sure enough, I was able to puncture the hull with my screw driver! There are now 10 small holes ranging from the end of my flat screw driver to the end of those little nails pulled from the transom cap.

What would you guys recommend to fix these holes? Suggestions are welcomed!!
 

Attachments

  • Interior Before.jpg
    Interior Before.jpg
    149.6 KB · Views: 29
  • Not Fixed Up.jpg
    Not Fixed Up.jpg
    90.8 KB · Views: 25
  • Interior Removal 1.jpg
    Interior Removal 1.jpg
    146.4 KB · Views: 24
  • Floor Removal 1.jpg
    Floor Removal 1.jpg
    150.8 KB · Views: 24
  • Hull Holes.jpg
    Hull Holes.jpg
    151.6 KB · Views: 26

jasoutside

Supreme Mariner
Joined
Dec 20, 2009
Messages
13,269
Re: Starcraft Juniper Restoration - Saved from the scrap yard...

Re: Starcraft Juniper Restoration - Saved from the scrap yard...

Hey Jim, welcome to iBoats and the Starcraft corner here on the site!

Quick point of clarification,

Juniper...
rob_cl_20090308115817.jpg


Jupiter...
DSCF1923.jpg


Just messin with ya a little:)

Bummer on the corrosion! First step would be to get that as clean as humanly possible. Then maybe a big thin hunk of alum notch trowled with JB Weld or 3m 5200 to seal it up good and reinforce the whole thing.

You have a great project there!

Welcome!
 

InMotion

Commander
Joined
Nov 3, 2011
Messages
2,080
Re: Starcraft Jupiter Restoration - Saved from the scrap yard...

Re: Starcraft Jupiter Restoration - Saved from the scrap yard...

Oops! Yes quite the difference --- juniper vs jupiter!

I was thinking along those lines but using a couple of carridge bolts to sandwitch a some 5200 between the inside of the hull and a thin sheet of aluminum. I don't know if this will work. A couple of years ago a friend of mine used ice and water shield to patch a 24 x 6 inch gash in the side of his hull --- temporarily. However, while it did last long enough to get him back to the boat launch, it had pretty much pealed off. So, i don't really want to put a patch on the underside of the hull as i am concerned the same will occur. Perhaps with such small holes it will not be an issue. Do you think the hull is comprimised?

Overall, it has been interesting! I originally bought the boat, trailer and motor just for the motor. Then strangly I became compelled to fix her up! My 2 kids have been helping where they can. My wife... she just thinks I am nuts for doing this!!! :) Once we get the kids in bed, I am going out tonight to continue sanding the deck and top sides.. Record temps here today --- so gotta take advantage of the weather while it is still strangly warm!

Most of the boat was in tact. The original floors although sopping wet --- there was more of a water line in the boat then on the sides of the boat ---were iin remarkably good shape. Underneath was a disaster. There was some pitting on the transom as well. Not as bad as the floor --- mostly under the ply wood that the motor was pressed into.
 

InMotion

Commander
Joined
Nov 3, 2011
Messages
2,080
Re: Starcraft Jupiter Restoration - Saved from the scrap yard...

Re: Starcraft Jupiter Restoration - Saved from the scrap yard...

One other thing... I just got an e-mail from a co-worker who's friend was going to scrap a 15' Starcraft with a 40 or 50 Johnson on it. So I told him I would take it... 80 bucks!! Pictures to come in a week or so. He is going to store it for the winter for me.. He said the hull and transom are in great shape. Has a windshield that is not broken. Also has a trailer. I couldn't pass it up!! I guess I am going to have a spring summer project as well!!!

J.
 

jasoutside

Supreme Mariner
Joined
Dec 20, 2009
Messages
13,269
Re: Starcraft Jupiter Restoration - Saved from the scrap yard...

Re: Starcraft Jupiter Restoration - Saved from the scrap yard...

So, i don't really want to put a patch on the underside of the hull as i am concerned the same will occur. Perhaps with such small holes it will not be an issue. Do you think the hull is comprimised?

Yah, go from the inside, that would be better. Compromised? Nah.

Have fun!
 

ezmobee

Supreme Mariner
Joined
Mar 26, 2007
Messages
23,767
Re: Starcraft Jupiter Restoration - Saved from the scrap yard...

Re: Starcraft Jupiter Restoration - Saved from the scrap yard...

I'd skin that area with an aluminum patch, some 5200 and some rivets.

That was my Jupiter jas posted above. Had a lot of fun with that boat. I restored it prior to finding iboats so I don't have a detailed restore thread but I do have a picture album here http://s176.photobucket.com/albums/w200/ezmobee/Boat Project/ That 60 should be a great motor for yours. Good luck with the restore. I replaced my dash with a PVC trim board from Lowes. Worked awesome.
 

InMotion

Commander
Joined
Nov 3, 2011
Messages
2,080
Re: Starcraft Jupiter Restoration - Saved from the scrap yard...

Re: Starcraft Jupiter Restoration - Saved from the scrap yard...

Thanks ezmobee. I was thinking about using an aluminum patch as well. I now have the boat flipped over and upside down in my garage. I used a wire brush attachment on my drill to scrub the area on the bottom of the boat were the triangular transom brace attaches to the bottom of the boat. I will post some pictures shortly, but the long and short of it is that there are about 20 holes in the bottom of the boat. I used the claw end of my hammer to bang on the metal in the area and it seams surpising solid. The hammer bounces of the metal --- no denting or softness.

The most interesting discovery though is the fact that approx. 40% of the rivits that hold the floor ribs in place are corroded --- some quite badly. The hull had hundreds of small corroded area about the size of a dime! Along the edge of the keel was also badly corroded. I used the drill wire brush to clean each one out... there isn't any perferation... but it doesn't look great. I did a little reseach on the corrosion and it seams that it could be that the boat sat in the water and as a result corrosion was able to occur or that the paint that was applied caused the corrosion.

Here is my plan to fix the holes and patch/seal the corroded areas around the rivits and the hull.
1. Sand the hull and wire brush out the corroded areas
2. I am going to get a triangular patch made of 18 gauge aluminum to go over the back of the hull made up at work on Wednesday.
3. Put a rivit in the small perferations with 5200 in each hole
4. 5200 the larger holes with an alumium patch on the inside of the hull
5. Rivit the patch to the bottom of the hull and put 5200 sandwitched between the hull and the patch to add an extra layer of protection to that area.
6. Put 5200 to fill all the corroded areas around the rivits
7. When everything has dried/set, lightly sand any areas that are rough
8. Paint in the spring when it is warm...

What do you guys think? I realize it is maybe a little over kill, but I would prefer to make sure I give it a chance to not leak! I am also hoping that the corrosion will not continue once I have cleaned/patched/primed/painted the bottom of the boat.

As far as the 60hp goes... I also have a 1988 90 HP Johnson in great shape that I was thinking of putting on the Jupiter. I realize it is rated for an 85... it's just that I have a great running 90 and more importantly my wife loves the sound of the 90!! Happy wife, happy life!! The real question is... will the jupiter handle a 90? Thoughts?

Ezmobee --- I like your idea for the dash. The dash was two pieces of oak joined in the middle with a rotted piece of plywood. I have a good friend who is a master cabinet maker and is gung ho to help with the dash... so when I get to that point I will see what his thoughts are for the dash! Your boat restore turned out great. I really like your SS... it looks fantastic!
 

ezmobee

Supreme Mariner
Joined
Mar 26, 2007
Messages
23,767
Re: Starcraft Jupiter Restoration - Saved from the scrap yard...

Re: Starcraft Jupiter Restoration - Saved from the scrap yard...

Your repair ideas sound good to me and not overkill. I think the 3 cylinder motors are ideal for 16' Starcrafts due to their power/weight ratio however it will certainly handle the 90 fine.
 

InMotion

Commander
Joined
Nov 3, 2011
Messages
2,080
Re: Starcraft Jupiter Restoration - Saved from the scrap yard...

Re: Starcraft Jupiter Restoration - Saved from the scrap yard...

Good to know about the 90. I find the 90 is smoother than triples. I grew up with a 70 on a 15 foot Doral fiberglass boat. We used to pull 4 skiers behind it... really pushing it. The 90 however, has a lot of torque... I was just worried that it would to much for the transom.

On another note, the Starcraft logo on the sides of the boat were missing. However, the guys at one of our plants is going to laser cut a couple of Starcraft logo's. I will post some pictures when I have them. They are made out of stainless steel... they should be quite nice.

I also have a 12 gallon gas tank that I am going to mount in the boat. I was hoping to put it up front, but it makes the leg run a bit tight --- I am 6 4' --- so leg run is important. If I mount it at the back, it will actually fit perfectly between the aluminum stringers! It will also fit under the splash well. I may have to extend the splash well a bit to have a cover/sliding doors in front of it. Has anyone put a gas tank of approx. this size at the back? With the boat be to low at the back with the motor, battery and approx. 85 lbs of fuel? I can modify it a bit at the front to make it fit better... it's just not ideal.
 

InMotion

Commander
Joined
Nov 3, 2011
Messages
2,080
Re: Starcraft Jupiter Restoration - Saved from the scrap yard...

Re: Starcraft Jupiter Restoration - Saved from the scrap yard...

Progress update: Managed to get the boat flipped over and into the garage. The neighbors next door, my 4 year old son and wife got the boat flipped over by lifting it off the dollies, setting it on it's side and rolling it over on to the dollies. Really wasn't a big deal. With the boat completely stripped it probably doesn't weigh more than 250 to 300 lbs.

Getting it into the garage was a bit more challenging. When it was up right the nose of the boat cleared the shelves at the back of my garage and fit neatly between the two shelves with about an inch to spare. However, with it flipped over, I had to actually lift the nose of the boat onto the shelves and slide it in. The doors for the shelves also had to come off to allow access for the whole nose of the boat to fit.

The other challenge is that I have a remote control indoor rock crawling course on the the right hand side of the garage. Right now it holds the splash well, the side panels, the remains of the dash and other salvage debris from the gutting of the boat. As a result it is rather tight to get the right side of the boat... but hopefully I will be able to properly sand that side.

I will get into it in a bit...but I have decided to redesign a the stern of the boat --- transom area, splash well etc. The idea is that the gas tank I want to install will not fit under the existing splash well, the splash well is not in the best of shape if I am being honest and I would like to re-enforce the transom. I will detail it out more shortly.

Boat Flipped and Hull_resize.JPGThe Boat and Son_resize.JPGThe Boat Pre Flip_resize.JPG
 

InMotion

Commander
Joined
Nov 3, 2011
Messages
2,080
Re: Starcraft Jupiter Restoration - Saved from the scrap yard...

Re: Starcraft Jupiter Restoration - Saved from the scrap yard...

I have made some indirect progress on the boat. I now have all of the patch plans and have the aluminum patch itself. There are 20 holes in the bottom of the hull around where the transom brace attaches to the hull. The aluminum itself seems strong enough... but not in great shape if I am being honest. The plan is still to rivet and 5200 holes that are small enough to be riveted. 5200 the larger holes with and aluminum backer in the floor of the boat and then rivet the patch in place and 5200 the patch to the hull as I rivet it.

I had the patch designed like a triangle to try and make it a tad more aero dynamic so as to try to reduce the chances of it lifting and/or peeling back. We shall see if this actually works.
Full Hull Damage_resize.JPGFix Piece_resize.JPGHull Damage_resize.JPG

I also cleaned up an old tach --- I think it came out great!! Wayne at my work also created a great SS Starcraft logo on his lunch hour (thanks Wayne!!!) for the sides of the boat and one for the dash. They will really look good when I buff them up!

Fixed and Cleaned Tach_resize.JPGStarcraft Logo_resize.JPG

It has been snowing here... so I guess it is really winter now!! :(
 

InMotion

Commander
Joined
Nov 3, 2011
Messages
2,080
Re: Starcraft Jupiter Restoration - Saved from the scrap yard...

Re: Starcraft Jupiter Restoration - Saved from the scrap yard...

So the idea for the stern of the boat is this: I am having a new stern piece cnc'd out of Aluminum that I will attach to the existing stern --- skinned on the outside of it. I will then make the transom board to match the new design --- basically the back of the Jupiter is smily face ... now the transom will be much higher --- two inches lower than the two sides of the boat. It will extend towards the center of the transom on both sides at that height. There will be a 31 inch wide opening that the splash well will attach to. The splash well is now 34" deep instead of 24". On either side of the splash will be 3 pcs of 3/4" ply attached to 2x2 aluminum angle iron riveted to the hull ribs and the transom. There will be 2 small jump seats or perhaps two swivel seats that can extend upwards for fishing.... more likely the later will be installed. A swim platform will also attache to the hull beside the motor so that we can get in and out of the boat from the water with much more ease!

The result: more transom strength; room for the gas tank; fishing platform without taking up much room in the boat; new splash well that is in good shape!

Will post pictures as I get into it!
 

InMotion

Commander
Joined
Nov 3, 2011
Messages
2,080
Re: 1968 Starcraft Jupiter - Rebuild

Having a heck of a time finding Gluvit. Anyone know where I can get Gluvit in Ontario, Canada? I have tried everywhere north of Toronto with no luck. West Marine does not carry it due to labelling issues and packaging problems. Any suggestions or know places that carry it would be great.
 

jasoutside

Supreme Mariner
Joined
Dec 20, 2009
Messages
13,269
Re: 1968 Starcraft Jupiter - Rebuild

I think I remember some of the Canadian fellas having a hard time getting some smuggled over the border.

Have ya tried eBay yet? One of those guys might ship it to ya.

Some of the fellas around here also use CoatIt which may be more readily available to ya.
 

InMotion

Commander
Joined
Nov 3, 2011
Messages
2,080
Re: 1968 Starcraft Jupiter - Rebuild

Thanks jasoutside. I will see if I can get CoatIt locally. Even getting 5200 was surprisingly challenging. West Marine was the only place that I found somewhat local to me to get it. Funny how that is. Anyway good to know.

On another note, I am going to try and zip tie my shop vac hose to my drill so that when I am wire bush sanding the hull, the shop vac will suck up most of the dust. In trying to sand last night, it looked like I was in a sand storm in the desert --- except of course it was paint!

I also have 4 sheets of marine ply on order from my cabinet maker friend. He can get it at a better price then retail... which is great. The new splash well and transom skin should be available next week.

Has anyone but a ski tripod in a Jupiter? What reinforcements would you recommend. I was thinking of riviting some angle iron and extra plywood braces below the floor around where the main post of the tripod will screw into the floor as well as extra ply wood in the back corners of the boat. The back corners really only have metal ---- so bolting the pins that the tripod attaches too I think is a bit weak.

Thoughts?
 

InMotion

Commander
Joined
Nov 3, 2011
Messages
2,080
Re: 1968 Starcraft Jupiter - Rebuild

Will do Craig. I just called another hardware store and they said that there is one hardware store in Barrie that might carry it called Robinsons in Barrie. I am going to call them tonight and see if they have either product.
 

InMotion

Commander
Joined
Nov 3, 2011
Messages
2,080
Re: 1968 Starcraft Jupiter - Rebuild

It seams to be specifically formulated for fixing dry rot and sealing wood (transoms, floor etc). It may work --- it just doesn't say anything about use on aluminum though. Has anyone used anything aside from Gluvit to effectively seal the aluminum hull?
 

GA_Boater

Honorary Moderator Emeritus
Joined
May 24, 2011
Messages
49,038
Re: 1968 Starcraft Jupiter - Rebuild

Looking at the West Marine site , wondering if this stuff is the same as Gluv-it, maybe it doesn't have the label problem and is available.

http://www.westmarine.com/webapp/wc...toreNum=50218&subdeptNum=50219&classNum=50220

Hi Dave. That stuff is thinned epoxy and every time it gets mentioned the glass experts really knock it. I don't think it is similar to Gluvit, but I don't know for sure. Pride Marine in Ontario carries Gluvit according to their website. Hope this helps and good luck on the resto.
 
Status
Not open for further replies.
Top