1974 Starcraft SS16 Restortation

FIGMO

Petty Officer 1st Class
Joined
Jun 18, 2017
Messages
320
Mr. Watermann,

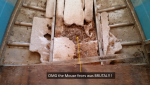
I really didn't want to hear that (read that). Okay so Hienz vinegar spray to help remove the corrosion. Where do you get the Hienz? Can you provide an example of a soft wire wheel? What did you use to fill the pitted portions of the skin? If other posts are any indication, then I am guessing that JB Weld would be the solution for that.

If I am understanding you correctly, once you cleaned up the inside of your transom skin, you then painted the inside of the transom skin. Is there any special paint I should consider for that task?

I would really appreciate some details on the removal of the Z brace. I know you posted a link on another thread (which of course I can't find again) about rivet work. I will be honest, I have never riveted before. I did want some Youtube videos and it looks fairly straight forward, but its the closed/solid rivets that I am not 100% clear on.

Again, I appreciate your input Mr. Watermann I said to myself at the beginning of this project that if I was going to do it, then I was going to do it right. So I guess I will tackle the Z Brace once I have properly prepared myself for the task.
 

FIGMO

Petty Officer 1st Class
Joined
Jun 18, 2017
Messages
320
Another quick update. I pulled all the decking up today, OMG the MOUSE CRAP WAS EVERYWHERE!!!

Okay sorry for the yelling, but it was truly disgusting. I made sure I was wearing a good quality mask through the entire process. The last thing I need is hantavirus. I am not sure if you guys get that in the USA, but it is a really problem in western Canada from field mice. That crap can literary kill you.

Text with images:

Z1.jpgJust prior to ripping the guts out of it. I cleaned up a lot of the mess from the earlier work just prior to the gutting.

z3.png
Words cannot describe just how disgusting this part of the tear down was. It took me about 2 hours, and I had to wear a mask the entire time. I think I filled five garbage bags. Once I was done with the shop vac, it was full. I decided to throw out the vac filter, there was no way I was using that thing again. The vacuum and the hose all got a solid hosing.

Z3.jpg
Yes the cradle on wheels is awesome! Pushed it out by myself. I had to get it out on the grass where I could give the inside of the boat a good hosing and let it drain onto the grass. I am guessing the grass will like the mouse poop.

Z4.jpg
Note to self, when you flush water through your boat for an hour, the castor wheels will sink into the grass forcing you get your son to help you move it again.

Z5.jpg
Looks better after a good hosing, but then again doesn't everything...

Z6.jpg

Z7.jpg
The boat is safely back in its birth (the garage). I still have some cleaning up to do the stern area near the drain, but nothing major. Plus I am confident that the feces scare has now passed.

The only other thing that was scary today was the price of marine grad plywood. I picked up 2 x sheets of 1/2 inch 4x8, and 1 x sheet of 3/4 inch 4.8. $350.00 later I wasn't sure I wanted to go home and face my wife. The worst part is that I need to go back for one more sheet of 1/2, they only had 2 in stock when I got there. Sheesh!
 

Attachments

  • Z2.png
    Z2.png
    1.4 MB · Views: 22

Watermann

Starmada Splash of the Year 2014
Joined
Jan 12, 2013
Messages
13,753
Wal Mart sells the cleaning vinegar and HD has the fine wire wheels for the drill. Yeah some will say you shouldn't use a steel wire wheel on aluminum but I've never had an issue just don't use the wheel on your steel trailer rust and then on the boat. As you can see the Z brace is a catch all for everything nasty and it concerns me what gets between it and the transom skin so that's why I recommend removing it and the knee brace as well to clean out underneath. The primer can just be some rusto SE and then some Rusto pro both in rattle cans. The rivet thread is on the upper level page here in the SC forum but you could use SS machine screws with nylocs and 5200 to re-attach the braces if you don't want to get into solid riveting. Almost all the other bolts and screws that go through the transom are SS so it's not a big deal to add more of them, they just need some 5200 to seal and isolate them is all.
 

Prarie Guy

Seaman Apprentice
Joined
Sep 10, 2017
Messages
43
Some interesting similarities I had the same issue with mice and much the same reaction, I also pulled off that Z bracket though it was because it had pulled away from the transom on one side looks like you are making good progress
 

Decker83

Commander
Joined
Apr 5, 2011
Messages
2,592
Making great progress.. Looks like the mice had a field day.. I have read not to use a steel wire brush on the aluminum.. Only a stainless steel one.
If you use a steel brush on aluminum and try to weld it, the steel brush will contaminate the aluminum and the weld as well.. Just my 2 cents..
Make sure the vinegar says cleaning vinegar on the bottle..
 

FIGMO

Petty Officer 1st Class
Joined
Jun 18, 2017
Messages
320
Mr Watermann & Gents,

Sorry for the delay in responding, I have been busy with another task. Greatly appreciate the information! This other task is going to suck up some of my time, so I likely will not have many posts between now and 06 Dec. I am currently in planning mode now that the boat is empty, and I can contemplate the desired layout (lots of measuring).
 

FIGMO

Petty Officer 1st Class
Joined
Jun 18, 2017
Messages
320
Hello Again!

This will be my last post for a bit. I might get a couple in before 06 Dec, but it is unlikely.

I did a bunch of measurements of the boat. I am attempting to figure out how I am going to make things fit. This will give me an opportunity to work out some details while I am busy with the other task.

Anyway, I thought the measurements might be of use to someone other than myself. I invite people to double check my measurements. I am confident that they are fairly accurate.

Top view 2.png

Cross Section Bow.png
 

FIGMO

Petty Officer 1st Class
Joined
Jun 18, 2017
Messages
320
Hey Gents,

I was wondering if anyone knows how many sheets of 1"x4'x8' XPS rigid foam insulation is required to fill the area under the deck? That stuff is pretty expensive so I want to make sure I get it right.
 

MD28

Petty Officer 1st Class
Joined
Sep 1, 2016
Messages
222
Depends on how tight you want it. If you cut it out in triangles to fit as snug as possible for better deck support and maximum buoyancy, or just lay them in the bottom for maximum linear use. The latter allows for better air circulation as it bridges the ribs and I would assume has less waste. It also is less time consuming. I installed mine the former way by cutting 2”? foam down into triangles with a table saw. Just mind your fingers! I used 3 sheets of 2”? for a 18’ boat.
 
Last edited:

Watermann

Starmada Splash of the Year 2014
Joined
Jan 12, 2013
Messages
13,753
I used 2" foam board too in my boats, so I would imagine it would take nearly twice as many. I also used 3 sheets in my 18'rs. My guess would be between 4 and 5 of the 1" boards in a 16'.
 

FIGMO

Petty Officer 1st Class
Joined
Jun 18, 2017
Messages
320
Thanks for the advice Gents. As it turns out the 2" is cheaper by the sheet than 1"!
 

FIGMO

Petty Officer 1st Class
Joined
Jun 18, 2017
Messages
320
Hey Gents,

No work to be done at -30 C in the garage, however I did manage to score a pneumatic rivet gun for 20 bucks on Kijiji. I have not tried it yet, but the guy that sold it to me assured me that it still works. At the end of the day for 20.00 I was quite happy. I did some checking on line and these tools are not complicated, and any parts that might be broken can likely be replaced. The only thing I am not certain about are the sizes of the tips that fit on the frame head. I will have to test those, you can get additional tips for these things.
 

Attachments

  • photo283119.jpg
    photo283119.jpg
    234.2 KB · Views: 8
  • photo283120.jpg
    photo283120.jpg
    191 KB · Views: 8
  • photo283121.jpg
    photo283121.jpg
    236.6 KB · Views: 8

Watermann

Starmada Splash of the Year 2014
Joined
Jan 12, 2013
Messages
13,753
Be sure to give her a couple drops of tool oil before hand. The 3/16 and 5/32" blinds are the most common.
 

FIGMO

Petty Officer 1st Class
Joined
Jun 18, 2017
Messages
320
Be sure to give her a couple drops of tool oil before hand. The 3/16 and 5/32" blinds are the most common.

Hello WM, and happy New Year. Sound advice. I was planning on stripping it down and having a look at the innards before I start using it. Give it a light oiling.
 

jbcurt00

Moderator
Staff member
Joined
Oct 25, 2011
Messages
24,871
Aluminum brazing rods....

Been posted a few times, perhaps that brand, perhaps different.

Typically a 50/50 split: half love them, others hate 'em...

Few long term results, unlike other hole repair methods which members report back working well, after several seasons: jb weld, marinetex or riveted patch panel back buttered w 5200. Countless reports for that.

Watermann has done a few on most of his restos, all 3 methods IIRC.
 

Watermann

Starmada Splash of the Year 2014
Joined
Jan 12, 2013
Messages
13,753
I've not used any of the brazing materials in my resos. What is a keel knee? Transom knee brace? If so no brazing should be done on anything structural.
 

jbcurt00

Moderator
Staff member
Joined
Oct 25, 2011
Messages
24,871
I've not used any of the brazing materials in my resos. What is a keel knee? Transom knee brace? If so no brazing should be done on anything structural.

I meant patch panels, JB weld and Marinetex repairs....
 

FIGMO

Petty Officer 1st Class
Joined
Jun 18, 2017
Messages
320
Hey Gents,

I have read that JB Weld is popular for filling holes and cracks in a number of posts. However, after watching the video for the Alloy 5, it would seem to be the perfect solution for dealing with cracked aluminum or holes.

Yes the transom knee, sorry for the confusion. If I am not mistaken, another person on this site recently had their transom knee welded with new extensions?

What would be the reason for not using brazing materials for structural work? In the video the guy was bending the joint that was welded, and it did not break. Instead the material around the joint bent out of shape. They claim that the welded joint is actually stronger than the aluminum that was welded together (30,000 psi). The other bonus seems to be that the melting point of that stuff half the melting point of aluminum.

Always interested in your guys' input and advice.
 

Watermann

Starmada Splash of the Year 2014
Joined
Jan 12, 2013
Messages
13,753
Yeah well Handy Man in a can flex tape fixes a boat sawed in half right?

It's your boat and you can do what you want. To fill some holes with it is a good way to see how well it works, but to me it sounds like a huge PITA when JB weld is proven to work perfectly. Reviews are mixed online.
 
Top