No Title
mbroughton02 has provided his solution to removing the yuk. His is the one I halfway remembered.
I have a 25 E-TEC on my Jet Star and just love it. Bought it new summer '09 and have 900+ hours on it. Super stingy on gas and oil. If you get a used E-TEC be sure to get a current computer report (hard copy) and service history and if possible talk with the certified E-TEC tech that did the services. I would be somewhat wary of a PO diy service and would insist on a "pro" 300 hour service and history before purchase. These motors are not cheap.
So, I'm not a typical SC purist. I have no problem re-doing or changing things to meet my needs. Tillers will always be the way I go. Your avatar and other pics certainly would suggest you could bring it back close to original if that's what you wanted.
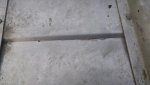
You should be able to make adequate repairs without going to great extremes. I would like to know if anyone else ever had a crack on the lapstrake bend on the bottom of the hull. I would be tempted to use a piece of thin aluminum angle fitted to the inside of the crack and sealed with 5200 and JB Weld fingered into the crack from the outside or maybe just the 5200 from both sides without any rivets.
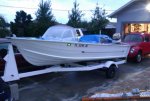
Question: What are the two chrome fittings on the gunnels just in front of the end caps? I recognize most everything else, but these are new to me.
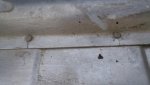
The restorers here don't talk much about why the plywood transoms turn to mulch. Probably because it's obvious: water intrusion. If you look at the ends of your gunnels you will notice a muddy outline of your end caps. Water has gone between the end caps and the gunnels and run down onto the top of the transom and caused the rot. The joints between the end caps and the gunnels need to be sealed. I just painted the edge of the cap at the same time as the gunnel and let the paint do the job. You can determine the best way for your boat but be sure to seal that area because it will leak.
Keep going and we always want more pics.
I really havnt decided on the repower thing yet. depends how the repairs turn out. Ive heard many horror stories about E tecs, but then again you hear them about all the new motors.
JB has suggested a patch panel for the crack. i guess I would need to try to form it to the shape of the lapstrake. he also said patch from the outside of the hull, seems like you would want it in the inside, but then again the outside would be easier.
apperently the crack through the hull is the least of my worries, how would you go about repairing the cracks in the braces? my first thoght would be welding by a professionel, mabey with some extra bracing/gusseting.
the fitting are for a ski pole, po were into skieng I guess it would also make a good tow point for tubing also, just needs a new pin. pic is from when I first got the boat about 5 years ago. I replaced the windshield which was barely able to see out off with a homemade lexan one, its been good for a few years but is now showing small cracks on the ends were its bent the most.