Delay's Budget SS160

delay18

Seaman Apprentice
Joined
Feb 22, 2016
Messages
33
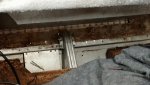
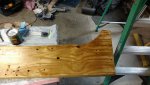
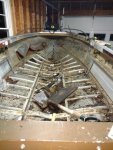
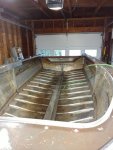
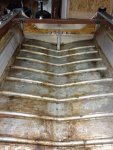
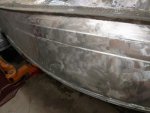
Well I started a thread when I first bought this boat as it needed some transom work. That was a year ago. Last spring I redid the transom (Thanks to A LOT of stalking on this site) and just fished it as is. It certainly was nothing pretty, but it floated and kept us on the water all summer.

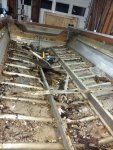
A couple months ago I decided to pull it out and get to work on it. My goal is to build a fit for purpose budget friendly vessel to enjoy with my friends and family. This will certainly not be any show piece or SOTL but it'll get the job done. I made phenomenal process on it in the first two weeks (the fun demolition part). After that it took a back seat again as I began what has become a rather nasty divorce.

So now that my house is about ready and up for sale and the weather is making me stir crazy, I am back at it and figured I would start a build thread.


Stats are as follows 1986 Starcraft SS160 w/ 86 Johnson 50 no trim. Shorelander roller trailer that does not fit well at all.

I also picked up a 1989 Eagle 16' Bowrider for $150 (not a typo lol) This came with a nice EZ-Loader Trailer, a 1989 Johnson 48SPL with Tilt/Trim, and a bunch of parts I stole off it.

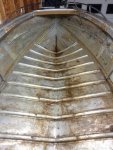
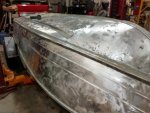
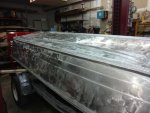
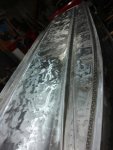
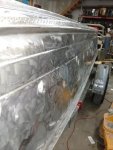
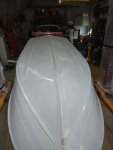
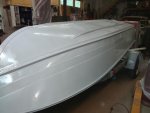
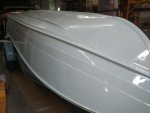
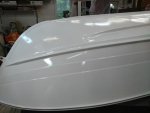
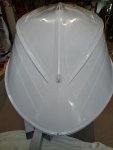
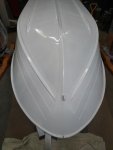
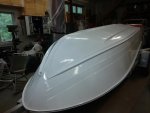
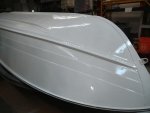
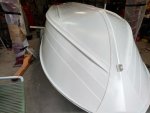
As of right now, the donor has been completely stripped and scraped. Both motors are on carts in the barn with all the parts. The EZ-Loader was torn apart, cleaned up, painted black and is mostly back together. (Pics to follow). The SS is totally stripped and is currently turtled waiting on paint work.

Hoping this coming week to paint.


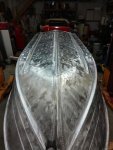
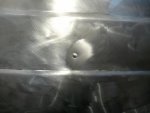
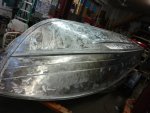
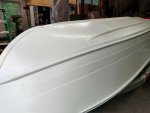
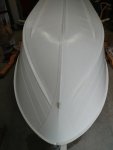
Pics from last year:
12832545_942955110263_2355237877651914789_n.jpg 10985174_947366639523_904758769915095837_n.jpg 12814319_942955225033_9209168833429995103_n.jpg 1923513_947366504793_2626187442096213680_n.jpg 600394_947366574653_7351398839731226749_n.jpg
 

Attachments

  • 12814319_942955225033_9209168833429995103_n.jpg
    12814319_942955225033_9209168833429995103_n.jpg
    116.7 KB · Views: 2
  • 12814319_942955225033_9209168833429995103_n.jpg
    12814319_942955225033_9209168833429995103_n.jpg
    116.7 KB · Views: 2
  • 12794604_947366534733_7444725051232849043_n.jpg
    12794604_947366534733_7444725051232849043_n.jpg
    128.1 KB · Views: 2
  • 12794604_947366534733_7444725051232849043_n.jpg
    12794604_947366534733_7444725051232849043_n.jpg
    128.1 KB · Views: 2

delay18

Seaman Apprentice
Joined
Feb 22, 2016
Messages
33
No Title

The tear down:
 

Attachments

  • photo265946.jpg
    photo265946.jpg
    28.4 KB · Views: 2
  • photo265947.jpg
    photo265947.jpg
    35.8 KB · Views: 2
  • photo265948.jpg
    photo265948.jpg
    33.8 KB · Views: 2
  • photo265949.jpg
    photo265949.jpg
    32.8 KB · Views: 2
  • photo265950.jpg
    photo265950.jpg
    31.3 KB · Views: 2

delay18

Seaman Apprentice
Joined
Feb 22, 2016
Messages
33
Sooo Two questions for all you experts.

1.) If I am repainting the whole hull do I need to go down to bare aluminum or should I be ok with a scuff and shoot?

2.) For those of you that kept the "swoosh", what's the best way to get a template for repainting it? My plan is to do a white base with black swoosh.
 

chuckndiscs

Petty Officer 1st Class
Joined
Apr 18, 2008
Messages
383
Looking good delay!

I dont think its necessary to go to the bare metal but you need to scuff, use a specific primer (someone will come along soon). If you find Huron's rebuild on his 16' he saved his swooshes by making templates with paper.... Just a thought.

Now, apologies on the divorce. Went through my own 3 years ago - they arent fun any way you look at it! I do wonder....it seems a lot of tin owners end up down that road.... I wonder if its the garage time, the budget issues, or .... I would maybe also guess those that get the admiral involved grow their marriage / relationship and those that door and go sol might not..? Anyways keep your chin up and awesome work!
 

Watermann

Starmada Splash of the Year 2014
Joined
Jan 12, 2013
Messages
13,753
Sooo Two questions for all you experts.

1.) If I am repainting the whole hull do I need to go down to bare aluminum or should I be ok with a scuff and shoot?

2.) For those of you that kept the "swoosh", what's the best way to get a template for repainting it? My plan is to do a white base with black swoosh.


:welcome: aboard and to the tinsanity of the Starmada,

I for one do not subscribe to the scuff and shoot methodology, it's down to bare, sand the entire bare hull with 220 to break the surface tension, clean well with a vinegar wash down. Make any repairs to the hull needed and then solvent wipe (acetone works good). Shoot the entire hull to be painted with self etching primer one coat, wait an hour, next shoot a coat of regular primer and then 2 coats of base color within 2 hours. Wait a couple hours and then pull the tape before the paint dries. Close the door, walk away and one all in one long sticky day.

For the 2nd layer of accent paint, I usually wait to the next day when the paint is dry enough to tape over but still gassing out to make that coat. Shoot 2 coats an hour apart and again pull the tape before paint dries. I wait a month doing all the interior work until the paint is fully cured, apply decals and wax over with 303 Quick wax.

For the swoosh and accent stripe I put a piece of drop cloth plastic up over the old paint, taped it into place, marked the outline with a sharpee, pulled it off and rolled it up. When ready I put it back on the boat draping it over, made marks with a pencil that would be the edge of the tape and put on the tape. Sounds easy enough but it was very time consuming and difficult. My paint is not perfect like a paint shop would do but I'm fine with it so it's good enough.

IMAG2739.jpg
 

ezmobee

Supreme Mariner
Joined
Mar 26, 2007
Messages
23,767
Watermann's advice above is likely the best way to paint. For a lower budget job I'd go with Woodonglass's "paint your boat with tractor paint" steps he's got listed stickied in the resto section. Thoroughly scuff, clean, prime, and paint with Rustoleum or the Tractor Supply paint with the Majic hardener added would be how I'd paint it if it was me going another one.
 

delay18

Seaman Apprentice
Joined
Feb 22, 2016
Messages
33
No Title

Well the scuff and shoot is out of the question. I didn't like the way the base paint was looking. So off it comes. I stripped it with chemical stripper. Now a scotch brite pad on the grinder. I have it a little more than 1/2 done. Hopefully finishing the grinding tonights, then go back over the rivets by hand. Slow and painful, but hopefully it'll pay off in the end.
 

Attachments

  • photo267118.jpg
    photo267118.jpg
    19.1 KB · Views: 0
  • photo267119.jpg
    photo267119.jpg
    28.5 KB · Views: 0

Watermann

Starmada Splash of the Year 2014
Joined
Jan 12, 2013
Messages
13,753
Yeah that's where I was on my boats, no old paint and take her down to bare. Lookin good!
 

delay18

Seaman Apprentice
Joined
Feb 22, 2016
Messages
33
No Title

15-18 hours of metal prep down and I think I'm satisfied. Shooting primer tonight.
 

Attachments

  • photo267559.jpg
    photo267559.jpg
    26.3 KB · Views: 1
  • photo267560.jpg
    photo267560.jpg
    25.3 KB · Views: 1
  • photo267561.jpg
    photo267561.jpg
    24.8 KB · Views: 1
  • photo267562.jpg
    photo267562.jpg
    26.6 KB · Views: 1
  • photo267563.jpg
    photo267563.jpg
    15.3 KB · Views: 1
  • photo267564.jpg
    photo267564.jpg
    25.5 KB · Views: 4

Watermann

Starmada Splash of the Year 2014
Joined
Jan 12, 2013
Messages
13,753
I'll be interested in seeing if the sanding marks show through, the pics make the hull look kind of rough.

fetch
 

delay18

Seaman Apprentice
Joined
Feb 22, 2016
Messages
33
It looks rough but it really isn't. It was all done with a scotch brite pad on a grinder. And a brass wire wheel around the rivets.
 

delay18

Seaman Apprentice
Joined
Feb 22, 2016
Messages
33
No Title

Well last week I sprayed my first 1/2 coat of primer. I say 1/2 coat because I had a random shower pop up and rain as I was spraying. Lost a couple days sanding it back down and waiting for more primer to arrive. Finally received the remaining primer on Friday, so I spent the weekend doing some paint work. 2 coats of primer and 1 coat of white layed down. (Directions say 24hrs between coats). Primer sprayed out great but I am not in love with the white paint. I followed directions and thinned correctly. Just seems to have a lot more orange peel then I would like to see. It's slowly coming along.
 

Attachments

  • photo268066.jpg
    photo268066.jpg
    18.2 KB · Views: 1
  • photo268067.jpg
    photo268067.jpg
    19.5 KB · Views: 1
  • photo268068.jpg
    photo268068.jpg
    18.2 KB · Views: 1
  • photo268069.jpg
    photo268069.jpg
    17 KB · Views: 1
  • photo268070.jpg
    photo268070.jpg
    17.5 KB · Views: 1
  • photo268071.jpg
    photo268071.jpg
    16.2 KB · Views: 1
  • photo268072.jpg
    photo268072.jpg
    19.8 KB · Views: 1
  • photo268073.jpg
    photo268073.jpg
    17.4 KB · Views: 1

delay18

Seaman Apprentice
Joined
Feb 22, 2016
Messages
33
No Title

Third coat of Semi-Gloss white is on and dry. I'm going to let it cure for a couple days before flipping is over onto the new trailer. Ill do the graphics in a couple weeks.
 

Attachments

  • photo268477.jpg
    photo268477.jpg
    4.7 KB · Views: 0
  • photo268478.jpg
    photo268478.jpg
    12.3 KB · Views: 1
  • photo268479.jpg
    photo268479.jpg
    21.3 KB · Views: 1
  • photo268480.jpg
    photo268480.jpg
    19.2 KB · Views: 1
  • photo268481.jpg
    photo268481.jpg
    14.5 KB · Views: 1

Watermann

Starmada Splash of the Year 2014
Joined
Jan 12, 2013
Messages
13,753
Looks good, nice to not have a dented up hull to repair. Once on the trailer the fun work begins. :encouragement:
 
Top