1977 Starcraft Restoration project

pntbtrjllytme

Petty Officer 1st Class
Joined
Mar 10, 2017
Messages
219
You from around the area MD? Im out of GR. And also thank you :)

Made a lot of progress over the weekend. Got some carpet on today on the sides in the front. Ill post some pics later. I went with black carpet, its not all in yet but Im not 100% sold on the color.. just didnt want grey and vinyl everywhere. Would like some color separation. Didnt want to be "the guy with the solid grey boat" lol.
 

pntbtrjllytme

Petty Officer 1st Class
Joined
Mar 10, 2017
Messages
219
I keep forgetting.. but anyone have any info on some hinges to get so I can make my own hatches so they are flush and you dont see the hinges? Bro in law has piano hinges on his but he has carpet so it hides all of it. Im assuming with the vinly I have that wont hide it at all so trying to find other options. There are other options but was hoping someone had some more insight on what is best. Thanks in advance!
 

Watermann

Starmada Splash of the Year 2014
Joined
Jan 12, 2013
Messages
13,753
Look for offset piano hinges, the attachments are hidden underneath the deck and hatch with all that shows is thin strip of the hinge. You may have to paint them tho, aluminum is gray. :rolleyes:

s-l1000.jpg
 

MD28

Petty Officer 1st Class
Joined
Sep 1, 2016
Messages
222
Hudsonville area... born and raised. Its hard to not recognize that lighthouse in your pic :cool:
 

pntbtrjllytme

Petty Officer 1st Class
Joined
Mar 10, 2017
Messages
219
Nice MD you are about 15-20 min from me then. And yeah the holland pier is pretty recognizable if youre from around here. I grew up in Hamilton so definitely familiar with the area.

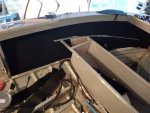
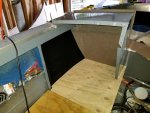
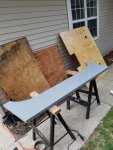
Worked on the boat for a few hours today. Kind of slow going and Im a bit frustrated b/c I made a bit of a mistake even though it wasnt too big of a deal. I cut the boards under the consoles too small b/c I cut them before I put the bars in to raise the floor. When you raise the floor the boat is wider so you have to adjust for that. Dunno what I was thinking but thankfully the boards are small and I had more than enough material to make new ones. Will have to epoxy these now.. just got the old ones sealed.. those are pretty much trash now not sure where else I could use them. Also decided to not run one bar along the ribs you see in the first pic. It just wasnt level and I couldnt get it to level out so I ended up pulling that up and running the bars along the ribs and that worked out great but definitely took me a little longer to cut. Was planning on getting the rest of the carpet done up front and the driver console in but after finding out my error that side tracked me a bit. Either way, happy with the results for the passenger side. None of this is bolted down, this is just to make sure everything fits right (hence me finding out my mistake) and see if I can make any improvements along the way. Shes really coming along. Still very eager to get to the splashwell after feeling successful with the livewell install.

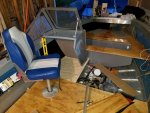
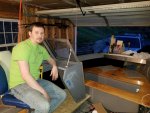
And I did what I thought would be a final coat of paint on the passenger console.. last coat I think I just got too eager.. was too cold out and it ran. So had to sand it down. No biggie there its a small area Ill just do another couple of coats. Also, youll see the seats are IMO too high. Will be ordering new wave absorbing poles for the seats this is just to help me see the layout a bit and it helps me get a little excited to imagine some seats bolted down ready for her to get out on the water!
20170423_202124_zpsw9i0jvvz.jpg 20170424_201823_zpsjd0o9sq7.jpg 20170424_205214_zpsgxymaxyu.jpg 20170424_205413_zpsqa4r5ijm.jpg
 

Pusher

Lieutenant
Joined
Sep 2, 2014
Messages
1,273
Coming right along. You haven't even hit a second wind yet! 😃 You're making me look like I never had a first wind.
 

ezmobee

Supreme Mariner
Joined
Mar 26, 2007
Messages
23,767
Look for offset piano hinges, the attachments are hidden underneath the deck and hatch with all that shows is thin strip of the hinge. You may have to paint them tho, aluminum is gray.

I got mine from Veada Boat Seats. Google it. I'd love to link it but alas that's not allowed :(
 

pntbtrjllytme

Petty Officer 1st Class
Joined
Mar 10, 2017
Messages
219
Pusher its definitely wearing me down thats for sure! Hard to stay motivated but doing everything I can to get her done on time. An energy drink here and there doesnt hurt any =)

Thanks EZ for the post I havent come across that page yet Ill check them out!

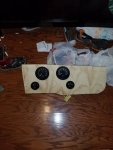
Wasnt able to get too much done today at least not as much as I would have liked. Felt pretty tired so the brain just wasnt wanting to cooperate today and took a bit longer to get anything done. Got the transom painted. Working at getting the motor on so I can run my wiring to all of my gauges before I bolt the floors down. Got the driver side lifted properly so all I have to do is get the gauges and switches in, run wiring, then mount floors. Did a rough draft template of the gauge layout. Not a perfect cut just seeing how it all looks. This is kind of what Im looking at doing, and having the right side of the dash for switches.

Goal is to get vinyl down by the start of next week. Its a bit of a long shot but gives me something to work towards. I feel pretty confident in my electrical capabilities so I think its within reach as long as nothing comes up. Kinda worried about doing the transom to be honest. Worried about drilling the holes perfectly. I have the old transom so planning on using that as a template. I think once the motor is on it will be smooth sailing from there as thats the last "big" part of the boat I have to do. Everything else Ive got planned out pretty well. For now....

20170425_155937_zpsalatvaxf.jpg 20170425_211008_zpspcoywz49.jpg
 

crankbait cowboy

Chief Petty Officer
Joined
Mar 25, 2013
Messages
570
looking good pntbtrjelyy , ( heck of a handle!) sounds like you are planning on running wiring under the floor? I am not an expert by any means , but my plan was to run it up under gunnels, above storage area. my thinking if anything in the wiring goes bad, I sure don't want to pull up my floor. and maybe I am misunderstanding your plan. what adhesive did you use for black carpet, on aluminum and what are your thoughts on how it worked out and strength of adhesive? keep at er, its looking good.
 

pntbtrjllytme

Petty Officer 1st Class
Joined
Mar 10, 2017
Messages
219
Thanks CC! Yes, I am running wiring under the floor through the alumimum tubes I used to lift my floors up. Not worried about bad wiring, if it goes bad Ill be able to pull it out from the front. Running new wire I have flexible wire sticks to push new wiring through. May not run the graph through b/c Ive upgraded that 3 times now lol. Dont want to run under gunnels b/c I have light stips Im installing under there. Wasnt sure if the wiring would be in the way of the light or not. The adhesive is Tec indoor/outdoor adhesive. It doesnt say anything about aluminum but I liked the thickness of it. On the container it says suitable for wood and concrete so I just scuffed my sides up so it had something to grip on to. It spreads on like peanut butter. I hadnt checked it til now but after doing so, I hope I dont ever have to replace the carpet b/c its REALLY on there! They had it at lowes and menards. Not sure who else has it. But I paid 20$ for a gallon.
 

Pusher

Lieutenant
Joined
Sep 2, 2014
Messages
1,273
I have led strips in the gunnels along with the wiring and don't have any issues. You'll probably get your use out of the boat by the time tge wirss give out though.

I used outdoor carpet adhesive from Lowes. I'm not thrilled with the long-term results but most of my issue lies in using cheap 1/4" laminate for my side panels.
 

pntbtrjllytme

Petty Officer 1st Class
Joined
Mar 10, 2017
Messages
219
Hey guys! Got some of the wiring pushed through and while doing that I checked my bilge and livewell pumps and found out the bilge wiring was burning out and the propeller was cracked.. so went out got a bigger pump but had to order a motor cartridge for my livewell. The offset hinges just arrived, and had to order a couple of other things Im waiting on that should be here by tuesday one of them being a new larger fuse block. So because of that theres no way Ill be able to get the vinyl down this weekend like I was hoping.

I do have one question though. For the hinges, are SS screws the best option? If so, do you seal them with 5200 or something to prevent any rust?
 

Watermann

Starmada Splash of the Year 2014
Joined
Jan 12, 2013
Messages
13,753
Not a bad idea to use the 5200 not only as a sealer but it will also keep the screws from backing out as they always seem to do on hinges sooner or later.
 

pntbtrjllytme

Petty Officer 1st Class
Joined
Mar 10, 2017
Messages
219
I could be wrong but doesnt the stainless steel cause the aluminum to galvanize? The hinges I got are aluminum
 

Watermann

Starmada Splash of the Year 2014
Joined
Jan 12, 2013
Messages
13,753
I could be wrong but doesnt the stainless steel cause the aluminum to galvanize? The hinges I got are aluminum

I've never seen or personally had a problem using SS on my AL boats and I'm at a loss as to where you learned that SS rusts and or galvanizes aluminum.
 

pntbtrjllytme

Petty Officer 1st Class
Joined
Mar 10, 2017
Messages
219
Well like I mentioned, I could be wrong. I was reading on a chart about different metals and it looks like its just steel and aluminum not SS. But, thanks for the feedback. One last question on the metal on metal Im reading mixed answers on zinc plated and SS metals.. I was going to get the SS tee nuts but they were like 3-4$ a peice for SS vs about 6$ for 25 for the zinc plated. Will the zinc plated rust or can I use 5200 to stop that if it does? Rather not spend 125$ in tee nuts unless I need to.

Other than that, got the bilge installed got an 800gph instead of the old 500gph. Got my offset hinges today so that will be in the works this weekend. Trolling batteries installed, finished the console floor boards.. again. Right side carpet done, and a lot of the wiring. Posting pics by end of weekend! Had to wipe out my laptop was acting funny so finishing that up before I load everything back on to load my pics. Oh and installed new lighting in garage :-D Doesnt sound too exciting but im so happy I can actually see what Im doing now!
 

Watermann

Starmada Splash of the Year 2014
Joined
Jan 12, 2013
Messages
13,753
Yeah lots of crazy unsupported ideas float around and it's tough to sort though them all. I'm not one of the guys who freak out over steel touching aluminum briefly but rusted steel in constant contact is a serious problem.

The steel t nuts even with a zinc coating will rust out sooner or later and it's a pretty humid environment below deck. I bought my t nuts at my local K hardware store and they are spendy (like a $1.75 ea) but I only use them for my pedestal seat bases and they'll outlive the decking. Everywhere else I use SS nylocs and washers with the machine screws.

SS is the best way to go but if you do use zinc plated steel, don't hammer on them to seat the t nut into the wood as that will ruin the coating, rather use the machine screw to suck it in. Bed the t nuts in 5200 and suck em up tight so they stay in place and leave the screw in until the 5200 sets up that way the t nuts are sealed between the wood and the nut.I wouldn't coat the exposed underside of the t nut with 5200 as that could create a space for moisture to sit, if anything a shot of se primer and then paint to add an extra level of protection. They would probably outlive the decking like that.
 
Top