1977 Starcraft Restoration project

pntbtrjllytme

Petty Officer 1st Class
Joined
Mar 10, 2017
Messages
219
Hello everyone! First off before I get into my project I want to say this site is amazing! I've read through numerous projects for inspiration for my own boat and am just impressed on how much knowledge everyone has and how willing you all are to share. So, thank you everyone ahead of time for any help you may give I really do appreciate all of your time and effort not only for my project, but for helping out and posting on others it has helped me tremendously.

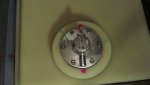
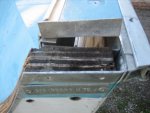
Now to the fun stuff =) I'm not 100% sure what exact year or model my starcraft is.. I bought it about 2 years ago from my brother in law but shes a 16ft deep V 1970s I believe. When I first got her she was in decent shape but after running her 3-4 times a week for the last couple of years she is showing her age. Was going down the saginaw bay chasing some eyes and all of a sudden the wife's chair rips out of the floor. So my project began then and there. I'm kind of a noob to most of this but have a bit of experience in carpentry and the like so this is a small learning curve for me I more need help with ideas to make her as functional as possible with the little space I have, and also what materials to use.

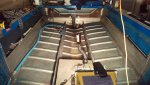
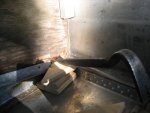
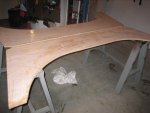
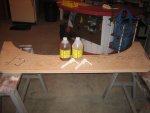
But today after work Ill be cleaning up all the rivots and sealing them with the first coat of glovit. While all of that is sealing I will be pulling the transom out for replacement. So my question to you guys is what is best to use as a core between the sheets of plywood? Ive seen some guys use a sealer of sorts and others use fiberglass. Also, what do you use to coat the plywood in to keep it water resistant? And lastly, Ive read to keep the holes that I drill for my bolts water tight to over drill them about 1/2 inch then fill with sealant and drill the sealant to put the bolt through. What do you use for that exactly? Any tips at all that you could suggest for transom replacement would be appreciated =D I wont have any problem getting the transom out Ive read a few tips from EZ. Getting the new one made and sealed up properly is what I'd like some help with.

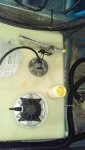
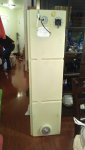
Shes getting new paint, belly tank came in the mail today along with a larger livewell, vinyl flooring is ordered, new seats, electronics already purchased, new wiring, basically.. everything new =) Looking forward to the hard work, sweat, and blood and the finished project. Hoping to finish by May


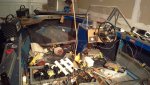
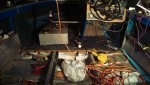
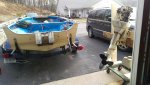
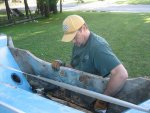
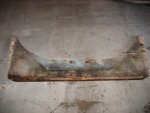
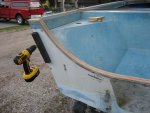
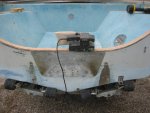
So far this is what I have as far as progress.. She was messy at first b/c I dumped my tools all over the floor while pulling the left console out =(

So there it is guys! Thanks again ahead of time for any help!!
 

Attachments

  • IMAG0263_zpsezztjgrf.jpg
    IMAG0263_zpsezztjgrf.jpg
    280.5 KB · Views: 13
  • IMAG0247_zpsixbur7g5.jpg
    IMAG0247_zpsixbur7g5.jpg
    266.4 KB · Views: 4
  • IMAG0280_zpsh7h0coal.jpg
    IMAG0280_zpsh7h0coal.jpg
    272.5 KB · Views: 4
  • IMAG0282_zpshasqkwnv.jpg
    IMAG0282_zpshasqkwnv.jpg
    304.8 KB · Views: 4
  • IMAG0287_zpsgkdsadmk.jpg
    IMAG0287_zpsgkdsadmk.jpg
    277.4 KB · Views: 4
  • IMAG0290_zps3wytom4j.jpg
    IMAG0290_zps3wytom4j.jpg
    306.5 KB · Views: 4
  • IMAG0298_zpsnmxklzei.jpg
    IMAG0298_zpsnmxklzei.jpg
    295 KB · Views: 4
Last edited by a moderator:

MNhunter1

Ensign
Joined
May 12, 2014
Messages
979
Welcome! Looks like a Starcraft SuperSport (SS) from the pictures, but that tin looking ID plate just to the starboard side of the steering wheel should tell you the correct year and model number.

You'll discover that there are many different approaches at doing things around here, but the most common method I see for the transom is gluing together 2 pieces of 3/4" marine ply or ACX exterior grade ply with either Gorilla Glue or Titebond 3. You'll want to stay far away from any green treated or pressure treated lumber as it does not play well with aluminum. Most here tend to shy away from any fiberglass on their aluminum boat builds, but it has and can be done, just debatable on the added value it might add. Transom is usually sealed with epoxy. Some will over drill all the holes before sealing, then drill them back out to the correct size to fully encapsulate the transom wood with epoxy, but this could also be argued as overkill to some extent as well. Either way, a good coating of 3M 5200 is recommended for any stainless hardware you'll be putting into or through your hull, especially below the waterline.

Similar use of marine ply or ACX for the flooring and other wood structures, although the expense of the epoxy can often be spared by using Spar Urethane to coat the wood with and then cover with the vinyl flooring. If I am not mistaken, I believe the factory wood was not sealed at all, for neither the transom or the flooring.

There are several rebuilds contained in the sticky threads at the top of the forum...endless reading if you're ever looking for some time to kill, and lots of valuable information. It's a pretty active forum as well, so many are often around shortly to respond to any questions you have. Best is just to keep it all in one thread so everyone can follow along, no need to start a new post for each topic or question you have.

Welcome, and prepare for a new addiction!
 

No-AH

Petty Officer 1st Class
Joined
Oct 20, 2016
Messages
234
Welcome to the "tin sanity"! You've done well on the tear down so far mate. Sure looks like an SS and appears to be in a very solid state. Not sure if there were leaks below the waterline before but now would be a good time to water test the inside for leaky rivets/seams before you gluvit. This forums' members ARE truly inspirational and well versed and ready to help with whatever challenges we come across with these rebuilds as so well displayed in MN's post above. Well said MN! Keep us posted mate, and remember lots of pics, as we all LOVE to see progress.
 

pntbtrjllytme

Petty Officer 1st Class
Joined
Mar 10, 2017
Messages
219
Hey thanks for the warm welcome and advice guys! She is in very good condition and did have 1 or two small leaks I marked them a while back so Ill be sure to tighten the rivets up in those spots. The worst leak is up front. I wasnt able to get much done tonight had a parent teacher conference for my 6 y.o. But I looked at the plate and all it says its Starcraft SUS 16 O/B. No year mentioned anywhere. I drill brushed the rivets and couldnt help but put the new belly tank in to see how it fit and I think it looks nice. Im trying to distribute weight at much as possible so I think the tank will help with that.. however.. I cant find any info on this tank. I thought I would be able to figure it out but any idea what half of these nozzles are for on this tank? I know one is vent, another is for the gas line, and theres the fuel sending unit but theres a whole extra port on here I have no idea what its for. Any ideas?

The glovit will be put on tomorrow after work and transom removal will begin =)

And MN I've been addicted since I bought the boat =) LOVE to fish and can't wait to get back out on the water! Only thing stopping me is work or the cold Michigan weather =(
 

Attachments

  • IMAG0302_zpsdkr4i58t.jpg
    IMAG0302_zpsdkr4i58t.jpg
    129.4 KB · Views: 2
  • IMAG0303_zpsowhgtphm.jpg
    IMAG0303_zpsowhgtphm.jpg
    210.2 KB · Views: 2
  • IMAG0299_zpsmrkg2bjo.jpg
    IMAG0299_zpsmrkg2bjo.jpg
    163.4 KB · Views: 2

ezmobee

Supreme Mariner
Joined
Mar 26, 2007
Messages
23,767
I'll be following along! Good work on the tear out. Start from the back and work your way forward on the gluvit so if you run out hopefully you're high up in the bow by then and then who cares. don't over apply it and spread it out over large areas. It's flaked up in my boat in areas where it's spread out. I think what it's best at is seeping down in and sealing leaks, not covering large areas.
 

crankbait cowboy

Chief Petty Officer
Joined
Mar 25, 2013
Messages
570
the big port is for filling the tank, and the other 2 one is fuel pickup ( to engine or filter then engine) and the other for a vent tube along with sending unit. good advice from mnhunter,( I did exactly as he stated on transom as I learned here from others and it is documented with pics on my project) and many of us have been in your shoes before, and I know this forum is what inspired me to tackle my project and has also been a world of information and advice. reading thru some projects before you or checking them out will give plenty of ideas or feel free to ask away. the guys I have connected with on here are all great information and more than kind, good luck and I will be following along
 

pntbtrjllytme

Petty Officer 1st Class
Joined
Mar 10, 2017
Messages
219
Thanks a lot cowboy! I dont have pics yet but I have the transom completely torn apart but apparently I don't own a crowbar or anything to pry the transom out so Ill get that on my way home tomorrow. Was able to get it to budge a bit but that was it. Getting too late now so don't want to upset the neighbors.

As far as the gas tank goes there looks like there may be 2 different fuel pickups possibly? Youll see the black one and theres another "thing" on the other side of the tank all on its own.. it has 2 different sized ports on it.. I was tempted to just unscrew it all and be sure but thought Id ask ahead of time just in case =)

By this weekend she will be completely sealed up and Ill be working on building the new floor layout template. Then she will be ready for paint! Pics to come!
 

crankbait cowboy

Chief Petty Officer
Joined
Mar 25, 2013
Messages
570
No Title

if you mean other side of tank to be other end , my guess would be that is a vent , as on many long tanks the vent is at opposite end of pickup. if you have a fitting at other end of tank , then the black and other one may be 2 different pickups , I am somewhat guessing now. pics show how I was able to remove transom, and from what I have read here I got somewhat lucky as some befor me have stated it is tight and a real pita.
 

Attachments

  • photo260615.JPG
    photo260615.JPG
    273.2 KB · Views: 3
  • photo260616.JPG
    photo260616.JPG
    339.7 KB · Views: 3
  • photo260617.jpg
    photo260617.jpg
    336.5 KB · Views: 3

crankbait cowboy

Chief Petty Officer
Joined
Mar 25, 2013
Messages
570
No Title
 

Attachments

  • photo260618.JPG
    photo260618.JPG
    330.5 KB · Views: 1
  • photo260619.JPG
    photo260619.JPG
    304.2 KB · Views: 1
  • photo260620.JPG
    photo260620.JPG
    339.7 KB · Views: 1
  • photo260621.jpg
    photo260621.jpg
    352 KB · Views: 1
  • photo260622.JPG
    photo260622.JPG
    360.4 KB · Views: 1
  • photo260623.JPG
    photo260623.JPG
    313.7 KB · Views: 1

pntbtrjllytme

Petty Officer 1st Class
Joined
Mar 10, 2017
Messages
219
Yeah I see you have a bit of transom to lift up on I have next to nothing =( I didnt have much at all to pry up on. Im going to get a crow bar after work see if I can weasel it out but its definitely loose shouldnt take much to get it out I just didnt have the right tool for the job.
 

pntbtrjllytme

Petty Officer 1st Class
Joined
Mar 10, 2017
Messages
219
What type of ply and sealant did you use for your transom cowboy? Also on my transom each corner was screwed down to the main transom piece.. They were both separate pieces and all that was holding them in place was a small single screw.. So all I have left now is one solid rectangle to pry out
 

crankbait cowboy

Chief Petty Officer
Joined
Mar 25, 2013
Messages
570
good luck, I also have an ss, and mine ( and most i have seen ) have ears on the ends of the transom ( port and starboard) myself and most guys on here have for gone those ears when building the new transom and made it all one piece
 

Watermann

Starmada Splash of the Year 2014
Joined
Jan 12, 2013
Messages
13,753
Welcome to the Starmada :wave:

Man looks like your SS needs some love alright. Is the other console and windshield gone?

Careful prying on the transom to get it out, it looks solid enough to where you could use the eyebolts method of screwing them into the top and hooking up a cable/rope to the eyes. Something that doesn't stretch too much is best. With the rope tight and tied off from above use the trailer tongue jack starting all the way down you can raise the jack which lowers the transom. You may have to get inside and weigh it down some but it should pop out.

fetch
 

pntbtrjllytme

Petty Officer 1st Class
Joined
Mar 10, 2017
Messages
219
Yes everything is there I just pulled the left console out and knocked every tool I owned it seemed like into the boat lol. I dont think Ill have too much trouble getting the transom out its fairly loose as it is she just needs a little help. And thank you for the warm welcome =) Ive seen all of your restorations and I actually came back on to tell ezmobee that his boat was actually the first post I followed ever on this forum and what inspired me initially to begin this trip =)

The transom actually isnt in too bad of shape.. when I first bought the boat my wife lowered the motor too high and it ended up cracking the top of the transom.. soooo.. thought Id just replace it now. It is a little soft in a couple of spots but nothing crazy. I figure if Im redoing everything else why the heck not.
 

ezmobee

Supreme Mariner
Joined
Mar 26, 2007
Messages
23,767
I actually came back on to tell ezmobee that his boat was actually the first post I followed ever on this forum and what inspired me initially to begin this trip =)

I am honored :) We love the SS even though we've upgraded to the Hydra-Sports. I can't bear to sell it considering all the work I have in it plus it's set up just how I want for fishing. The big boat stays out at our seasonal campsite 2 hours away but the SS stays at my house to use locally for fishing. I'm fighting through some major motor issues unfortunately which is what prompted buying the new boat. It runs and is still fishable but it's not firing on all cylinders. I've thrown lots of parts at it to no avail. I was hoping to take it to my mechanic soon and get it straightened out once and for all but the IRS had other plans for my money :(
 

pntbtrjllytme

Petty Officer 1st Class
Joined
Mar 10, 2017
Messages
219
Got the transom out with the crowbar no problem there slid right out. Also got the first coat of glovit on. Not sure if Ill need another? Anyone put more than one coat on? Was thinking I could just spray a coat of bed liner or something over the glovit. Thoughts? Not really sure what the next move is. I think Ill start working on the floor template next. Would be nice to see her with some flooring even though it will only be temporary for now =) IMAG0311_zpszqsawqvr.jpg IMAG0309_zps3xjxxl3q.jpg IMAG0310_zpsvrrv8ow1.jpg IMAG0312_zpseownt814.jpg IMAG0313_zpsmb6o76ov.jpg
 

crankbait cowboy

Chief Petty Officer
Joined
Mar 25, 2013
Messages
570
I used 3/4 marine grade plywood ( 2xmakes 1.5 ) and a two part epoxy that you mix ( it gets hot when mixed) Clark craft marine epoxy part a and b
 

pntbtrjllytme

Petty Officer 1st Class
Joined
Mar 10, 2017
Messages
219
Thanks for that cowboy. I appreciate the tip. Ive flipped houses, worked on cars, computers and anything in between but this is all new to me. No clue what materials to use so that def helps! Was looking at your boat do you have an estimate when you think youll be done with yours? Yours is coming along very nicely! Excited, as im sure you are as well, to see the end product!
 
Top