1984 Starcraft 16ft Glutton for Punishment [Splashed July 2019]

Status
Not open for further replies.

SHSU

Lieutenant Junior+Starmada Splash Of The Year 2019
Joined
Mar 8, 2017
Messages
1,665
Thanks WM,
Have been helping family that got hit. We are very very very blessed. Looked at my security camera footage and you can see where the water got half way up our driveway. That means the road would be about 3-4 ft under!!!!!! For us that is crazy as we are in a non flood area!!!!!


82rude

Rear Admiral
Joined
May 8, 2012
Messages
4,082
Just to let you know the fasco worked great on mine .Zero leaks now! And i only replaced a dozen rivets with 3/16 blind! Yours should be good for life.Mind you mines a fresh water baby .I would assume saltys are a little more in need of care.
 

SHSU

Lieutenant Junior+Starmada Splash Of The Year 2019
Joined
Mar 8, 2017
Messages
1,665
Well it has been a while since my last post... Between a couples retreat, Hurricane Harvey, helping family with mucking out houses, office being flooded, another vacation, and working from home it has been a very busy last month. Got some time to work on the boat so progress listed below:

Wire wheeling the gunwales. You can see how much muck was on them.
DSC03640.JPG


After wire wheeling and then filling the holes with JB WaterWeld and covering with JB Weld. Sanded it all smooth
DSC03643.JPG


Put two light coats of Fasco White Epoxy on all the gunwale to give it some additional protection. Admiral has decided we will be covering the gunwales with Nautolex Shark vinyl so didn't need to put it on thick.
DSC03648.JPG

Prepping the Transom for my welder to close it in and fill in some of the holes. You can see that the extra splash well drain hole I drilled as the original one was off and it bugged me (I know I am crazy). I will have my welder fill in the original with the plug that I took from the new hole. Also, the transom u-bolt holes will be filled in. Got new transom U bolts when Gander Mountain was going out of business and didn't realize they were larger. It works out, because I can now move the U bolts off to the side and which allows me to bypass my trailer bunks that were in the way. DSC03658.JPG


So the family we helped during Hurricane Harvey didn't want the Mercury 8.0 HP kicker they had from the Netherlands when they were overseas. So that baby has a new home with me and will be mounted as my kicker!!!!!! Will need to go through it and replace the impeller and rebuild the carb but for a free motor it will be perfect.
DSC03647.JPG
 

Attachments

  • DSC03647.JPG
    DSC03647.JPG
    131.3 KB · Views: 8

Watermann

Starmada Splash of the Year 2014
Joined
Jan 12, 2013
Messages
13,753
You got lucky with the amount of holes in the gunnels, mine on the Chief looked to have been left at a gun range for several months. :lol:
 

SHSU

Lieutenant Junior+Starmada Splash Of The Year 2019
Joined
Mar 8, 2017
Messages
1,665
You got lucky with the amount of holes in the gunnels, mine on the Chief looked to have been left at a gun range for several months. :lol:


Looking at it your work now, you would never have guessed that. You do some awesome work WM
 

SHSU

Lieutenant Junior+Starmada Splash Of The Year 2019
Joined
Mar 8, 2017
Messages
1,665
Been a while since I have been able to do any updates. Still working on the project and back in the office. Got the boat over to my welder and we fixed up the drain plug that was bugging me and closed up the splashwell


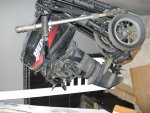
Before going to welder
DSC03658.JPG

Tacking pieces into place
DSC03661.JPG

Redrilled splashwell drain hole as it was off by 1 1/4"
DSC03662.JPG

Finished and grinded down on the outside to make flush
DSC03667.JPG

Interior view
I did have the transom U-bolts closed up as the U-bolts I got when Gander Mountain closed are bigger. Plus this will allow me to move them around for better positioning. Thinking about pushing them almost to the edge and go through the aluminum transom plates on the edge as well.
DSC03668.JPG

After wheel grinding and cleaning everything with acetone, I painted the lower part of the splashwell and floor to help protect the aluminum in that area because of all the pitting that was already there. I had previously filled the pitting with JB Weld.
DSC03670.JPG

Transom bracket installed and holes drilled for knee brace/test fitting. You will notice I did cut a hole for a new drain plug at the very bottom of the hull.
DSC03672.JPG

DSC03675.JPGDSC03680.JPG

Adding 5200 liberally to parts before install
DSC03681.JPG

Knee bracket installed with plates
DSC03683.JPG

DSC03684.JPG

DSC03685.JPG

Now that this is done, I have plans for my Dad and Brother to come over this weekend to help me flip the hull. Once flipped, will be wheel grinding the 5200 to smooth it out and make it look pretty before painting with the epoxy paint. Hopefully the weather will stay warm enough, otherwise it will take forever for it to cure.
 

Watermann

Starmada Splash of the Year 2014
Joined
Jan 12, 2013
Messages
13,753
Nice work, that bottom plate outside looks like a nice fit and should reinforce the area perfectly. :thumb:

I do wonder about the top plate on the outside of the transom skin, it's small and not a motor pad replacement. Is it there for the upper knee brace attachment as a backer and will it be in the way of the motor mount seating against the transom?
 

SHSU

Lieutenant Junior+Starmada Splash Of The Year 2019
Joined
Mar 8, 2017
Messages
1,665
Nice work, that bottom plate outside looks like a nice fit and should reinforce the area perfectly. :thumb:

I do wonder about the top plate on the outside of the transom skin, it's small and not a motor pad replacement. Is it there for the upper knee brace attachment as a backer and will it be in the way of the motor mount seating against the transom?

Good Point WM,
It is for the upper knee brace. I didn't even think about that. I pulled up an old pic from when the motor was originally installed. I will definitely have to take a look at it when I get home

DSC03020.JPG
 

SHSU

Lieutenant Junior+Starmada Splash Of The Year 2019
Joined
Mar 8, 2017
Messages
1,665
Can anyone tell me how many 2 inch foam sheets in need to get from HD? My calculations are all over the place, and I am not sure. I see some people saying they only put 2 sheets down, but that doesn't seem like enough to float the boat.
 

Watermann

Starmada Splash of the Year 2014
Joined
Jan 12, 2013
Messages
13,753
Can anyone tell me how many 2 inch foam sheets in need to get from HD? My calculations are all over the place, and I am not sure. I see some people saying they only put 2 sheets down, but that doesn't seem like enough to float the boat.

It depends on what you have below deck (fuel tank) or a ski locker and how you lay the foam board in the bottom. For a start 2 of the 2" 4x8 boards wold be way more flotation than the dollops of soggy foam the factory put in the 80's boats or the styrofoam they put in my 70's boats. Not everything in a boat is negative buoyant so consider those things as flotation as well.
 

SHSU

Lieutenant Junior+Starmada Splash Of The Year 2019
Joined
Mar 8, 2017
Messages
1,665
It depends on what you have below deck (fuel tank) or a ski locker and how you lay the foam board in the bottom. For a start 2 of the 2" 4x8 boards wold be way more flotation than the dollops of soggy foam the factory put in the 80's boats or the styrofoam they put in my 70's boats. Not everything in a boat is negative buoyant so consider those things as flotation as well.


Appreciate your constant imput WM, makes me feel better. As for underneath, I am still looking to have a custom fuel tank built. otherwise, I will be filling everything else with foam.
 

SHSU

Lieutenant Junior+Starmada Splash Of The Year 2019
Joined
Mar 8, 2017
Messages
1,665
I think I can officially say it
WE ARE DONE WITH ALL THE SOLID RIVETS
We have literally replaced every single rivet in the hull. Here are pics of installing the last peices
Used some bolts to hold the pieces in place. Also pulled the hull into shape with the piece
DSC03690.JPG
Install completed, I also added some additional rivets. to help keep the hull tight with the piece
DSC03691.JPG

Going to flip the hull this weekend. Fill a couple areas that are pitted badly, repair the keel area that is cracked (Going to use the JB Water Weld method that WM suggested), and finally start to paint her!!!
 

SHSU

Lieutenant Junior+Starmada Splash Of The Year 2019
Joined
Mar 8, 2017
Messages
1,665
Dad and Brother came over to help and got the boat flipped. Finally get to move into actually putting the boat back together. Used some foam to help cushion the boat from the concrete and the 2x4 with clamps to hold it shape.

DSC03692.JPG

Moved into position to begin final preparation for paint

DSC03695.JPG

Have a couple spots that I will be filling with JB Weld and the keel to fix with JB WaterWeld. Then will be wire brushing the excess 5200 off in final brushing of the hull before cleaning and then painting. Probably wont be done until after Turkey day with all the other activities that are about to start to happen
 

nrf414

Chief Petty Officer
Joined
Feb 16, 2008
Messages
573
Wow. Just caught up on this resto. You are the new tinny rivet master sir. Hats off to you.

Good idea on the 2x4 with clamps for the flip
 

SHSU

Lieutenant Junior+Starmada Splash Of The Year 2019
Joined
Mar 8, 2017
Messages
1,665
Hey what was the final tally on the solids?


My final rough tally was 1,773. I added some extras in a couple spots. I ordered 2200 3/16 total and have about 150 left. Had to redo quite a few early on until the Admiral and I got in some proper practice.

Wow. Just caught up on this resto. You are the new tinny rivet master sir. Hats off to you.

Good idea on the 2x4 with clamps for the flip

Thanks NRF. When I get another boat to redo (Bitten by the Bug) I will make sure I won't have to redo the whole boat LOL. I can handle a couple hundred if need be, but NOT the entire boat. I enjoy projects and now I can say I did it
 

FIGMO

Petty Officer 1st Class
Joined
Jun 18, 2017
Messages
320
Hey SHSU,

I have been following your restoration, very impressive job thus far. I am also restoring a 1974 SS16. I had the same problem with the knee bracket, cracked and broken. It looks like you fabricated a new bracket. Is that the case? If so, what sort of cost would I be looking at to do the same thing?
 

SHSU

Lieutenant Junior+Starmada Splash Of The Year 2019
Joined
Mar 8, 2017
Messages
1,665
Hey SHSU,

I have been following your restoration, very impressive job thus far. I am also restoring a 1974 SS16. I had the same problem with the knee bracket, cracked and broken. It looks like you fabricated a new bracket. Is that the case? If so, what sort of cost would I be looking at to do the same thing?

I had my welder clean up my old one, fill holes, and then manufacture new "wings" and weld them on. Plus I had the additional exterior pieces cut at the same time. He charged me $100 bucks cash, that included material and everything. I have see people on here say anywhere from a pack of beers to over $100. It just sucks when you can't do it yourself and have to shop it out. In the end, remember you need to find someone you are comfortable with and can do a good job.
 
Last edited:

SHSU

Lieutenant Junior+Starmada Splash Of The Year 2019
Joined
Mar 8, 2017
Messages
1,665
Finally got some time to post updates.

Since I added the new drain plug, I decided to cut off the old one. I will have my live well feed through it

Before
DSC03580.JPG

After
DSC03697.JPG

Fill the crack I had on the Keel with JB Water Weld

Before
DSC03598.JPG

After: I didn't take a close up of the final sanding. You can kind of see it halfway down in the next pic
DSC03699.JPG

With the boat flipped, I wire brushed the entire hull. Removed all of the extra 5200. Then I wiped it down twice with 50% vinegar and 50% water.

DSC03700.JPG

With the long weekend coming up, going to try and paint. Planning on doing a final wipe down of 50% vinegar and 50% water before a wipe down of acetone before I start painting. Hopefully everything works out and next week I have photos worth sharing.
 
Status
Not open for further replies.
Top