New member, new project

jpruns37

Cadet
Joined
Aug 6, 2016
Messages
17
Hello everyone,
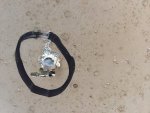
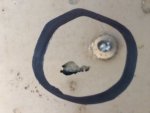
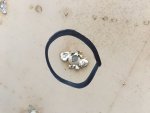
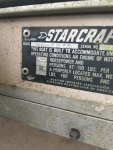
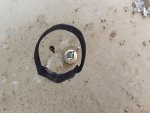
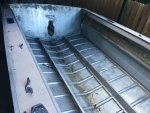
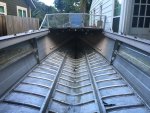
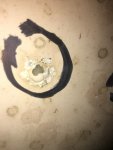
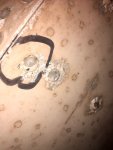
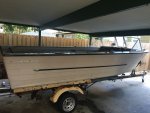
I am new to the site and to boating as well. Very excited to be here and to get started. A while back I got my hands on an older Starcraft 18ft. It is in rough shape in parts and there are a few questions I need some wisdom on before I go deep into the restoration. It looks as if the aluminum is getting eaten away around some of the rivets. I am familiar with the rivet process by searching other builds on this site. If it is repairable, the plan is to flip the boat, clean the rivets, drill out the bad rivets, replace with larger dipped in 5200, then gluvit the inside for extra protection, sound reasonable?
Questions:
1. Are these repairable in this condition? There are a total of 20 flat out holes next to the rivets in certain spots as pictured.
2. If daylight is still visible after replacement with a larger rivet, would the gluvit suffice?
3. How do I fill the pinhole and sometimes larger gaps aside the rivets created by this corrosion?
Any information and guidance is greatly appreciated,
Also, if I posted the wrong area or the pictures did not come out, my apologies, new to computers too.
Jason from Orlando
 

Attachments

  • IMG_5034.jpg
    IMG_5034.jpg
    176.7 KB · Views: 3
  • IMG_5034.jpg
    IMG_5034.jpg
    176.7 KB · Views: 2
  • IMG_5035.jpg
    IMG_5035.jpg
    85.9 KB · Views: 2
  • IMG_5032.jpg
    IMG_5032.jpg
    137.2 KB · Views: 2
  • IMG_4784.jpg
    IMG_4784.jpg
    174.4 KB · Views: 2
  • IMG_5033.jpg
    IMG_5033.jpg
    185.5 KB · Views: 3
  • IMG_4904.jpg
    IMG_4904.jpg
    252.4 KB · Views: 5
  • IMG_4903.jpg
    IMG_4903.jpg
    281.3 KB · Views: 3
  • IMG_5812.jpg
    IMG_5812.jpg
    79.9 KB · Views: 3
  • IMG_5813.jpg
    IMG_5813.jpg
    106.6 KB · Views: 3
  • IMG_4902.jpg
    IMG_4902.jpg
    194.1 KB · Views: 3

ezmobee

Supreme Mariner
Joined
Mar 26, 2007
Messages
23,767
Welcome to the forum Jason. I am not an expert in corrosion issues. Fortunately neither of my Starcraft projects had any significant amount to deal with. Corrosion is pretty much the one thing that can and will take out a old aluminum hull. Yours doesn't look too bad or unsalvageable though to me. If you don't have any large areas of pitting you're probably safe to just to address the individual occurrences. Your plan sounds feasible to me. Hopefully someone more knowledgeable comments. I don't think Gluvit will suffice in daylight visible holes. You'd want something like JB Weld for those.
 

jpruns37

Cadet
Joined
Aug 6, 2016
Messages
17
Thank you for your swift reply,
This is good news and I am excited to move forward. When I first received the boat it had a PT floor structure that was sitting in multiple inches of water and leaves. Hopefully the degeneration will cease now that the PT is removed.
I will keep posting the progress.
Thanks!
 

jbcurt00

Moderator
Staff member
Joined
Oct 25, 2011
Messages
24,871
You'll need to completely gut the hull to assess the corrosion damage, based on the pix, it looks like it'll be quite a project to address it.
 

GA_Boater

Honorary Moderator Emeritus
Joined
May 24, 2011
Messages
49,038
Welcome aboard, JP

Was she used in salt water? The PT didn't help, glad you got it out.

I hope I'm wrong, but all the corrosion bubbles in the skin are potential holes. I would hit those with a wire brush inside and out to see if they are holes covered by the bubbles.

Those rivets need solid metal to secure them and will need plates larger than the holes around the rivets or things will get worse. Gluvit won't permanently fill the holes and will fail if aluminum plates aren't used to give a foundation for repairs.

I think you have a real job ahead of you. Take a closer look at the corrosion and we hope for the best.
 

jpruns37

Cadet
Joined
Aug 6, 2016
Messages
17
Thank you for the replys gentlemen,
I am betting the boat was in the salt at one time or another. However, the previous owner said "all fresh" and I was too excited to question him. The registration shows last update 1994 in upstate NY.
The wire brush is a good idea and I will be giving it a workout. I am currently trying to figure out the rigging at my house to flip the boat over and back easily.

jbcurt00- When you write "gut" are you referring to the removal of the inner and outer support ribs to search for more damage? If so, should I do one at a time, or does that not matter?

GA_boater- The plates you refer to, are they small aluminum patches? Would 1/16" work? Also, would the patches go on the inside/outside/ or both? I ask because if i place the patch inside the boat under one of the support ribs it seems that the surrounding rivets attaching the ribs would be compromised. However, If I remove all the ribs as jb was possibly suggesting It may be a non issue because i will be installing new rivets in them all anyway.
Thank you all for the information and have a great weekend!
 

GA_Boater

Honorary Moderator Emeritus
Joined
May 24, 2011
Messages
49,038
Got an idea. How about we move this to the Starcraft section - If you concur?

I missed adding the picture showing what I meant about the bubbles. You got the idea though.

Several of the SC rebuilders have done the reinforced plates and have a better idea how to advise you. I haven't done that yet and hope to keep it that way. :smile: One of Mob did a fair amount of added plates and which thread has the pics is beyond my memory tonight. Maybe chemicalwire?

tinholes.PNG
 

mxcobra

Chief Petty Officer
Joined
Jun 27, 2011
Messages
526
IM not a tinny guy, but I like to learn about boats so Im going to watch from a distance:rolleyes:
 

Ned L

Commander
Joined
Sep 17, 2008
Messages
2,266
I'm sure other more experienced people will come along with better ideas...... I think I would look at removing the the rivets that are neighboring the holes to the extent that I could slip a sheet or strip of aluminum flashing between the rib and the hull plating. Then clean everything out well (all the surfaces), coat the inside of the hull plating in the area that will be under the flashing, and then the backside of the flashing itself with 3M 5200, and slide the flashing back in place. Then rivet using (as mentioned above) aluminum fender washers or something similar "home made". That would give you both the mechanical intgrety and water proofness.
 

jbcurt00

Moderator
Staff member
Joined
Oct 25, 2011
Messages
24,871
classiccat is the extensive corrosion fixer GA

What Ned describes is s a lighter weight aluminum flashing repair similar to ClassicCat used bemeath the ribs.

The problem w the method Ned desxribes is it isnt sufficient to repair or prevent rib end cracks. Thats a whole different problem, that also needs to be addressed, but not until the full extent of the corrosion is known.

Watermann also did rib end crack prevention/repair on his Chieftain.

dozerII has done some as has Grandad
 

Watermann

Starmada Splash of the Year 2014
Joined
Jan 12, 2013
Messages
13,753
:welcome: to the Starmada Jpruns,

Oh boy another neglected old SC, :) it would be great to see her returned to her former glory. It looks like you have her gutted out and cleaned up. The next step is to tackle those problem areas where the corrosion has gotten hold of your old Holly. Use a fine wire wheel on a drill with a side handle to clean the affected areas off to bare AL. Removing rivets can be done in a couple ways, with a wood chisel and mallet on the head or by drilling. Those rivets are 3.16" and you should only drill out the center of the head until it pops off, try not to drill an off center hole and create a larger hole than is necessary. Remove all of the compromised rivets first off, that should give you an idea of what you're facing down the road putting her back together. Try not to think too far ahead and work on the task at hand, it's doable.

So was the transom also replaced with that PT? My old Chief spent many many years in the salt water and had corrosion but it was different and didn't effect the rivets. My SS on the other hand was used in The Great Salt Lake (8 times saltier than the oceans) and there were a lot of rivets wasted, well not all only 2 or 3 HUNDRED. :eek: but a few days of replacing them was not that tough.

fetch
 

jpruns37

Cadet
Joined
Aug 6, 2016
Messages
17
This is great information gentlemen, thank you all very much.

GA_boater - Thank you for the clarification and if you are referring to me, I am completely fine with moving the thread to wherever you feel necessary.

Ned - Thank you for the insight!

jbcurt00 - Thanks again

Watermann - Thank you for the information, Three hundred is quite a bit of work! The transom had rotten PT wood that I removed. I like your section Idea until I get comfortable removing and replacing the rivets and patches. I had a nightmare that I removed all the ribs at once and the boat went flat like a pancake. Then I had to reassemble it with harbor freight bungees. terrible..
 

jbcurt00

Moderator
Staff member
Joined
Oct 25, 2011
Messages
24,871
Yep, if that nightmare is already haunting your dreams, its nearly 100% likely that MBS isnt far behind.

Unfortunately, theres only 1 cure for MBS and its to fully accept your fate.........

Rivet-itus is real, despite what the Admiral says..
:cool:

Multiple
Boat
Syndrome

Good luck and keep posting the pix as you dig into her.
 

sphelps

Supreme Mariner
Joined
Nov 16, 2011
Messages
11,435
Welcome aboard JP !
The ACBS is gunna be in your back yard next month .http://www.acbs-sunnyland.org/
If ya have a free weekend it might be a good time .. Me and the Admiral are gunna make the drive from j-ville ..
Good luck with your restoration ! I don't know much about tin boats so I can't be of much help but the Starmada looks like they got ya covered !
 

GA_Boater

Honorary Moderator Emeritus
Joined
May 24, 2011
Messages
49,038
GA_boater - Thank you for the clarification and if you are referring to me, I am completely fine with moving the thread to wherever you feel necessary.

Where you talking to me? Yes I was. LOL

It's moved to the Startcraft section for better help on exactly these issues on the Starcraft.
 

Grandad

Lieutenant Commander
Joined
Jun 7, 2011
Messages
1,504
I'm sure other more experienced people will come along with better ideas...... I think I would look at removing the the rivets that are neighboring the holes to the extent that I could slip a sheet or strip of aluminum flashing between the rib and the hull plating. Then clean everything out well (all the surfaces), coat the inside of the hull plating in the area that will be under the flashing, and then the backside of the flashing itself with 3M 5200, and slide the flashing back in place. Then rivet using (as mentioned above) aluminum fender washers or something similar "home made". That would give you both the mechanical intgrety and water proofness.

Jason, Ned said it all. That's exactly how I patched the cracks at the rib ends in mine. I wouldn't use anything too heavy if you want to slide a patch under several ribs that will require the aluminum to bend much. This will also create a smaller "step" in hull thickness under the rib. I can't remember the gauge that I used in the picture below. The picture was taken in a "dry run" without 5200 to ensure that the aluminum flexed enough and that all of my guides/spacers would stay in place during final assembly. I used both strips of hardwood floor tongue and a series of short chunks of C-channel as guides. I put 5200 on the hull only as handling a gooey patch of this length would not be do-able. 5200 will spread and fill the entire surface between the layers as long as you're prudent in spreading it. I may have used a floor tile cement spreader for uniformity. You'll have lots of time as 5200 sets and dries very slowly. More pictures in the story linked in my signature below. - Grandad
 

Grandad

Lieutenant Commander
Joined
Jun 7, 2011
Messages
1,504
Jason, I should have added in the post above the guide supports kept the patch just above contact with the 5200. I previously drilled all rivet holes and new through-holes at each end of the patch during the dry fit, so I knew exactly where to position the patch. After putting temporary bolts in those end holes, I worked back to the other end removing the supports as I went, lowering the patch gradually into the goo. Once alignment bolts were in the opposite end, I removed the clamps and L-bars that you see in the picture. I then riveted using solid rivets which really aren't that hard to master. - Grandad
 
Top