'71 Starcraft Sprint V15 RestoMod

natemeins

Seaman
Joined
Oct 20, 2013
Messages
73
Hey y'all. I've finally found the motivation and time to post my restoration. I should note that it's lake ready (because when are they ever "done", right?) as of last week, but was diligent to make a good photo record. I must say that the final result came out far better than I had hoped, which is good AND bad. I wanted an old aluminum boat so I could beat the thing up and not worry about it. But by the looks of things I'll likely be a SOB when someone tries to step on my beautifully polished brightwork (SMH). Oh well. Stay tuned, here goes:

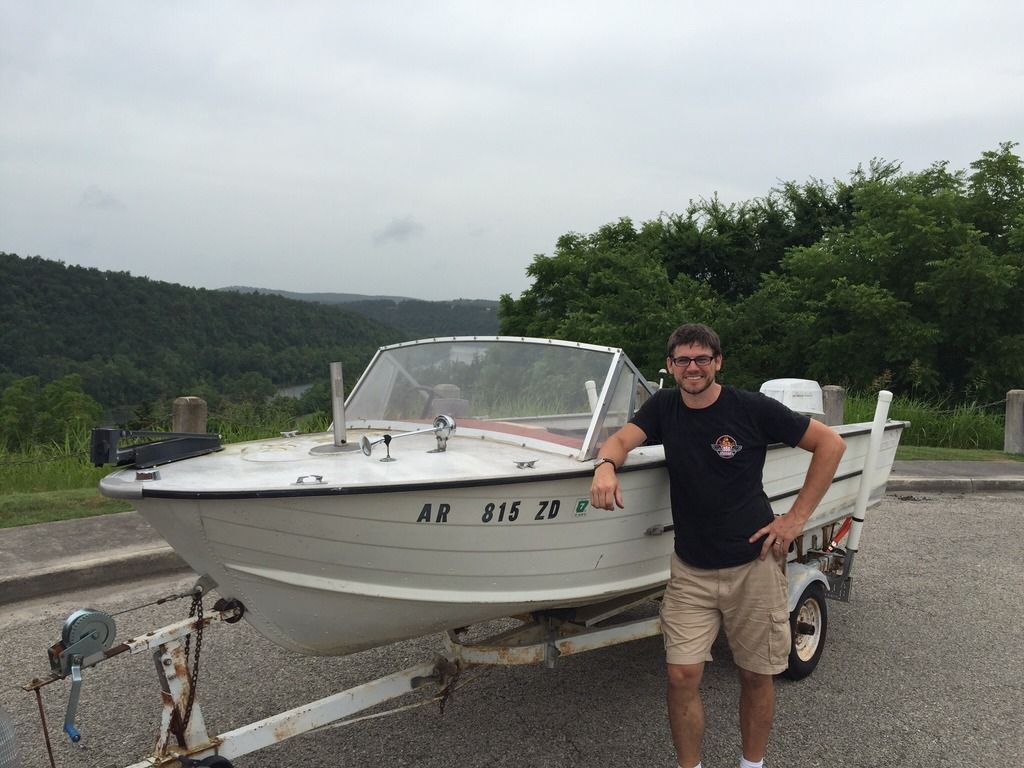
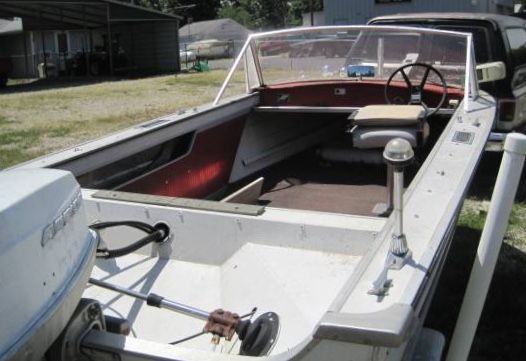
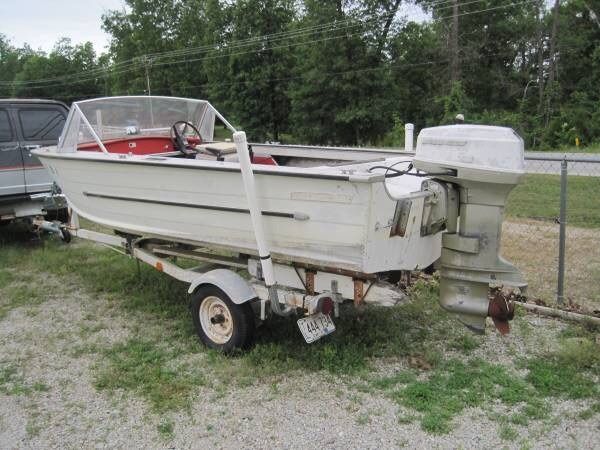
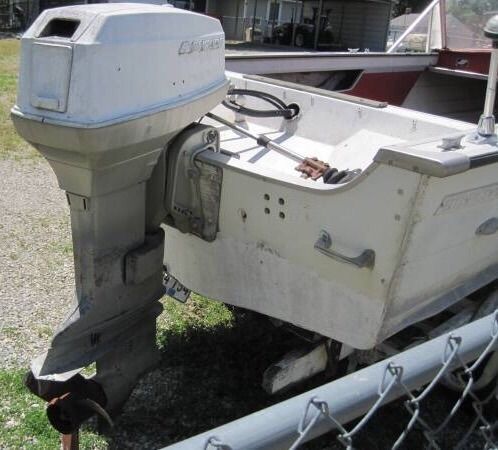
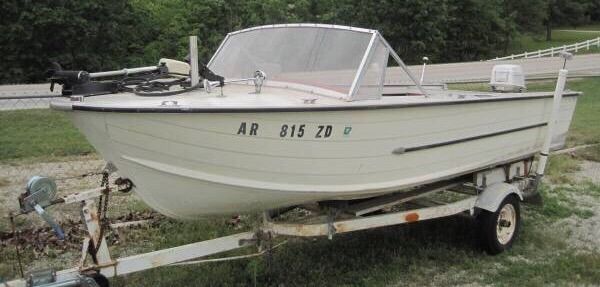
In June of 2015 I owned a 14' flat-bottomed aluminum boat with a Johnson 30hp that I practically grew up with. Learned to ski, tube, wakeboard (yuuup!) behind it, not to mention fish. My dad gave it to me and I restored the old girl and modified it into a fishing boat. But what I always wanted was an old closed bow runabout. Found this boat on Craigslist, and when the owner agreed to trade, my best friend and I drove from NW Arkansas to Lakeview, AR to pick it up. It wasn't much to look at, but the potential was there. In fact, as it turns out, it was VERY original. Original vinyl, paint (kinda), vinyl floor covering AND original plywood flooring. Even the old '71 Evinrude Lark was original to the boat. Since it was Summer, I needed it to be lake ready. It wasn't. So I did enough to make it lake ready and we (my wife and two young girls) had a blast! I was, however, itching to start on its resto. So on Labor Day, it went into dry dock (my garage) and the process started.


natemeins

Seaman
Joined
Oct 20, 2013
Messages
73
The engine needed a lot of work. It would start but ran very rough. It had not been maintained in years. Pulling the lower unit I found the water pump rotted and in pieces, the wiring was OK but not to my standard (I'm an aircraft avionics tech by trade, my wiring standards are a little high). Plugs installed weren't right, plug wires, boots, and coils were all but done-in, and the carbs were in major need of rebuilding. Surprisingly though, the lower unit oil was ok (filthy, but no water), so I didn't feel the need to tear it down. New pump, coils, plugs, carb rebuild kits, fuel hose, and a ton of elbow grease and the old girl sprang to life. She fought me for quite a while till finally it quit and wouldn't run start. Turned out the regulator wiring had melted. Managed to rig it enough to get back to shore, and was replaced. After that it ran quite good! Struggled to idle reliably, but high idle and above was fine. So it stayed all summer and ran like a champ. Cold-natured, though.


Last edited:

natemeins

Seaman
Joined
Oct 20, 2013
Messages
73


Walter, our '68 VW WestfaliaWeekender, has no problems pulling the ol boat.


My brother, my sister's son, and me out tubing and having a blast!


My mom and my brother's son. This was the last day the boat was wet before dry dock.


And so it begins. First off and first on, the outboard.
 
Last edited:

natemeins

Seaman
Joined
Oct 20, 2013
Messages
73
Last edited:

natemeins

Seaman
Joined
Oct 20, 2013
Messages
73
Hull teardown starts. Was working on some paint scheme renderings, and taped up a design to see how it's look in real life.
I just realized that I have no photos of the work I did to the old tilt trailer, but you can see that I sanded and painted the frame, new wheels/bearings, new bunk wood and poly rollers to replace the rotted rubber ones, LED lighting, and a new winch.


Parts are piling up, awaiting to go into the attic for the winter.


The transom was questionable. Actually, it really wasn't-it was done. But not bad considering the time in-service. Had I known the true status of it I'm not sure I would've pulled anyone behind me, let alone yank em around as much as I did. Interestingly, the transom was built in 3 pieces- one main piece which was in pretty good condition but was beginning to flex, and the two top tips. They were screwed into the main part. They were nothing but paper, so badly rotted. The replacement transom I build would be a one-piece affair, made from two 3/4" sheets of exterior grade NON PRESSURE TREATED plywood with a single 10oz sheet of fiberglass sandwiched between. It would make the transom twice as strong as the original.


The bow cap was removed for access. Good thing too, the bow stringers were cut into when the PO installed a fishing least on the bow. These will need replaced too.


Transom is out.


Again, all things considered, the transom sheet is in ok shape. Some pretty bad pitting going on where water was trapped between the wood and the aluminum, but nothing eaten-through. Will have a lot of sanding and cleaning to do.


Floors are out. As I thought, they were the original floors. The wood was still being held in by (mostly) the original rivets. They were very heavy, too. By the looks of things, it looked as though a major fuel spill had happened at some point and the oil had soaked into the aft most sheet. On top of this, I think the boat had been neglected and was retaining water for some time as the hull had some pitting along a rather deep waterline near the stern, and the wood, though not rotted, was water damaged and very heavy. I was expecting to find some very heavy water logged foam under the floors, instead I found a single mouse nest, some old fishing tackle, and not nearly enough foam to say there was any in there. And it was all dry. In fact, some was melted. When I first got the boat and was cleaning it up, I found what appeared to be old beef jerky from fishing trips long past. It wasn't jerky, it was foam, presumably melted from heat and a possible fuel spill. Otherwise, the areas under the floor were in fantastic shape! For the most part, at least the sheet metal side of production, these boats were built to last! Some installations were sub par in terms of quality, but the hull is a tank!


Last edited:

natemeins

Seaman
Joined
Oct 20, 2013
Messages
73
First coat of primer rolled on. I used Rustoleum's marine paint system. I thought about other brands, but I had previously used this brand on the old flat-bottom and it proved very, very durable (we regularly slid it up onto gravel embankments and generally beat the crap out of it) and kept its color very nicely. Plus, it was easily had and less expensive than other brands. Using a trick sailboat owners use to apply paint to their fiberglass hulls and keep them smooth and keep brush strokes to a minimum, I used a foam roller and a 2" cheapo foam brush, rolled the paint on in one direction and very lightly brushed the rolled paint perpendicular to the rolled direction. This removed roller lines and brush strokes and gave the paint a near sprayed-on look. Maybe not that good, but unless you look close-up you can't tell.


Prior to painting, I installed a second bilge drain for two reasons: first to help water that seemed to get trapped on the other side of the transom bracket get out of the boat, and second to have a place to install an underwater LED light, similar to one I had seen on a boat at night on the 4th of July. The look is so awesome at night!


Primer is on, while it's drying, time to tackle the new transom.


Transom laid up and drying.


First coat of color applied.


Not bad for being rolled on.


You can see the hole that had to be patched where the seat base was installed by the PO.


Love how the polished cap contrasts with the white. Its gonna look fantastic with the red.
 
Last edited:

jbcurt00

Moderator
Staff member
Joined
Oct 25, 2011
Messages
24,863
Nate, what plywood did you use for the dash and side panels, looks like oak?

What'd you use to seal it?

Didn't use the oak for the transom too though, right?

Paint layout looks nice, very much like the 50s Lone Star paint schemes, or Trxas Maid maybe...
 

natemeins

Seaman
Joined
Oct 20, 2013
Messages
73
Nate, what plywood did you use for the dash and side panels, looks like oak?

What'd you use to seal it?

Didn't use the oak for the transom too though, right?

Paint layout looks nice, very much like the 50s Lone Star paint schemes, or Trxas Maid maybe...

The dash I used leftover 3/4" non pressure treated exterior grade ply I used with the transom, then laminated the 1/4' oak veneer ply on top of the other with epoxy. Stained, then sealed it with 3 coats of Spar Varnish. A few months later I did a light sanding of the spar varnish and laid up another coat, but real heavy. This made it very tough and super glossy! No, no oak into the transom haha!
Thanks for the compliment on the paint. I'll have to look up those old boats. As I said earlier, I did borrow from an old Aero-Craft Ski Dart and a newer Glastron GTR-160.


Watermann

Starmada Splash of the Year 2014
Joined
Jan 12, 2013
Messages
13,753
Nate didn't you already start a thread on your Sprint? Waiting for the next round of pics. :popcorn:
 

natemeins

Seaman
Joined
Oct 20, 2013
Messages
73
Nate didn't you already start a thread on your Sprint? Waiting for the next round of pics. :popcorn:

Sort of. I had asked if I should start a new thread or just use the existing and it seemed it was dealer's choice. Months later I just thought it easier to make a new and dedicated thread to the resto. Hope I have t screwed anything up. More pics tomorrow. Sleep time now, fishin' in the morn. 😃
 

classiccat

"Captain" + Starmada Splash Of The Year 2020
Joined
Dec 20, 2010
Messages
3,405
That is a super-cool design & it's turning out great! :cool: :thumb:

I'm planning something similar for my bow plate since it takes such a beating...

...and/or is it because I bought a bunch of polishing supplies and changed my mind on polishing the boat...I can't remember which :lol:

Which Red did you use as a base? Rusto-Pro has a Regal Red that I've been considering as an accent.
 
Last edited:

coostv

Petty Officer 1st Class
Joined
Mar 21, 2010
Messages
230
Boat is looking great! I was wondering what to do with the bow on mine. I would hate to paint it and end up having the bow stop take the paint off, I think I may steal your idea for that!
 

natemeins

Seaman
Joined
Oct 20, 2013
Messages
73
Thanks, fellas. As for the red, I don't recall the rustoleum marine paint being a "pro" paint, and there is only one shade of red they offer. If you were to see my other post "another starcrafter enters the fold" you'll see the true shade of red on my old flat-bottom. This shade is about half a gallon can of the red followed by some black followed by some white to brighten it followed by some more red to lose the pink shade followed by more black...😆

My second favorite boat maker is Chris-Craft and I considered doing a "poor man's Faux-Craft" design, but abandoned it, too. Polishing the bow plate was plenty, and I think it looks damn good. Wait till you see it finished! I too chose to polish it not only because of the look but that it was taking a beating. If you do polish it I HIGHLY recommend, as others have, to use Sharkhide wheel sealer. Stuff is awesome!! I've used it on pretty much anything polished, and has held up very very well. Learned the hard way to definitely seal the bow cap: after I polished it I took it out for one day of lake fun and when I got home it was obivious where the waterline had been- it was tarnished-like old silver candlesticks tarnished. It took quite a bit of work to get it back to mirror again. It's expensive stuff at $50 but totally worth it.
 

coostv

Petty Officer 1st Class
Joined
Mar 21, 2010
Messages
230
Hey, thanks for the tip, I will definitely look into the Sharkhide stuff. I figured I would do some searching when the time came, looks like I can skip that step! lol
 
Top