The well traveled 1979 Starcraft 18' V5 SS

Candutch

Chief Petty Officer
Joined
May 8, 2015
Messages
637
Congrats on selling the SN and hope that the Merc will be running like a top now.
 

budski

Lieutenant Commander
Joined
Sep 12, 2012
Messages
1,845
Hope that solves your problem on the merc, full selling price right on.
 

BWR1953

Vice Admiral
Joined
Jan 23, 2009
Messages
5,852
Congrats on the sale!

And good work on the carb stuff. I can totally relate to carb issues right now. :rolleyes:
 

Watermann

Starmada Splash of the Year 2014
Joined
Jan 12, 2013
Messages
13,753
Thanks for the well wishes fellas, well the motor idles smooth as silk although it's not going to idle down any lower for me and I'm not sure why. I don't like the sound of shifting into gear at 1050 RPMs, I'm versed in the quick throttle movement popping it into gear and stopping before throttle is applied, I'm not one of the indecisive long drawn out gear grinding types. :lol:

Going to pull the plugs and check the timing again to make sure it's where it needs to be.

Oh and I put on that TP 19p prop, those vent holes are not good on my particular set up, causing me to have to ease into the throttle slowly otherwise it ventilates, maybe on a different set up vents would be good. I think I'll try to find a way to plug the holes. The prop runs smooth and would have some good acceleration too if it wouldn't ventilate and want to over rev my old Merc.

Tested the prop after installing that plastic ring and tuned the carbs this morning. Water just right for testing too...

y4mzppIXI9dVjQ_gdsfPhdgEd7A-X2U7eJgCTfgDxgNorDwmg6dav_ukiZA06QYsBslW8CB6WaImG4pdxWetmkAvaVFcjH8k2eBkv5TO-SVGTxPZjT-kWASJMzrwKpU8VRrelCI8yygmgRlXJhlhRl1vSCs6p7tjf7ZZiHanj83wEPSPZ-5fw0l8V1CaK2z_rjswN2X4HTHpv8lRdzt4wqOXQ


I'm not getting the rpms I want out of the 19p, 5500 rpms is in the power band and there was little gain for all the issues that have come along for the ride.

y4mEqUKLG3Mw5OFJ-mRTpnsN-4OAcTR6_HeSACatcZT8j-ZTgzlns9w6q7YdUwJnu5HUug1r984BpDDY2_DQ5IcWvQmRx3YTFt5guNO--SFXV4zIdmzxfgundv9wzXe6OKOfb4RvQNDrL95Ro2JWdKj99uxVQzc_XrVASlr85cAOx8F-BQmw6m2RVwCcrgu42a2eZJrfj8HX1xjUtRDe3p2QQ
 
Last edited:

DLNorth

Chief Petty Officer
Joined
May 26, 2016
Messages
432
Waterman,

Have you spent any time over on the Scream and Fly site? There are guys there that know how to make a Merc inline 6 run. Plus the correct sync and time procedure is there too.

Dan
 

MD28

Petty Officer 1st Class
Joined
Sep 1, 2016
Messages
222
Well that's a bit of a let down. Might as well go with the old prop. Can you return or sell the 19p?
 

Watermann

Starmada Splash of the Year 2014
Joined
Jan 12, 2013
Messages
13,753
Waterman,

Have you spent any time over on the Scream and Fly site? There are guys there that know how to make a Merc inline 6 run. Plus the correct sync and time procedure is there too.

Dan

No but most of the Inline 6 heavy hitters are on a Inline 6 Facebook group I'm in and it's almost an instant reply from them unlike forums.

Well that's a bit of a let down. Might as well go with the old prop. Can you return or sell the 19p?

You install a prop it's yours, no returning it. It's going to be my spare if I can't plug those vent holes.
 

PikeHunter431

Petty Officer 2nd Class
Joined
Sep 8, 2015
Messages
171
On another brighter note the SS will not only catch bass, walleye are not safe either! We stuffed a bakers dozen in the livewell and a fat perch on her first trip to big wally dog water. :D

IMAG3012.jpg

Now that is a sweet looking future fish fry swimming in the live well.
 

Watermann

Starmada Splash of the Year 2014
Joined
Jan 12, 2013
Messages
13,753
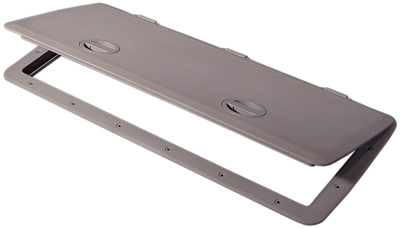
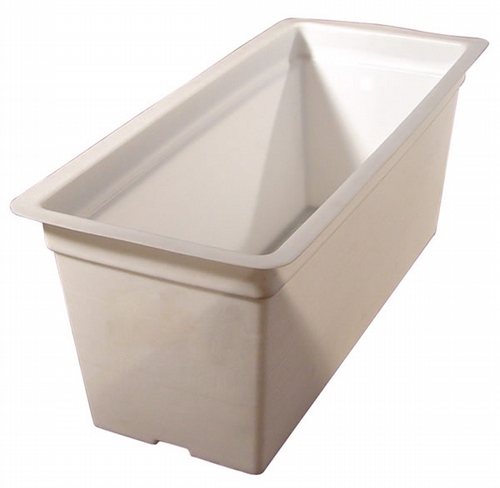
Parts list and how I set up the Livewell in my SS. This is for the stern but could be adapted for the bow. Here's a run down on how I did mine.

I used a Tempress 1330 hatch and liner, TH marine 3/4" spray nozzle with shut off valve, Rule aerator pump screen, 4 SeaSense 1-1/8" thru hull fitting, Shields 1-1/8" reinforced livewell hose for drain, super smooth inside and the 3/4" feed line as well, very high quality, iboats has the line but not by the foot, the link will show you what it is..Attwood Tsunami Cartridge Aerator Pump. All the fittings were sealed with 5200 as was the mating between the hatch liner and the deck and the lines were secured using SS hose clamps.


298709480.jpg
3736682.jpg


ZZ15276.jpg
29-73_0.jpg
5579.jpg
88-1490346bx_0.jpg
23-46407_2.jpg
t.png
t.png
50-18231_0.gif


A SS drain plug goes in the bottom drain hole when in use and in the cooler too so water doesn't back flow into it. The drain line has a Y fitting in it rather than a T but either will work. The drain lines are swept back rather than squared off like in the illustration.

Click image for larger version  Name:	LW1.jpg Views:	1 Size:	248.2 KB ID:	10423068


An inside the well look.

Click image for larger version  Name:	LW2.jpg Views:	1 Size:	176.3 KB ID:	10423070
 

Attachments

  • LW2.jpg
    LW2.jpg
    176.3 KB · Views: 0
Last edited:

Pusher

Lieutenant
Joined
Sep 2, 2014
Messages
1,273
Nice step by step. I especially like the text over the photos effort. I'll be using this info if I do a livewell in the future.
 

Candutch

Chief Petty Officer
Joined
May 8, 2015
Messages
637
Nice, that will definately help those out that plan on installing a livewell.
 

MD28

Petty Officer 1st Class
Joined
Sep 1, 2016
Messages
222
As long as the parts aren't shipped to Alaska. šŸ˜
Thanks Rob. I was wondering where you had found the lids and liner.
 

Watermann

Starmada Splash of the Year 2014
Joined
Jan 12, 2013
Messages
13,753
Hah yeah Alaska, well I just put a link to Tempress, those hatches and liners are tough to find in stock just about anywhere you look they're out.
 

Watermann

Starmada Splash of the Year 2014
Joined
Jan 12, 2013
Messages
13,753
Thanks for checking in fellas :yo:

The only thing I didn't mention was the issue of to support or not to support. :indecisiveness:

I decided that I didn't want the LW hanging by it's small lip supporting 160 Lbs of water so support it was. The only fear was having the plastic sides of the well liner supporting man weight. Framing in with 1/8 in x 2 in AL with vertical supports relived that concern. The vertical supports are on top of the deck support stringers underneath.

A perfect pad to put under the well liner was the hatch cutout piece of ply. I sealed the piece ply with spar, screwed the ply in place and glued the carpet down.

y4m6OIBMmOTG20re1yUiZ4AZpbr83Q_AT-UM2upvyzFI6tiF2AquuUdgJwQHO8Fa3EefoAVP0hmrUVDZMgTdTDVx6GSCZ63uBb7px8VRp7AOso06Pu83hBtapqa_lkZWZyA2cyGa6JEByQwIjPWMYVmq6o3azv_0aMIDzjclvPumv23RYKK91z3UkDf3_NvaCqGhb2G9-PUrloqhPBg7-6Ahg
 
Last edited:

Watermann

Starmada Splash of the Year 2014
Joined
Jan 12, 2013
Messages
13,753
A couple of things I found that were needing to be done after several fishing trips in the SS. The drop / climb between the windshields being a foot was just too much so I needed a step. Some 5/8in ply with deck vinyl and 1/8in thick angle solid riveted to the consoles should do the trick and it's a 7in rise, just enough to make a cubbyhole to stash a small tackle box like my plastic worm box.

y4moGu5bCFkzlUqUER28UJmz_nsJWaNaDbrPFJk52Mq6cMJWCkWlSmxebfPFAFxS1LjwHIvx4irD80LfhoJbK11AcGxnDhwS0eWe6sG2VAqxpsX3IkuSM4AS3lJZvgGOJssRLF1DeAwDQny2uuZyJn0QNtYDJGdLVw0tLep1Pw5SzGnPB1irYhnnNowfrBHK-NnNoXBFiuygh9fR4STNQ7xXg


Having to drag out my battery charger for the aft deep cycle was a pain so I decided to add another onboard charger like the one for the trolling motor batteries. I didn't need that monster charger so got the Noco Mini 1 bank 4 amp and another thru the deck port to plug it in.

y4m5EMUa8SQwCWncpJFPRm7SPws-XA2VfDK2x60bCFAVOTTd-diOYlmdJeL1-CwCBMXO8VLt4V5PL7aIDOGr8k2M1cfFW15tb2JaUeihzNisUKDaXCfbCvaKfPsBAaBXHdgZ0c4mEgog0OKOP_FBB_rzaBi5T6nf23bjqU0hyLoeCM77ApYIJCcqDGxWq83400hELj8e1DF-DGg1DgaNtZfHw


y4mVYb_JLthjWFXOEOtQWoloHLyEHTGUOl1b0p3KXUiBHGvxAh8reUTI_Unv8wWAi1HirKcoE88zHFA_q5t9adM2TE_gydShxMmOPgssb5SLESfAsgJm9foPXCBVL997vtT6f04aGIgaNuuoEmPfSpUwLrsBWBQj2lDIazitL2xJSxcehbUY7BVzA87zs5yJDRaJHusIjThIUFt2QD4Ez6psQ
 
Last edited:

Candutch

Chief Petty Officer
Joined
May 8, 2015
Messages
637
Nice work Rob. That is the same charger I have for my dual battery set up. I hooked it up to the selector switch and just choose which battery to charge although now I wish that I would have gotten a 2 bank charger, next time they are on sale maybe.
 

Patfromny

Lieutenant Junior Grade
Joined
Dec 2, 2012
Messages
1,197
Nice job. Love the step. I really didn't like that dash piece when you posted it way back when but I absolutely love it on the boat. I wish I had the room for it as I'm out of space on my dash, which looks to be about the same size as yours without the insert. My windshield has to much rear angle or rake to fit one there but it sure would free up space for the tach I want to install. Maybe I'll have my tin knocker buddy fudge something smaller up. Did you take a hole saw to the top of the dash for the wiring or did you do something more trick to get the wires up to the gauges?
 

Watermann

Starmada Splash of the Year 2014
Joined
Jan 12, 2013
Messages
13,753
I had noticed that when people and myself accessed the boat from the bow we used the windshield as a banister to get through down to the lower deck and then it was a hard landing when their foot hit the deck so a step down/up was the obvious fix for that.

Yeah Pat SC did a real number on the helm console, it's completely cut out wide open behind that insert. It was so flimsy when turning the steering wheel that after I ran the boat once I went underneath when I got back and added a support that goes between the rotary helm to the front console panel to make the dash solid. I did have to drill holes in the dash panel though to add the tach and volt meter.
 
Top