1971 StarCraft Star Trek-V rescue

Dave Turner

Petty Officer 2nd Class
Joined
Mar 7, 2006
Messages
118
The amount of weight I would guess at 150 to 175# for the deck and braces. One 4x8 3/4" plywood would go about 80#. The PO had that sheet against the console and another piece up in the end and 2 strips on the sides. I can see some pices here an
Anyone know what the original flooring was fastened down with from the factory
I think the fasteners on the deck of the half moon are square slot screws.
 

Watermann

Starmada Splash of the Year 2014
Joined
Jan 12, 2013
Messages
13,753
The decking was attached by the factory to the rib ends with large flange blind rivets.
 

GA_Boater

Honorary Moderator Emeritus
Joined
May 24, 2011
Messages
49,038
Welcome to the Starmada, Dave.

Once you take the lumberyard out of her she'll be a lightweight. That's a lotta wood. Some of the PO's work looks a little shaky to me, but he left the original layout untouched when covering it up. That is a big plus in my mind.

A thought about making more deck room - A side console was mentioned, another idea is to narrow the center console. It looks awfully wide for the width of the boat.

Did you make blue smoke yesterday when the motor fired up? I hope she started!
 

Dave Turner

Petty Officer 2nd Class
Joined
Mar 7, 2006
Messages
118
No Title

Did not get to the motor as planned but I tore into the inside some more today. I got all of those 2x4's out and removed a portion of the floor up front. Looks like the floor has only been replaced once, hence two holes in the end of the ribs. I was pretty pleased with the condition of the bottom under the floor. I vacuumed the dirt and she looks pretty good.
 

Attachments

  • photo237294.jpg
    photo237294.jpg
    66.8 KB · Views: 4

Dave Turner

Petty Officer 2nd Class
Joined
Mar 7, 2006
Messages
118
No Title

I pulled the rear floor out today and moved the console out of the way. I have to unhook the steering and get the console out of the boat next, then the throttle controls. Any suggestions on what and how to take care of the oxidized spots in the V part of the hull. There are 4 or 5 places toward the back and they look like divots but don't seem to be all the way through the hull. I circled one in the picture.
Will the bracing that's in the hull be enough if I put 1/2" plywood back in? The 1/2" that was in there seemed to give when I walked on it. The PO had very little floatation foam under the floor and there were 8 or so pieces here and there. Any suggestions on what kind and where i can get some foam sheets? Thanks very much.
 

Attachments

  • photo237337.jpg
    photo237337.jpg
    64.5 KB · Views: 2
  • photo237338.jpg
    photo237338.jpg
    68.1 KB · Views: 2

GA_Boater

Honorary Moderator Emeritus
Joined
May 24, 2011
Messages
49,038
Dave - Don't forget the 1/2" deck was old and probably abused. New ply should not be bouncy. I used the metric equivalent of 5/8" and you can bounce boulders.

Closed cell insulating foam board is carried by Home Depot, Lowes and other building supply places. 1" and 2" sizes in either pink or blue depending on the manufacturer.

On the almost hole - Use a stainless wire brush, either a cup wheel in a drill or by by hand and clean all the corrosion out of and around the pit, rinse with cleaning vinegar and then a final rinse.

Since the hole isn't through the hull, I would make an aluminum plate about 3" larger than the pit, shape it to match the hull and glue it down with 3M 5200 with some weight on top. If any holes are through the hull, I would use some closed head rivets to hold the 5200'ed plate in place around the hole, maybe 3 or 4. Use 5200 to coat the rivet body for sealing.

You will learn to hate 5200. It gets everywhere!
 

Watermann

Starmada Splash of the Year 2014
Joined
Jan 12, 2013
Messages
13,753
The original decking SC used was 1/2" marine grade ply. I think the 1/2" does need some extra support under it due to some spring it has but you don't need a dance floor in a boat or as Grandad says it doesn't need to be an aircraft carrier. I've added cross supports that are angle AL and try to add the foam to where it supports too which makes 1/2" just fine in my book.

GA has the right idea for the dent but I would add my measure of paranoia to using blind rivets on the bottom of the boat if going with a secured patch. Even a minimal impact could dislodge the blind rivet from the hole or at least the head, they just aren't very tough. I would opt for solid rivets. SS machine screws would work good too as my 2nd choice. Anything that makes for a smaller possibility of a leak below deck is wise. ;)
 

GA_Boater

Honorary Moderator Emeritus
Joined
May 24, 2011
Messages
49,038
I used 5/8" because I only have one stringer. With a pair of stringers and about the same width as Dave's, I think 1/2" new ply would have been fine. I'll never know on this one. :wink:

All my headless rivets under the the water line were solid. Being less freaked by paranoia, some of these things get filed under the Stuff Happens category. LOL

I've used the stainless screws with inner and outer washers and lots of 5200. So far no leaks through those.
 

Dave Turner

Petty Officer 2nd Class
Joined
Mar 7, 2006
Messages
118
Did someone use JB Weld and stuff called Gluvit (sic) for repairs and sealing and such? I thought I read some posts on those products? I have used 5200 and it sure does work. I used it when i put a new transom on my jon boat. Most of the suspect places I need to clean are farther back where crap laid in the V and did not wash out to the transom. The draining down through there gets restricted pretty easy for sure. Thanks for all the help and comments.
 

GA_Boater

Honorary Moderator Emeritus
Joined
May 24, 2011
Messages
49,038
We buy JB Weld by the truck load and cram the empty spaces in the truck cab and drivers pockets with Gluvit. LOL

JB is usually used to to fill holes. Like when PO gets drill happy after buying a new one. :blue: Gunnels, metal decks and transoms are some of the most used places. It is good for filling and smoothing smaller pits.

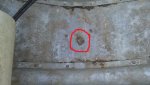
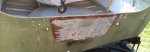
I recommended the plate and 5200 because 5200 remains pliable like rubber after curing, And those look to be large pits and the pitted tin will be thin, so the 5200 cushions the plate and helps to back up the thinned metal. That part of the hull gets a lot of water pressure from wakes and just normal running, not to mention rocks and semi-submerged logs, so a fix should be as strong as it can be made.

Gluvit is a runny epoxy-like product that oozes into seams and around rivets, It has a drawback - It is brittle after curing and can crack if flexed. One more thing about - It is not UV resistant and sunlight will destroy it. If it is exposed to the sun it must be painted, It is good under a deck protected from the sun.

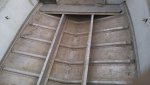
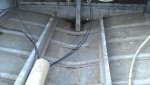
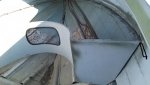
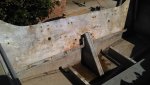
It isn't always easy to clean up before sealing, like in the V and all the crevices in these old tinnies. And naturally these hard to clean up places are where we find corrosion.
 

Dave Turner

Petty Officer 2nd Class
Joined
Mar 7, 2006
Messages
118
Got the console out this past weekend along with the steering cable. The console was solid wood. I would say counting everything wood I have pulled out we are looking at about 275# or better. It's snowing and we are looking at getting single digits, so, I will get back at it as soon as it warms a little.
 

Dave Turner

Petty Officer 2nd Class
Joined
Mar 7, 2006
Messages
118
Got to work on my boat after temps warmed up. I started messing with the motor and I actually got it running. Hope to get to work more on the inside up front on Saturday
 

Watermann

Starmada Splash of the Year 2014
Joined
Jan 12, 2013
Messages
13,753
Nothing quite like the aroma of 2 stroke oil wafting through the neighborhood :thumb:
 

jbcurt00

Moderator
Staff member
Joined
Oct 25, 2011
Messages
24,871
Congrats Dave,

Couple of nice weather days headed our way

Good luck
 

Dave Turner

Petty Officer 2nd Class
Joined
Mar 7, 2006
Messages
118
No Title

Pulled the rest of the floor and wood off of U shaped deck today. Left the frame in. I think I am going to extend the deck and make a hinged platform with storage underneath. I will add a couple pieces of angle on each side (marks show on the right). As far as the U deck I may add a lid on each side to have some storage under there to go along with the deck extension.
 

Attachments

  • photo238314.jpg
    photo238314.jpg
    29.8 KB · Views: 1

Dave Turner

Petty Officer 2nd Class
Joined
Mar 7, 2006
Messages
118
No Title

Been awhile since I posted. Weather and other interests have slowed me down. I finally got around to removing the transom. P.O. used treated plywood for the transom. (NO NO) I had a time getting it out and used my cherry picker to get at it. There are a lot of holes that were not necessary in the transom. The P.O. used some bracing behind for the splash pan that could have been screwed into the transom wood. What is the best way to cover those holes? The inside of the aluminum has that white powder stuff as seen. What is the best way to clean that and maybe coat it before putting new wood in? Thanks guys.
 

Attachments

  • photo241697.jpg
    photo241697.jpg
    52.8 KB · Views: 2
  • photo241709.jpg
    photo241709.jpg
    98.7 KB · Views: 2
Top