Starcraft 1984 Mariner 18, Winter project

Foxcat

Seaman Apprentice
Joined
Nov 18, 2015
Messages
44
Alrighty, had an eventful summer, now trying to close out this project before too long.
Here is the framework I installed out of AL angle. It supports the front deck and the bow.


Here it is with the deck installed. You can see way up front there is a white support for the bow that sits on the deck directly over an aluminum support. The second bow support has the access holes cut into it, and it also sits on top of another aluminum support under the deck.
boat hull 5.jpg
 

Foxcat

Seaman Apprentice
Joined
Nov 18, 2015
Messages
44
I also installed an aluminum framework for a small deck at the stern of the boat. Divided into sections, left for batteries, center and right for gas tanks.


Here it is with the deck on. It will not be flush with the sides of the boat, but I intended to do that. Each space will home a throw pfd. New Ohio law requires two throwables for craft 18' and above.
boat hull 4.jpg
 

Attachments

  • boat hull 4.jpg
    boat hull 4.jpg
    68.3 KB · Views: 0

Foxcat

Seaman Apprentice
Joined
Nov 18, 2015
Messages
44
Of course you do Gonefisshn, you hunt ducks! (And I bought this boat with camo paintjob from a duck hunter.)
But not to worry, I wont have any bright colors on this after I'm done- gray and white.
 

Foxcat

Seaman Apprentice
Joined
Nov 18, 2015
Messages
44
Making progress. Have three coats of rustoleum marine gray on outside of hull, white on inside of hull. Floor is flat grey outdoor paint. 6 coats over sand for traction. I've been cleaning up the hardware (rails, cleats, etc) since they were all spray painted camo, and starting to reinstall those.
Quick question about state I'd numbering/lettering on the hull. I like the idea of paint, but I think vinyl is gonna be more time effective and cleaner. Thoughts?
 

Watermann

Starmada Splash of the Year 2014
Joined
Jan 12, 2013
Messages
13,753
Ahem... pics?

I would use decals for the hull #s.
 

g0nef1sshn

Lieutenant
Joined
Feb 24, 2015
Messages
1,291
Making progress. Have three coats of rustoleum marine gray on outside of hull, white on inside of hull. Floor is flat grey outdoor paint. 6 coats over sand for traction. I've been cleaning up the hardware (rails, cleats, etc) since they were all spray painted camo, and starting to reinstall those.
Quick question about state I'd numbering/lettering on the hull. I like the idea of paint, but I think vinyl is gonna be more time effective and cleaner. Thoughts?


Depends on the look your are going for. Mine didnt need to be pretty so I had paint on hand. If it werent a hunt boat I would go another method within the regs that fit the design.
 

Foxcat

Seaman Apprentice
Joined
Nov 18, 2015
Messages
44
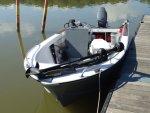
OK folks, I finally finished my boat back around Oct 10 and got it out on the water a couple of times. What a joy to see water again! Everything ran well and had zero leaks. Goal accomplished! Some picture are from Alum Creek Reservoir, north of Columbus Ohio.

Here you can see that I got the trolling motor remounted. The boards and the support pieces underneath really did the job, with absolutely no movement when the trolling motor was dropped and lifted. Two batteries for the trolling motor are located under the front casting deck. On the right and left of the casting deck are two small doors that open into storage spaces underneath.

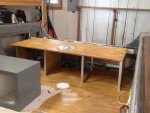
You can see that I have one seat in place on the deck. I have one fixed seat for the driver, and three additional seats on pedestals that can be moved to any of five receptacles. Two of the receptacles are on front and rear casting decks, with three others on the main deck for cruising around with company.

The depth finder is mounted with simple binder clips from our supply office, to allow easy removal when parked in areas where people have sticky fingers.
finished boat 3.JPG


Here you can see the rest of the boat's layout. I originally wanted to return the boat to its original center console configuration, but opted to keep the side console. It really does work better for fishing inland waters on a smallish boat like this. If it was a larger bay boat I would consider the center console. I did not replace the windshield on the console simply because it is easier to cover and trailer the boat without it. I've considered adding a flip-down windshield- saw one in Alaska this summer and seems very functional.

I removed the live well from the front of the console to allow extra floor space. On the front of the console you can see that I added a power outlet. Just above that I added an on/off toggle that is wired to an old bilge pup that I have in storage under the front casting deck. If I choose to keep fish, I can take my cooler on board and fill it using the old bilge pump that I have stored up front. Just toss the pump over the side, put the attached hose in the cooler, and flip the toggle switch on. When the cooler fills 2/3 of the way, toggle off. I can use this system to empty and refill the cooler as needed. Inside of the cooler itself, I have retrofitted a water circulating pump that aerates the cooler water. It plugs into the power outlet on the front of the console.

You can also see the finished rear casting deck. Two fuel cans sit under the rear console, as do two more batteries (which you cant see on the starboard side). One battery is specifically for cranking and the other is to run lights, sonar, functional bilge, etc.

Flip up rod holders are installed on both sides near the rear for those times when trolling is the ticket.

All walking surfaces are covered with sand and several layers of paint to make it skid proof. finished boat 2.JPG


There she is! I chose the vinyl lettering for the hull.
I just love the way this boat sits in the water. The paint job turned out great (thanks rustoleum marine paint!)

If I had my druthers I wouldn't have the trolling motor on because I feel like it really ruins the look, but this boat has to be functional.
finished boat 1.JPG


This site has been a great help, and I would never have been able to finish this project without all of the old posts to reference and all of your personal words of assistance and encouragement. Thank you!
 

Attachments

  • finished boat 2.JPG
    finished boat 2.JPG
    106.9 KB · Views: 4
Last edited:

Watermann

Starmada Splash of the Year 2014
Joined
Jan 12, 2013
Messages
13,753
Nothing quite like fishing from a boat you made new once again with your own hands. Nice work, she looks great! :thumb:
 

Tnstratofam

Commander
Joined
Aug 18, 2013
Messages
2,679
She turned out great. Nice work.:encouragement: Don't forget to add her to the 2016 Starcraft Spashes.
 

classiccat

"Captain" + Starmada Splash Of The Year 2020
Joined
Dec 20, 2010
Messages
3,405
awesome job foxcat! It's a very practical setup that was beautifully done...and you overcame some serious structural issues to get to this point. Well done! :thumb:
 

Foxcat

Seaman Apprentice
Joined
Nov 18, 2015
Messages
44
Thanks for the compliments folks! This project took a lot longer than I anticipated, but the results were worth it. I love these old starcraft tin boatS, and Im proud to own mine. See you on the water!
 
Top