Starcraft 1984 Mariner 18, Winter project

Foxcat

Seaman Apprentice
Joined
Nov 18, 2015
Messages
44
Thanks for the great tips and ideas, guys. I think I have enough info to make some inroads on this project. I'll post again in a couple weeks, when I have some progress to show. In the interim, merry Christmas and happy new year to all!
-Joe
 

Foxcat

Seaman Apprentice
Joined
Nov 18, 2015
Messages
44
Back to the project....
Did a water test to locate holes and leaks.


Found 34 rivets that were either loose or pretty damaged. Also found a pinhole due to corrosion on the port-side floor of the hull near the transom.
 

Foxcat

Seaman Apprentice
Joined
Nov 18, 2015
Messages
44
Cleaned up the inside of the hull a little more and found a great deal of corrosion on the transom. In fact, it ate through the transom in three places above the water line. I was able to clean it all up pretty well with some simple green and a wire brush in my drill. Filled all of the corrosion with JB Weld. Also filled in some holes that were left from the PO's outboard mount, using scraps of aluminum embedded in JB Weld.


Foxcat

Seaman Apprentice
Joined
Nov 18, 2015
Messages
44
Drilled out and replaced all 34 leaky rivets with a little dab of 5200 on each. Also drilled out the pinhole and filled in with stainless steel bolt, washer and nyloc nut, also with some 5200. Found about a dozen other misc screws through the hull used for mounting transducers and things, and filled in with stainless hardware.

As for the broken ribs, I repaired with angle aluminum embedded in epoxy, and attached with stainless hardware with some 5200 on the heads of each screw.
At each break site, I drilled out a rivet near the break and drilled another hole outside of the break and another inside of the break.

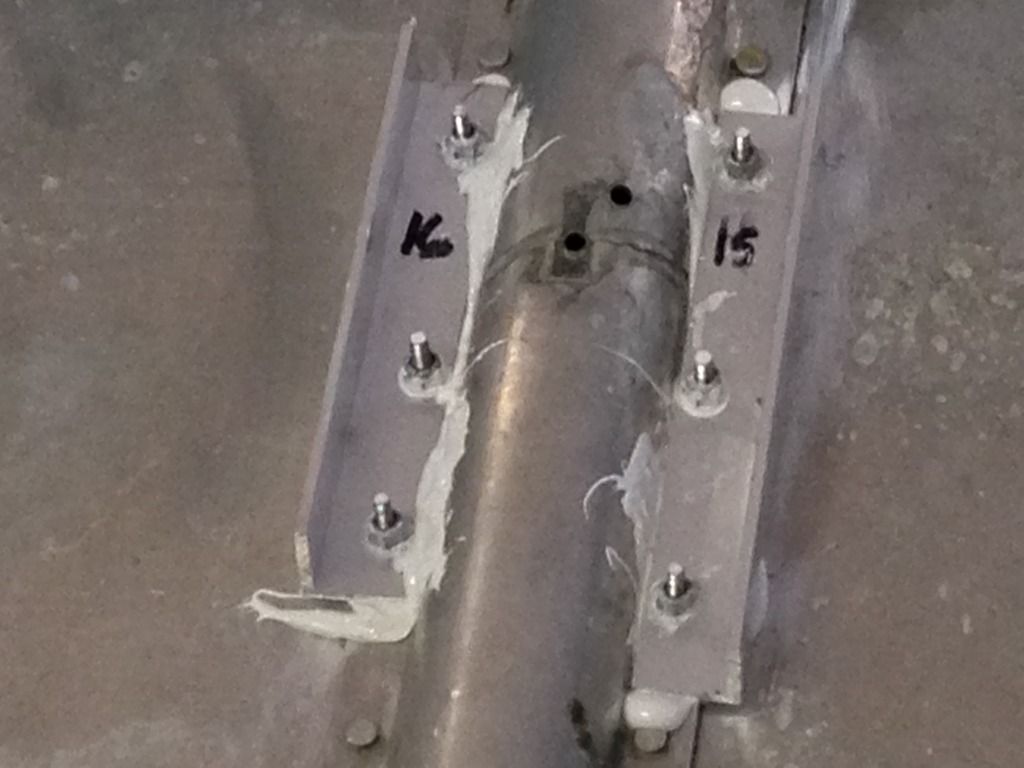
A little messy looking to be sure, but I'm not worried about looks of things that will be underneath the deck.

It was a real leap of faith to drill more holes in the bottom of this boat in order to make the desired repairs!
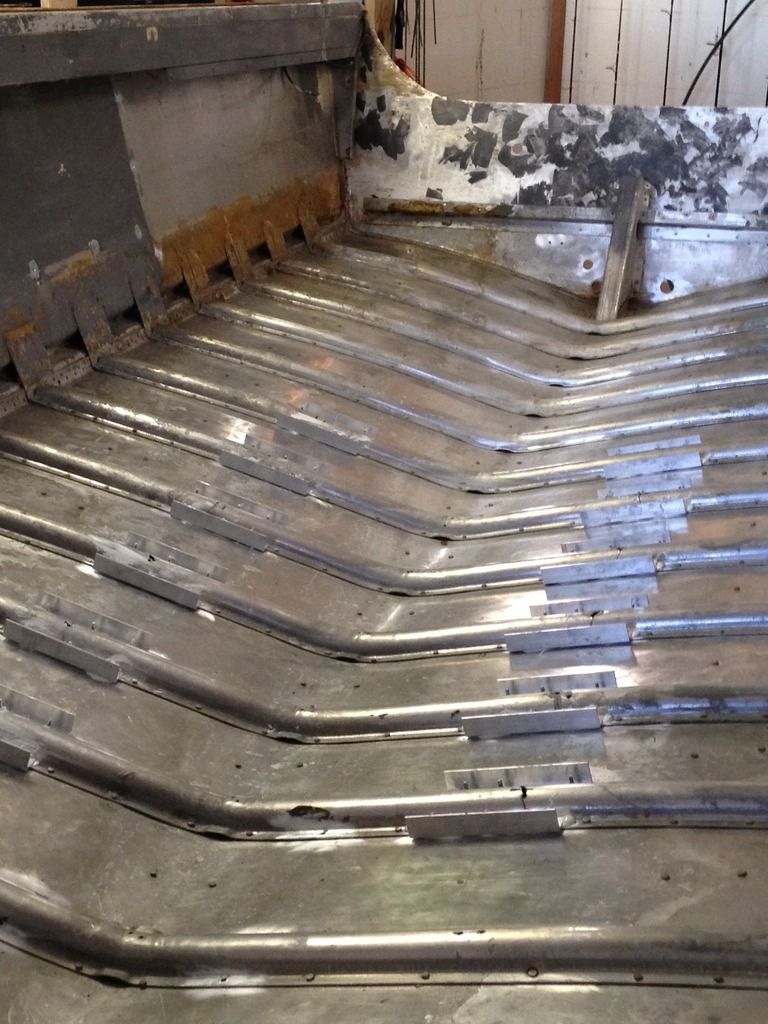
6 ribs, 2 breaks each (one port and one starboard), one aluminum angle on each side of the break = 24 removed rivets +48 new holes.
 

Watermann

Starmada Splash of the Year 2014
Joined
Jan 12, 2013
Messages
13,753
That's some serious damage, can you tell if it was from impact or the trailer set up?

The broken ribs should be well supported with the epoxy bedded angle AL splints. :thumb:

See you been busy filling the corrosion pits on the transom skin, it's amazing how well JB or MT repairs the damage. I think it's stronger than the AL around it as long as it's not in a location where it can be impacted all's good. The repairs I made on my Chief's transomn that were below the waterline where the holes/corrosion were bad from tabs and other things I filled with MT, sanded smooth then put on AL patches back buttered with 5200 and riveted in place.
 
Last edited:

Foxcat

Seaman Apprentice
Joined
Nov 18, 2015
Messages
44
That JB Weld really is something else. Ive never used that stuff, but it sets up super tough.

Im not sure how the rib damage originated. There are dents and dings all over the bottom of this hull, but nothing stands out as the cause. I do think that all of the holes in the ribs at least contributed to the damage (see earlier post above for pics of that). But it is difficult to id the ultimate cause of the failure.

The trailer is a roller type, but there are bunks on each side that should do a good job of support exactly in the area where the rib damage has occurred. I will note however, that the poles that hold the bunks kept slipping out of place. No matter how I tightened the bunk supports, they would always slip, causing the bunks to be about two inches below the hull, not providing any support at all.
In response to this, I recently used a dremel with a grinding attachment to put a groove into the supporting poles. Now when I tighten up the clamps to hold the poles in place, they don't slip. (Does that make sense? My boat/trailer terminology is weak).
 
Last edited:

Foxcat

Seaman Apprentice
Joined
Nov 18, 2015
Messages
44
OK, Ive reinstalled the original longitudinal stringers and have added lateral stringers.

In the pic below, you can see that Ive moved the two outside longitudinal stringers medially to take pressure off of the cracked ribs. By moving them inward, it lowered their height by 1", allowing me to cut the lateral stringers out of 1" square aluminum tube (1/8" thickness). The center stringer was still original height so I had to cut squares in the aluminum to allow the lateral stringers to pas through.

The lateral stringers are riveted to the rib ends and all three longitudinal stringers.

The center longitudinal stringer and the lateral stringers are flush and will support the floor.


classiccat

"Captain" + Starmada Splash Of The Year 2020
Joined
Dec 20, 2010
Messages
3,405
Nice job foxcat! Those lateral supports will do a fine job protecting the damaged area & give your deck a ton of support. :thumb:
 

Foxcat

Seaman Apprentice
Joined
Nov 18, 2015
Messages
44
Thanks Classiccat! It's been a little more difficult than I envisioned before I found those cracked ribs, but I'm feeling satisfied with this work. I don't want to be on the water worrying about things!
 

g0nef1sshn

Lieutenant
Joined
Feb 24, 2015
Messages
1,291
that is going to be a solid deck going back in there! I used an angle on the side walls to mark the wall where my ribs ended so I knew where to drill my holes for the new deck. I guess if you did that and a chalk line across the two sides you could hit the new supports pretty good all the way across. Just my thought on how I would go about it with out a lot of measurements anyway. Looking good!
 

Foxcat

Seaman Apprentice
Joined
Nov 18, 2015
Messages
44
Made some additional supports for the deck and riveted them to the metal framing.


Pic of the sub-deck infrastructure with extra deck supports in place and run for wiring installed.
 

Foxcat

Seaman Apprentice
Joined
Nov 18, 2015
Messages
44
You can also see in the last pic that the transom has been cut, fit and epoxied.
 

Foxcat

Seaman Apprentice
Joined
Nov 18, 2015
Messages
44
Also cut out a piece to support the front deck. It supports a trolling motor, and the original pieces of wood supporting it were half rotten and giving way.
 

Foxcat

Seaman Apprentice
Joined
Nov 18, 2015
Messages
44
Ive epoxied all of the deck; top, bottom and sides. Also cut aluminum backing plates for bolting the seat pedestals to the deck.
 

MyOutdoors

Seaman Apprentice
Joined
Mar 14, 2016
Messages
47
Your doing a great job! Any pics on the bow support install? What are you planning as far as putting in a livewell, I'm in the same process.
 

Watermann

Starmada Splash of the Year 2014
Joined
Jan 12, 2013
Messages
13,753
Good idea using a solid ply backer on the bow :thumb: I'm using 3/4" marine ply on my SS and it's basting in spar as we speak.
 

Foxcat

Seaman Apprentice
Joined
Nov 18, 2015
Messages
44
Thanks guys!
As for the livewell, there was an original one riveted to the front of the console that was used for storage. I was going to do some plumbing but thought better of it. I figured that if I bring home fish to fillet, I would have to transfer them into a cooler to get them from the boat to the fillet table. So why bother with a livewell? I'm going to hardwire a bilge pump with a hose to the boat's deep charge battery, and stow it in a waterproof compartment under the front deck. If I want to put fish in the cooler, just put the bilge overboard, flip a switch on the console, and fill up the cooler. To empty the cooler just reverse the process. Admittedly this is not a sleek high tech solution, but I always have a cooler on the boat, and this does free up deck space by getting rid of the original Livewell.
Bow support isn't in yet, but I'll post when I get it.
 
Last edited:

Watermann

Starmada Splash of the Year 2014
Joined
Jan 12, 2013
Messages
13,753
I'm afraid without a circulation pump coming on frequently the fish would die pretty fast especially when it's hot. You're better off just tossing the fish in the cooler on ice. I've always found that filleting fish that are cold and dead is more fun than ones that are fighting you tooth and nail right out of a livewell. Also they don't bleed when cold and dead. ;)
 
Top