Man of Steel Goes Aluminum

PikeHunter431

Petty Officer 2nd Class
Joined
Sep 8, 2015
Messages
171
No Title

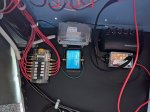
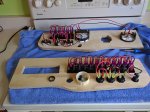
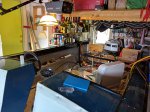
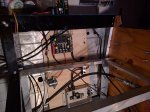
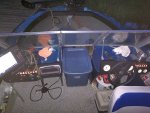
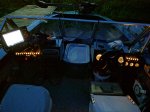
My son did all the wiring, which I am sure meets any and all possible codes. This is a good thing since I am more of just a wire cutter and a little electrical tape will be fine guy. The last picture is the fit check and preliminary wiring he did before I OTFed the pieces. We both forgot to take pictures under the driver side dash, so that is something for later this summer.
 

Attachments

  • photo267769.jpg
    photo267769.jpg
    177.2 KB · Views: 6
  • photo267770.jpg
    photo267770.jpg
    122.3 KB · Views: 5
  • photo267771.jpg
    photo267771.jpg
    221.2 KB · Views: 5

mbroughton02

Petty Officer 2nd Class
Joined
Jan 17, 2015
Messages
198
Very nice all around. Your son's wiring is neater than mine, and I'm a professional :eek:
 

Watermann

Starmada Splash of the Year 2014
Joined
Jan 12, 2013
Messages
13,753
Nice work Terry. Looks like you were very busy through May, lots of tough work out of the way. You should be down to a short list before splashing by now.
 

PikeHunter431

Petty Officer 2nd Class
Joined
Sep 8, 2015
Messages
171
MB: I'll pass that along to him.
Waterman: Thanks. Interim splash 2 coming in a couple posts.
 

PikeHunter431

Petty Officer 2nd Class
Joined
Sep 8, 2015
Messages
171
No Title

Steering wheel attached and passenger seat in. Next it was time to get going on the stern area. Motor, oh yeah, I need to reattach the motor, ladder and the bracket on the inside that holds the Teleflex cable. I reattached the cross support posts I made before when I took out the original splash pan/padding/beam. Then I reinstalled part of the angle aluminum which will be part of the support for the rear deck. Next came the wiring for this end. Besides the 2 batteries in the front for the trolling motor, I also have 2 batteries in the back. One is for ignition and the auto bilge. The other is for the house bus. The Teleflex steering cable seemed to be a little too long and previously it ran in the gunnel and had a big bow loop and sharp turn to the engine. This time I ran it under the gunnel and snaked it up and down. This seemed to get rid of the excess and now there is a normal turn at the end. The steering is noticeably easier. I also put foam below the gunnel. I used the original wood siding piece which goes under the gunnel again. (it seemed in pretty good shape yet.) I was running out of time and it also had all the holes for the gearshift done and in the right places. I did, however, OTF it. Then I covered it with some blue Vivid vinyl.
 

Attachments

  • photo267924.jpg
    photo267924.jpg
    221.1 KB · Views: 3
  • photo267925.jpg
    photo267925.jpg
    186.8 KB · Views: 3
  • photo267926.jpg
    photo267926.jpg
    164.9 KB · Views: 3
Last edited:

PikeHunter431

Petty Officer 2nd Class
Joined
Sep 8, 2015
Messages
171
No Title

I had purchased a new gas tank, 23 gal, to replace the original one. I wanted better access to the bilge area with all the plumbing we are running. I put angle aluminum on the floor on three sides, so it couldn't slide around. When I bring the boat back in July, I have some rubber pads to put under it and need to install a tie down of some sort.
 

Attachments

  • photo267927.jpg
    photo267927.jpg
    187 KB · Views: 1

PikeHunter431

Petty Officer 2nd Class
Joined
Sep 8, 2015
Messages
171
May 27th: Time to leave for the cabin. Problem: boat is not ready to splash. We could go up and finish it there. Forecast: Cold, almost constant rain and the black flies have just come out in droves. So we decided to spend the next two days at home finishing up what we needed to do to use it. Windshield on, Driver seat back in. Gear shift mounted and wired. (We put a grommet in the gunnel and ran the ignition wiring under it to keep that area clean). We took the rub rails and used some Mr. Clean pads on them to get rid of dirt, grease, and some white paint. Then applied some black shoe polish for coloring and moisturizing. Reinstalled them and put the end caps on. Also attached the end caps and bow cap for the upper rub rail as well as most of the cleats. Reinstalled the mounting plate for the Ultera trolling motor, nav lights, and a base plate we will use with a 360 imaging bracket. I am putting an Onix 8 SI Combo on the passenger console top. I got the larger Ram Arm mount to use with it. I put a piece of plywood under the console for the ram mount to attach into. We got a piece of 2 " pipe with flanges on both ends, sprayed it black and installed it between the plywood and floor. Perhaps it is overkill, but I am not always easy on things and don't want this thing coming out with the arm outstretched fully toward me in the driver seat. NY registration sticker on. Where are the fricken letter/number decals? I'll have to buy them in route to place the boat ID on. I also need to pick up or find a longer hose for the gas tank vent in order to use that. Load in the gear. Put new travel cover on.Go to bed.
 

PikeHunter431

Petty Officer 2nd Class
Joined
Sep 8, 2015
Messages
171
Monday, May 29th, get up, hook up lights - no lights. Quick check does not reveal problem. I keep a spare portable set of trailer lights I have never opened. Time to open, duck tape and tie down. Now we have trailer lights - take off.

Stop at ATM for cash. Check out boat and trailer. Everything looks good. Get on NYS Thruway. Two exits later, top seems stable, but I don't think I see all the straps coming down the side. Pull off to the side. Walk back. Arrggggg. From the windshield back, all of the plastic buckles connecting the straps from the top to the straps on the trailer, have broken. The top, from the windshield back, is inside the boat and one of the corners is shreaded in about a two foot block. So much for the buckles. Recover the exposed part of the boat, tie the straps together directly. Bypass the buckles on the front ones which didn't break and tie those together. Drive on. Get into camp around midnight.
 
Last edited:

PikeHunter431

Petty Officer 2nd Class
Joined
Sep 8, 2015
Messages
171
No Title

Next day, put boat id lettering on, plugs in, turn on power, launch boat. It doesn't sink - yeah.
 

Attachments

  • photo267929.jpg
    photo267929.jpg
    224.3 KB · Views: 14
  • photo267931.jpg
    photo267931.jpg
    198.1 KB · Views: 4
  • photo267932.jpg
    photo267932.jpg
    187.8 KB · Views: 3

PikeHunter431

Petty Officer 2nd Class
Joined
Sep 8, 2015
Messages
171
When I go up north the next time, I will be mounting the rear transducer for the Onix. I have a plastic plate to put on first, then a spring bracket and a transducer guard/holder to put it into.

When I bring her home in July, there are still several things to do. However, I think the only re-work will be the front panels of the console. The yet-to-do list:
Front Deck and padded sidewalls, Read Deck and Gunnel Side Panels, Panel below gunnel on passenger side, plumbing/pumps for cooler livewell system, remove/restore/polish windshield framing, storage sections ahead of casting deck which will hold casting seats when in down position, section to put in when cooler not in boat for pleasure cruising, sun shade / bimini top, cleat for anchor, sound system, marine radio. That will leave the trailer to be painted, a new bolt through swivel jack, and new winch/strap/cable, led lights, perhaps guide posts on the back. Although I know one is never truly done with a boat, at that time, I would call this project done.
 

Candutch

Chief Petty Officer
Joined
May 8, 2015
Messages
637
Congrats Terry! Glad to see you got the boat wet. Hope she ran good for ya. Enjoy the summer using your boat and finish her in the off season.
 

Pusher

Lieutenant
Joined
Sep 2, 2014
Messages
1,273
Yes, nice progress! I do enjoy some good reading material during those long winter months 😃
 

Watermann

Starmada Splash of the Year 2014
Joined
Jan 12, 2013
Messages
13,753
Congrats on the splash, 2017 is shaping up to be a banner year for old SCs hitting the water agian.

She looks great on the water, the only thing missing is a video! :D

fetch
 

Tnstratofam

Commander
Joined
Aug 18, 2013
Messages
2,679
Congratulations on a successful splash. Another great addition to the 2017 Starcraft splashes and what looks to be a great fishing machine.
 

PikeHunter431

Petty Officer 2nd Class
Joined
Sep 8, 2015
Messages
171
Congrats Terry! Glad to see you got the boat wet. Hope she ran good for ya. Enjoy the summer using your boat and finish her in the off season.

Thanks Rob. She ran pretty good, but I think the idle needs some fine tuning - a new item for my to learn bucket list. I am moving onto phase 3 now as I don't really have the option to work on her in the off season. But I do hope to use her some more this season.
 

PikeHunter431

Petty Officer 2nd Class
Joined
Sep 8, 2015
Messages
171
Congrats on the splash, 2017 is shaping up to be a banner year for old SCs hitting the water agian.

She looks great on the water, the only thing missing is a video! :D

fetch

Thanks Waterman. She feels better every time I put her in the water. We seem to have a hard time remembering to take pics once we get her in the water. I will take some videos when we do splash three in 2018.
 

PikeHunter431

Petty Officer 2nd Class
Joined
Sep 8, 2015
Messages
171
Top