Man of Steel Goes Aluminum

PikeHunter431

Petty Officer 2nd Class
Joined
Sep 8, 2015
Messages
171
No Title

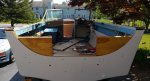
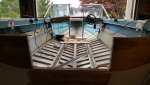
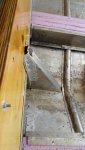
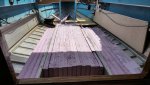
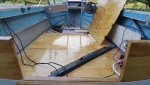
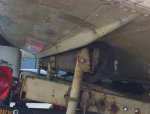
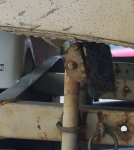
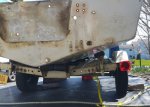
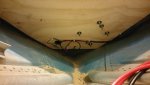
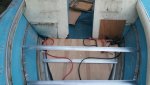
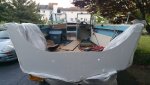
I have another question. The bunk rails don't seem to be set up in a way that seems right to me (but then again I am a rookie here.) I can see this set-up would provide support to a strong piece of the hull. However, It would seem loading it would have to pretty precise to get these swiveling bunks to catch those pieces (I am sure there is a name for them) just right. I would think most of the time you would end up with at least one of the rails being off.

Where do people try and get their bunk rails to rest/align with the hull?
 

Attachments

  • photo241925.jpg
    photo241925.jpg
    159.6 KB · Views: 4
  • photo241926.jpg
    photo241926.jpg
    195.3 KB · Views: 4
  • photo241927.jpg
    photo241927.jpg
    183.4 KB · Views: 8
  • photo241928.jpg
    photo241928.jpg
    140 KB · Views: 4
  • photo241929.jpg
    photo241929.jpg
    160.6 KB · Views: 5

Watermann

Starmada Splash of the Year 2014
Joined
Jan 12, 2013
Messages
13,753
You don;t want the bunks sitting on the chines. I used 4 bunks for my Chief trailer due to the weight of the V6 but it couldn't hurt to have them even on a OB 16'r. I would put 2 bunks even between the chines and keel strip and 2 on the outside even between the chine and edge of the boat.

This bunk has flipped over to the side on your trailer, I would fix some of those problems before being inside working so you don;t end up causing damage.

fetch
 

PikeHunter431

Petty Officer 2nd Class
Joined
Sep 8, 2015
Messages
171
You don;t want the bunks sitting on the chines. I used 4 bunks for my Chief trailer due to the weight of the V6 but it couldn't hurt to have them even on a OB 16'r. I would put 2 bunks even between the chines and keel strip and 2 on the outside even between the chine and edge of the boat.

This bunk has flipped over to the side on your trailer, I would fix some of those problems before being inside working so you don;t end up causing damage.

fetch

I was thinking it would be good to fix now while the motor is off and some of the inside is out. It seems that the bunks end about 15" from the transom. I would think that when I replace them, they should go back to support the transom as well (and perhaps keep the knee brace from breaking again.) That would make bunk end about 18" from the last bracket to the trailer. I would suppose that using 2x6's for two of the bunks may be better with kind of overhang?
 

PikeHunter431

Petty Officer 2nd Class
Joined
Sep 8, 2015
Messages
171
No Title

Made some progress last weekend. Picked up new bunk boards and angled the rear edges. Started working on getting the trolling motor in. Cut the bow tubing and removed most of the hardware. Took the tops off the bow compartments to work on battery wiring. I put some plywood up under the bow to support the trolling motor bracket. I also cutout a section of the transom for the motor to tilt up into the splash pan area. I am anxious to get sparring, but the weather turned cold again.

How warm does it need to be to spar the plywood?

I also ordered most of the stuff I will need before the May trip: Bolster brackets and stainless staples for the bunks, the aerator, valves, fittings and hoses for the live well set up, two seat post sets, various gauge wire, etc. I still need to order the vinyl and adhesive, as well as pick up some rollers for the trailer.
 

Attachments

  • photo242860.jpg
    photo242860.jpg
    105.4 KB · Views: 3
  • photo242861.jpg
    photo242861.jpg
    181.2 KB · Views: 3
  • photo242862.jpg
    photo242862.jpg
    120.9 KB · Views: 3
  • photo242863.jpg
    photo242863.jpg
    194.1 KB · Views: 3
  • photo242864.jpg
    photo242864.jpg
    136.7 KB · Views: 3

PikeHunter431

Petty Officer 2nd Class
Joined
Sep 8, 2015
Messages
171
No Title

Lifted the boat this morning and removed the bunk brackets. I believe I will move these toward the outside edge under the hull. The brackets angle on two sides to hold 2x4's. I have Bolster brackets coming in for the 2x6's and plan to have these closer to the center of the hull, supporting more of the weight, particularly the motor.

I also mixed up WOGs Old Timers Formula (1,2,1) with the products sold and put the first coat on one side of everything, flipped the bunk boards and did the back side of those.

I know I need to do at least one finishing coat of just the spar.

What about:
1) wait times between coats of WOGs Old Timers Formula?
2) wait time after the last coat of WOGs Old Timers Formula for curing?
3) wait times between coats of just the spar?
4) wait time after the last coat of Spar for curing?
5) Number of coats of WOGs Old Timers Formula?
6) Number of coats of just spar?

I am sure different people have done different numbers of coats of each sealer, just curious what combinations people have used and liked.
I imagine the answer could also be different for a) Transom, b) floor panels, c) trailer bunk which are not plywood.

As always any help and insight is appreciated.
 

Attachments

  • photo242887.jpg
    photo242887.jpg
    157.1 KB · Views: 3
  • photo242888.jpg
    photo242888.jpg
    154.9 KB · Views: 3
  • photo242889.jpg
    photo242889.jpg
    155.6 KB · Views: 3
  • photo242890.jpg
    photo242890.jpg
    171.9 KB · Views: 3

Watermann

Starmada Splash of the Year 2014
Joined
Jan 12, 2013
Messages
13,753
The answer has to do with the environment mostly, when the stuff is dry enough that you can flip it over without it sticking to something then it's time to put on another coat. How many coats is up to you and the type of ply. I would put on 2 and 2 of the OTF and spar.
 

jbcurt00

Moderator
Staff member
Joined
Oct 25, 2011
Messages
24,871
Yep ^^^ and coat all the edges w every coat on the faces. That way the edges have twice as many coats.
 

PikeHunter431

Petty Officer 2nd Class
Joined
Sep 8, 2015
Messages
171
No Title

After I finished the spar coats on the bunks, I picked up some carpet at HD and used stainless staples to attach it. I removed the original pipe brackets, wire brushed and painted them. I had to drill some new holes in the cross members to get the brackets all the way to the outside. I attached the new 2x4 bunks and positioned them so they reached the end of the hull. I also picked up some bolster brackets, painted them, mounted them on the inside and put the 2x6 bunks on them (again running them all the way to the edge of the hull.) There is probably some fine tuning of bracket angles, but it is a vast improvement already.
 

Attachments

  • photo244222.jpg
    photo244222.jpg
    158.7 KB · Views: 6
  • photo244223.jpg
    photo244223.jpg
    156.9 KB · Views: 5
  • photo244224.jpg
    photo244224.jpg
    113.6 KB · Views: 5
  • photo244225.jpg
    photo244225.jpg
    148.3 KB · Views: 6
  • photo244226.jpg
    photo244226.jpg
    132.9 KB · Views: 6

PikeHunter431

Petty Officer 2nd Class
Joined
Sep 8, 2015
Messages
171
No Title

The sealing and sparing continued. I did 3 coats of WOGs OT formula and 2 coats of spar. It has been cold and rainy for the last month. This did not help the dry time at all. We had three rounds of hail on Sunday. The admiral finally suggested I finish the last coat in the kitchen and let it cure in the house or we wouldn't be splashing until the end of the summer. It has been curing for three days now.
 

Attachments

  • photo244227.jpg
    photo244227.jpg
    170.1 KB · Views: 3
  • photo244228.jpg
    photo244228.jpg
    203.8 KB · Views: 3

PikeHunter431

Petty Officer 2nd Class
Joined
Sep 8, 2015
Messages
171
No Title

We started working on the electrical in the bow and it was clear the floor there was shot. So, I took out the aluminum bow platform support and the rotted plywood, and put in a temporary unsealed piece of 3/4 plywood I had from scraps. We were then able to work under the very front to mount the trolling motor bracket and wire up the nav light and a go-bee light. (my fishing partner surprised me with the go-bee light - seems he wants me to be able to see where I am driving. I often slow drive on the river without a light [no boats around] and folks seem to get nervous sometimes.)

We also ran the battery wires for the trolling motors. I am placing one on each side, in front of the consoles. I started cutting aluminum angle to make a temporary deck in the bow. I had some 18" wide plywood and thought I might be able to just section it and leave the deck a bit high. But I think it is too high and I need to cut it down a few inches, even for a temporary platform.
 

Attachments

  • photo244229.jpg
    photo244229.jpg
    153.3 KB · Views: 3
  • photo244230.jpg
    photo244230.jpg
    176.6 KB · Views: 4
  • photo244231.jpg
    photo244231.jpg
    107.1 KB · Views: 3
  • photo244232.jpg
    photo244232.jpg
    145.3 KB · Views: 3
  • photo244233.jpg
    photo244233.jpg
    155 KB · Views: 3

PikeHunter431

Petty Officer 2nd Class
Joined
Sep 8, 2015
Messages
171
No Title

We mounted a 4 bank battery charger under the passenger console, but had to put a piece of 1/4 plywood on the other side. The console wood is shaky, but that will need to wait until July for replacement. My son rewired everything under the dash, and ran the wiring to the stern for the starter and house batteries which will be there. We also started wiring up some rocker switches for the bilge pumps and live well aerator.
 

Attachments

  • photo244234.jpg
    photo244234.jpg
    137.8 KB · Views: 3
  • photo244235.jpg
    photo244235.jpg
    127.3 KB · Views: 3
  • photo244236.jpg
    photo244236.jpg
    157.5 KB · Views: 3
  • photo244237.jpg
    photo244237.jpg
    134.7 KB · Views: 3

PikeHunter431

Petty Officer 2nd Class
Joined
Sep 8, 2015
Messages
171
No Title

I now have two coats of primer and two coats of white on the transom skin, inside and out. The outside will be sanded down in July, so I just used standard Rustoleum spray enamel in semigloss for now.

I have today (Thursday) off and plan on putting the transom back in. Now when we tried a test fit, it was very tight and I didn't put it all the way in. Given we have now sparred it and I painted the transom skin, I expect a BFH approach will be necessary.

I see a lot of people spread 5200 on the transom when putting it in. I have not used the 5200 yet ( I do have it) and am not feeling very comfortable about layering this on and then trying to get this major piece in. I expect if I don't, there will be a gap between the transom and the skin before I install any motor bolts or other mountings.

What are people's thoughts about:
1) not putting the 5200 on the transom
2) maybe just putting 5200 on the inside of the z-brace
3) trying to put some on after it is in, particularly around the top where the skin meets the transom
4) any suggestions (advice) about going ahead and putting it on the transom.

Your consul and experience is appreciated as always.

Sidenote: I think the crew is getting a little anxious as I need to be ready to leave and splash in 8 days

Terry
 

Attachments

  • photo244238.jpg
    photo244238.jpg
    153.9 KB · Views: 3

classiccat

"Captain" + Starmada Splash Of The Year 2020
Joined
Dec 20, 2010
Messages
3,405
Definitely "no" on smearing 5200 on the inner transom skin! :eek: 
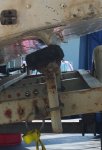
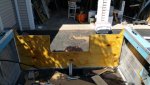
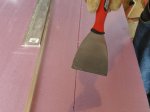
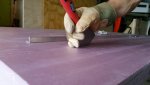
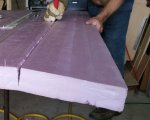
I think you're confusing it with guys buttering-up a new sheet of aluminum for the outer hull skin to cover-up severe corrosion.

Your freshly-painted transom skin looks great btw! :thumb:
 

Watermann

Starmada Splash of the Year 2014
Joined
Jan 12, 2013
Messages
13,753
I second that NO 5200 on the transom, it only goes in the through bolt holes.

Looking good with the forward progress, lots of smalls add up quick towards completion. :encouragement:
 

PikeHunter431

Petty Officer 2nd Class
Joined
Sep 8, 2015
Messages
171
No Title

In the mad dash before Memorial Day, I didn't get any updates made. So here is what was accomplished.
May 19th
Got the transom in. It went in like a breeze, which was counter intuitive since it was too tight to get past half way when unfinished, then added the spar coats, prime and painted the hull where it contacts.
Scope creep 1. I took the old floors out to put foam in and decided I needed to take the remaining section of old plywood out (the one under the consoles) and replace it now. With my "not light footed" crew, the wood between the consoles was giving way and not going to last for the two weeks I needed it for.
Scope creep 2 would come a bit later when I decided I needed to go ahead and take the panels off the front of the consoles. The wood on the driver side was just disintegrating on the bottom.
 

Attachments

  • photo245913.jpg
    photo245913.jpg
    128.8 KB · Views: 4
  • photo245914.jpg
    photo245914.jpg
    166.6 KB · Views: 4
  • photo245916.jpg
    photo245916.jpg
    172.5 KB · Views: 4
  • photo245917.jpg
    photo245917.jpg
    170.6 KB · Views: 4

PikeHunter431

Petty Officer 2nd Class
Joined
Sep 8, 2015
Messages
171
No Title

May 21st:
I was reading about ways to cut foam and came upon someone who used a 3 "putty knife. The idea was the blade is thin and doesn't continue to wedge out like a knife blade does. I was able to find a 4" putty knife, sharpened the end a bit, used some angle aluminum to make straight lines down the 8' sheet, ran the knife down twice and could snap the pieces off. All in all, I was pretty satisfied with the outcomes. We also found that you could drag the knife with blade trailing.
 

Attachments

  • photo245955.jpg
    photo245955.jpg
    109 KB · Views: 3
  • photo245956.jpg
    photo245956.jpg
    113.3 KB · Views: 3
  • photo245957.jpg
    photo245957.jpg
    122.3 KB · Views: 4
  • photo245958.jpg
    photo245958.jpg
    104.1 KB · Views: 4
  • photo245960.jpg
    photo245960.jpg
    152.8 KB · Views: 5

PikeHunter431

Petty Officer 2nd Class
Joined
Sep 8, 2015
Messages
171
No Title

May 22nd:
Mounted the board between the hull and motor (with 5200 on the bolts). Also mounted the knee brace fix (again with 5200 on the bolts). I cut some aluminum pieces to act as spacers between the top of the brace and the transom. This was the first time I cut aluminum. The miter saw worked like a charm and the edges were easy to clean up with the grinder/wire brush combo I have.

I also installed a through-hull inlet on the port side of the knee brace. This is for the live-well concoction I am making.

The foam cutting continued.
 

Attachments

  • photo245961.jpg
    photo245961.jpg
    119.7 KB · Views: 4
  • photo245962.jpg
    photo245962.jpg
    160.4 KB · Views: 4
  • photo245963.jpg
    photo245963.jpg
    154.2 KB · Views: 5
  • photo245964.jpg
    photo245964.jpg
    159.2 KB · Views: 4
Last edited:

PikeHunter431

Petty Officer 2nd Class
Joined
Sep 8, 2015
Messages
171
No Title

May 24th:
Put down the 2 rear sections of new flooring. Man, the wood looks nice all sparred up. Almost seems a shame it is all going to be covered up.

I picked up a section of aluminum fence a guy was tossing away. I cut the 2x2 pieces to make two upright posts and a then a piece for a cross support (which will be part of the rear casting platform.

We had installed a rear electrical box and finished up most of the wiring for the rear. Part of it was installing 2 bilge pumps (one with a float switch) and the inlet valve switch / aerator pump for the live well.

And, of course, more foam.
 

Attachments

  • photo245966.jpg
    photo245966.jpg
    166 KB · Views: 4
  • photo245967.jpg
    photo245967.jpg
    176.6 KB · Views: 4
  • photo245968.jpg
    photo245968.jpg
    168.5 KB · Views: 4
  • photo245969.jpg
    photo245969.jpg
    158.3 KB · Views: 4

Watermann

Starmada Splash of the Year 2014
Joined
Jan 12, 2013
Messages
13,753
Nice to have some forward progress and movement towards the rebuild. I see the transom going in as a milestone with the decking soon to follow after the foam job. :thumb:
 
Top