1973 21' Starcraft Chieftain project

jpormen

Petty Officer 2nd Class
Joined
May 24, 2011
Messages
172
Also when it's time to replace the front motor mount should I build it how the previous owner did?
 

Watermann

Starmada Splash of the Year 2014
Joined
Jan 12, 2013
Messages
13,753
:welcome: to the Starmada!

Good move from the lost sea of rotten glassers, I normally scan the resto forum but I missed your Chief thread somehow. :confused:

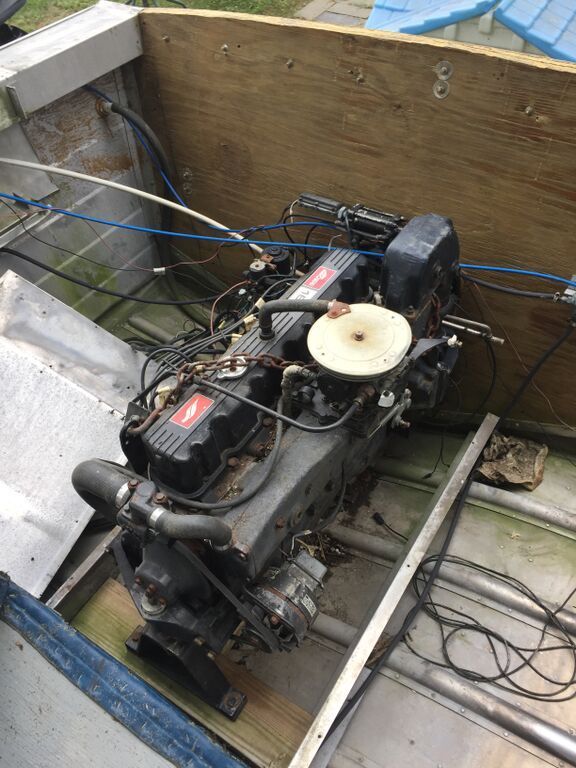
Yeah that front motor mount should have a 1.5" piece of ply that rests on top of the ribs that are fore and aft (rests on 3 ribs) and is attached to the cross piece the mount is bolted to so the weight is spread out more. I can't tell if the mount has that piece underneath.

Something else I can't see is the "horse collar" that goes around the keyhole where the motor mounts to the transom. It may be there but if not that's going to be a problem as the transom needs it to be the correct thickness.

bi-c1iTLgBsVNL2mtttWBSP04h4CMr74Jn0D5Facub0_zpsj4bgkgyx.jpg


Some suggestions for your motor.
I can see the exhaust and intake manifold is on the motor, it's one piece.

I would pull the spark plugs and check them for any signs of water. With the plugs out I would turn the motor over to make sure it moves freely and then oil fog the cylinders and turn it over some more before putting the plugs back in.

Check the motor oil and look for any sign of water intrusion.

Inspect and replace the ignition parts if they look bad. (Points, condenser, cap and rotor)

Make sure the water drain plugs are in place and tight on the block and manifold.

If you're going to add fuel and a battery then put a garden hose in the water inlet where the outdrive mates up. Looking at it, to the left of the large hole is a smaller one that is the water inlet.
 

oldhaven

Chief Petty Officer
Joined
Aug 30, 2015
Messages
568
Hello JP,

You are about where I am with my 18 ft Starchief, though she is an outboard boat. I will follow you along on your project, and if you want to keep up with my trials, look under the title "Another Maine Starchief", or look for it under my member information. I expect we will both end up in the Starcraft restoration links too. I also want to get to a positive stopping point before winter shuts down outside work. I feel better about mine already after getting it cleaned out and getting rid of the accumulated sins over the years. Have fun


Ron
 

jpormen

Petty Officer 2nd Class
Joined
May 24, 2011
Messages
172
We checked the oil, wasnt much in it but the oil was not milky. on sunday we put some oil in the motor, little bit of gas in the carburator and replaced the ignition coil, we fired her up for about 2-3 seconds with no motor going to it and she fired. The gas lines need replaced and we need to switch out the carburetor with a spare we have before we run water through it and let it run.
 

jpormen

Petty Officer 2nd Class
Joined
May 24, 2011
Messages
172
She's coming along nicely, just need to get the debris and water out of the hull and then get the windows out and ill be put down some gluvit and painting the inside, then foam then floor. Then once the floor is in ill tackle the motor mount and transom. I know its kind of out of order of how people do it normally but i took a pretty hard fall inside the boat today.


Watermann

Starmada Splash of the Year 2014
Joined
Jan 12, 2013
Messages
13,753
Once you get her all cleaned up and do the leak test, check the rib ends closely for any cracks that may have formed. Your year model doesn't have the hull stiffeners installed so cracking could be an issue. Mine were small and only visible from the outside underneath where the rivet heads are. They require repair as gluvit won't stop them from continuing to crack.

IMAG1143.jpg


Forgot to mention to also check the entire length of the spray rail as well as other have had issues with cracking that splits the side out in the center of the bend. Normally all this damage is caused by a PO running the boat with compromised decking and side panels not properly supporting the hull.
 
Last edited:

jbcurt00

Moderator
Staff member
Joined
Oct 25, 2011
Messages
24,871
Once you get her all cleaned up and do the leak test, check the rib ends closely for any cracks that may have formed. Your year model doesn't have the hull stiffeners installed so cracking could be an issue. Mine were small and only visible from the outside underneath where the rivet heads are. They require repair as gluvit won't stop them from continuing to crack..
Rob, how much GluvIt did you use on your 18ft Chief? And what's its beam? Same as JP's or not quite as wide?

JP, I agree, you may not need the larger 8lb Gluvit can, but IMO you'll definitely need more then one of the 1.8lb cans to do the seams and rivets, as well as the rivets along the edges of all the ribs.
 

jpormen

Petty Officer 2nd Class
Joined
May 24, 2011
Messages
172
I'll make sure you check for Cracks along the outside rivets. I'm gona buy a paint sprayer from harber freight and try to teach my self how to use a spray gun, I'm pretty bad ass with a rattle can so I hope I can put my rattle can skills to use wth a spray gun
 

Watermann

Starmada Splash of the Year 2014
Joined
Jan 12, 2013
Messages
13,753
I believe the 18'r has an 81" beam. What matters most is the seams and for sure his Chief has more feet total than I had. I used the 1 quart size on the seams and still had some left over to make a puddle in the keel and do the rivets in the field between the ribs that hold on the chines. Where I ordered gluvit from the sizes were labeled as 1qt and 1 gal rather than by weight. I'm thinking the 2 Lb are quarts and I would have to say that 2 of them would be plenty without having a bunch of left overs to go to waste. The stuff is pretty runny and goes a long ways. I used 1 qt on my SN and was able to go over the seams and rivets twice with lots of wasted run away product too since I didn't really know what I was doing the first time out..
 

jpormen

Petty Officer 2nd Class
Joined
May 24, 2011
Messages
172
Got some goodies today! Just starting with the small can of gluvit and will get more as needed


delms82

Seaman
Joined
Jun 10, 2014
Messages
52
Curious, how would you compare the crestliner weld construction to the Starcraft rivet?
 

jpormen

Petty Officer 2nd Class
Joined
May 24, 2011
Messages
172
Got gluvit put down on all the seams and rivits, going to buy wood for the floor soon, anyone have recommendations for epoxy? When I did the crestliner I used decksealer and its held up great over the past few seasons no soft spots or rot at all
 

Watermann

Starmada Splash of the Year 2014
Joined
Jan 12, 2013
Messages
13,753
No hull repairs needed?

I'm a spar user so I don't have any experience fiberglass resins for sealing decks.
 

jpormen

Petty Officer 2nd Class
Joined
May 24, 2011
Messages
172
No hull repairs needed, filled her up full of water and crawled under it and didn't find any leaks, went ahead and covered 85 percent of the seams and rivits. Didn't find any loose rivits either.
 
Top