Another Maine Starchief

oldhaven

Chief Petty Officer
Joined
Aug 30, 2015
Messages
568
Good idea. I have a ramp on Merrymeeting Bay (tidal but fresh water) just two miles from my house. No trouble to stop after an ocean trip and do a dunk and motor rinse out unless the ramp is very busy. Most of my trips will be in fresh, but the whole coast of Maine is out there waiting too. Getting way ahead of myself though.
 

oldhaven

Chief Petty Officer
Joined
Aug 30, 2015
Messages
568
In the couple of good days that just ended I managed to get the neoprene strips done on the twelve ribs that my tanks will rest on. I used 5200 that will take a while to dry with the tanks sitting on the strips until then. I can't get into the boat except very carefully until that dries a bit, but can't do much much anyway since the rain and cold will be here until mid week. I also have the deck panels and the cabin bulkheads painted with high build primer/surfacer. I'm afraid any top coating will have to wait for a few days, but I am using a roller on these panels anyway, and that should go quickly when the weather breaks. I will be able to prep the v-berth supports for painting in the barn under cover as my next chore. That will be a spray job, so again, good weather needed. I have also been working on redoing a nice set of teak bi-fold doors for the cabin, and also picked up some folding teak step footrests for the helm and passenger positions. These will bolt to the cabin bulkheads and leave the deck clear for snap in carpeting. I cleaned them up, fixed a couple of cracks in the door frame and I am using teak oil instead of varnish due to how they will be used, so it will be easy to reapply yearly without varnishing. No pictures right now since they are apart for this job, but I'll have some soon when I reassemble things.

I will be picking up the foam panels for flotation and as soon as the tank supports are solid I can start on putting in panels. I am going to keep most of the wiring above deck, but will have a fuel line to run from the forward tank. I have decided that since I have the 1/8 wall thickness rectangular tubing at the rib ends, I am going to install rivet nuts so the deck can be removed. I know I had misgivings about this in previous posts, but that was about putting them into the somewhat iffy curved and thin ribs themselves. These will be 1/4-20 stainless steel rivet nuts with ribbed exteriors and I will use SS truss head bolts in them with a special thread lubricant. I'll let you all know how it goes, since it involves a similar arrangement at the stringers and a few other places, like the sidewalls. I intend to do a bit of work modifying the boat over a couple of years after first splash, and the ability to remove the deck might come in handy, in addition to the inspection and maintenance advantages.

One final thing. In inspecting the hull up in the cabin I found a bit of corrosion (not the worrisome kind) up above where any water should reasonably be expected to be, and it was in a rain protected area right under a big mouse nest I took out last fall. I wonder how much that acidic mouse urine in soaked nesting material contributes to corrosion, and even when drained into in the bilge if it sits in the bottom of the hull away from the rodent houses? Little buggers!

Ron
 

Watermann

Starmada Splash of the Year 2014
Joined
Jan 12, 2013
Messages
13,753
Even with the foul weather your out there making forward progress, that's what it takes alright. I wish you had some of my 80 degree sunny weather to help out your boat work. :joyous:

Looking forward to seeing some of your ideas put into your Chief build.
 

oldhaven

Chief Petty Officer
Joined
Aug 30, 2015
Messages
568
It has been two weeks and time to catch up on what I have been up to since May Day.

I left off with installing tank supports and divider bulkheads, and that went well. the 5200 cured and the neoprene strips are on for good. I also made the tank hold downs and this was my first experiment with rivet nuts. I used 1/4-20 stainless steel rivnuts and the neoprene was riveted to the angle. The 3/16 rivets pulled down below the surface of the neoprene, so no contact with the tank. I used Permatex Nickel based Never Seize with the SS truss head screws into the SS nuts. this contains no copper and is designed for use with SS. I also used bearing stake loctite between the rivnuts and the 1/8 angle brackets, though I don't think this was necessary as the SS ribbed nuts pulled up very tight and I don't expect them to loosen. I was more worried about the SS to SS thread joint galling or corroding eventually, but we'll see. My goal is to be able to disassemble to this point again without drilling rivets. strcrft wrk 012.jpg
strcrft wrk 007.jpg


Next was starting to get some foam into the hull. The deck risers and stringers provided a nice hold down for the 1" foam between the ribs, and here you can see the tanks support structure. strcrft wrk 010.jpg


Also, a question about the sidewall end pieces for those of you with OB boats: You can see here that the base of this part has an angle that mounts to the deck. All the other projects I looked at have the angle on the bottom installed on the keel side of the part, while mine is mounted on the outboard side. I am sure this is original since the rivet holes do not allow any other configuration. . This makes it hard, but not impossible to install the fasteners, but I will go with it. strcrft wrk 011.jpg


Next, I painted the interior of the cabin and the berth supports as the next logical step in the process. That all has to be done before the cabin bulkheads can be put in. I had to remove or wire brush all the loose paint from the cabin interior and strip the berth supports. This assembly had been modified to accept the forward tank. I used Rustoleum products for this part of the painting, since I will probably cover the cabin interior with carpet or vinyl eventually, and did not want to use expensive PPG paint for that base. So, SE primer in cans with a convenient handle to save my right finger, Clean Metal Primer in an HVLP gun and then Gloss Almond Rusto with Majic hardener. It turned out pretty nicely, and the hardener cured the paint in an overnight to a very hard finish that I have been able to handle roughly during installation and crawl around on without damage. strcrft wrk 009.jpg


The decks and bulkheads are Coosa and were done with PPG Omni products over West epoxy. The paint is an acrylic urethane single stage automotive paint with hardener over a hardened high build primer. It was all done with a foam roller and turned out OK. It was a bit like roller painting the bedroom, except for the protective gear. This stuff is pretty toxic without a good mask, and I did it outside or in the opened up barn with a breeze blowing through. The color is Ford Wimbledon White. It is a bit lighter than the Rusto Almond, but I like the contrast where the two are used in the same space. The bulkheads turned out glossy, but I used Epifanes non skid beads on the decks final coat. This is an interesting product. When I mixed about two tablespoons full of what looked like a fine white powder into the urethane paint and waited about twenty minutes, the powder turned into a very fine grit that was distributed throughout the 300ml or so of paint. It absorbs the paint so it has the same color and is not hard on the feet or knees. Applied with a short fur roller it went on easily and looks right. This paint is hard and durable after an overnight and I am happy with it. I will eventually be putting snap in carpet over it so I have choices of what to use. strcrft wrk 008.jpg


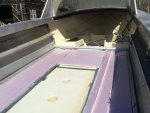
I finished up the tank installation and put in two full sheets + of 1 inch foam in prep for the deck and bulkhead install. I also ran some watertight flex conduit and put the forward tank fuel line in one of them. the other will be for wiring, though most will be above the deck under the gunwales. strcrft wrk 006.jpg


Then came the fun part, putting in the decks and the bulkheads. The bulkheads went in easily but the decks required several hours since I was installing rivnuts in the deck risers and stringers. Everything had to be done carefully so it all lined up in all the layers and so the nuts were centered in the stringers. The nuts in the rib end risers will double as the fasteners for both the deck and the sidewall base aluminum, so position was important here too. You can see the writing on the hull with the measurements needed for each nut location.

The good part here is that so far there is nothing in the decks, bulkheads or below that can rot, and I should be able to pull everything out again in an afternoon if I need to get to the tanks or the hull for maintenance or repair. I will depart from that from here on by installing wood parts, but will still use removable fasteners where it seems necessary. I just hope this works and I am not fated to be cursed by next owners after 40 year old thread joints lock up anyway.

You can see the rivet nut tool in the package shelf in one of the photos strcrft wrk 004.jpg
strcrft wrk 003.jpg


strcrft wrk 002.jpg


Finally, here are the cabin door and footrests I picked up used and refurbished. The door is too short for a standard Chief door area, but fits the area above the boxed in chase I will be building to cover the forward tank fill and vent. the forward cabin will be nore af a storage area for us, and access will be compromised by the tank , but that's fine. strcrft wrk 001.jpg


Next is the remaining foot of deck at the aft end of the boat and installing the sidewalls and steering/instrument console. the splash well is necessary, since i want to get the motor put on in the next few weeks. I will be launching it unfinished with just enough done to meet requirements, and it may take a while to get the outside of the hull done. I do have to paint the cabin top so the upper windshield can be put on, and the gunwales so I can reinstall hardware. In a car rebuild this would be called a rolling restoration. I'm not sure what it is called for a boat. Maybe a floating restoration?
 

Attachments

  • strcrft wrk 005.jpg
    strcrft wrk 005.jpg
    295.8 KB · Views: 6
Last edited:

laurentide

Lieutenant Commander
Joined
Jul 24, 2011
Messages
1,869
Ron, this is looking fantastic. Really impressive and well thought-out execution. She's gonna be bulletproof.

My sidewall end trim has the tab pointed inboard. I don't have a better photo at the moment.

zoshw28.jpg
 

Watermann

Starmada Splash of the Year 2014
Joined
Jan 12, 2013
Messages
13,753
Some super nice work and you're sparing no expense with the upgraded materials. You should have plenty of fuel to get you around on the water, looks like the entire belly is one big tanker!
 

MARUSS

Seaman
Joined
Jul 12, 2015
Messages
60
Very, very nice.
It's nice to see you coming along with such detail and great ideas.
With the pace your going you'll be on the water in no time.
 

FrankenCub

Petty Officer 1st Class
Joined
Dec 29, 2015
Messages
296
You're smokin right along, be no time and you'll be cruizin in her. Finally having decent weather sure helps.
 

Patfromny

Lieutenant Junior Grade
Joined
Dec 2, 2012
Messages
1,197
Looking great oldhaven. Just read the whole thread. You Starcraft guys have a lot more fun with your tin than I did. Moving stringers and the such. Love all the fuel capacity. Floor looks great. Nice and symmetrical. Well thought out from start to finishing....
 

oldhaven

Chief Petty Officer
Joined
Aug 30, 2015
Messages
568
Thank you all for the encouragement. I am afraid that despite the optimism, it will be a few weeks until I get this thing in the water. When I was buying the boat from its last owner I spent about a full minute in silence just before saying I would take it. He asked if something was wrong, but it was only that I thought I knew what I was getting into, and I wasn't sure I needed that much of a project. I had just finished a years long restoration of an old motorcycle, and was kind of burned out on the obsession it takes to get these things back in shape. It is only now that I realize I had badly underestimated how much time and energy, and yes..money.. this would turn out to take. In the beginning, reading others restoration threads without having done it myself, it was hard to fathom how much you guys who have done this had to do, even with a couple of days of reading in some of them. Now I get it. I don't mean this to discourage anyone, since I am having a great time with the project and expect to be rewarded by years of good times. I just want to say I appreciate the kind words and advice from you all.

Ron
 

Watermann

Starmada Splash of the Year 2014
Joined
Jan 12, 2013
Messages
13,753
^^^ Amen to all of that! and obsession is the right word, just don't let this become an addiction :lol:
 

laurentide

Lieutenant Commander
Joined
Jul 24, 2011
Messages
1,869
Ron, you're closer than you think you are. Don't sweat the cosmetics for now and get it wet. Time on the water in the boat will tell you what you really need vs what you think you need now. You have a big leg up on the power side of things with the new Merc...no troubleshooting on antique 2 stroke carbs etc.

As you know, your project is going above and beyond what a lot of us have done to get the boat useable again. I'm really looking forward to seeing the finished product, but don't pressure yourself or give yourself arbitrary deadlines. Take breaks, keep up on the house chores, and try to enjoy the process. Not that I need to tell you any of that.

FWIW, I'm taking a lot of inspiration from your rebuild that may be put back into my own current boat a couple of years down the line when I can afford a repower (after my truck and CC are paid off).

PS: have you seen the prices on new aluminum boats under 20'? That's a huge motivation right there. You'll have a gorgeous yet utilitarian vintage boat without the payment or ugly molded plastic trim.

Keep your eye on the prize.

If you can get her splashed by December 31 you'll have a formidable entry for SOTY!
 
Last edited:

Patfromny

Lieutenant Junior Grade
Joined
Dec 2, 2012
Messages
1,197
I agree with Watermann and chemicalwire. Hard deadlines are a bad thing. This should be fun and rewarding. As you know from reading my thread, I toke the three plus year plan and the best parts were using the boat finished or not. I had a deadline each year because I leave it 4 hours away and it is used by the whole family. My deadlines were usually the weekend before anyone was going up. But I left some things alone if I didn't have the time. Believe me, you will still have the big grin of accomplishment the first time she floats...even if only half of her is polished or there are no seats. The fact that you are going to such lengths to get her right is all you'll need. Using her in between stages is the best therapy. It recharges the batteries and also gives you seat time in her to possibly rethink original plans and modify them according to real time situations. It's not unfinished, I'm doing research. Lol. Don't worry about it being done in a month. If it takes you a few more weeks so what...it's a boat. And a nice one too.
 

MARUSS

Seaman
Joined
Jul 12, 2015
Messages
60
I've come to the same realization as you. You have a real good handle on your project though, and you'll be in the water this year. I take my hat off for you for all the obstacles you.ve run into and have overcome to get to where you are now. You have given me plenty of good ideas and solutions to implement on my project and it does seem like every time you open something up your project gets bigger and bigger like a bad nightmare coming true (lol) I don't have to tell you your living it.When it's all said and done and your out on the water cruising to your favorite spot you'll say it was all worth it.
​Keep on keeping on Ron and thanks.
 

oldhaven

Chief Petty Officer
Joined
Aug 30, 2015
Messages
568
"obsession is the right word, just don't let this become an addiction"

"don't pressure yourself or give yourself arbitrary deadlines. Take breaks, keep up on the house chores, and try to enjoy the process."

"Hard deadlines are a bad thing. This should be fun and rewarding"

"When it's all said and done and your out on the water cruising to your favorite spot you'll say it was all worth it"

I need to print these words out and put them up on the shop wall. Still, I think I am on the down slope of the work toward launch curve now. I got the steering console fitted, the last foot of the deck painted and in, the cabin sole done, and the sidewalls cut and fitted and I am putting on coats of varnish so they can be put in for good. I was surprised at how much space is behind there, and I may be able to get most of a sheet of 1 inch foam in. Next project is the splash well and painting it and the transom outside skin and any final jobs needed to hang the outboard. For instance, the gunwales have to be painted so I can put on the hardware that will be made impossible to install if the full width splash well is in. I am looking forward to that since it will be the first Damask Red paint I put on. For the next few days I am taking Andy's advice and heading up North for some walk in the woods and family time. I will still be doing planning for the next chores, (including the house chores) and can get the forum through my phone, but taking a break will be a good thing.

Ron
 

classiccat

"Captain" + Starmada Splash Of The Year 2020
Joined
Dec 20, 2010
Messages
3,405
"don't pressure yourself or give yourself arbitrary deadlines. Take breaks, keep up on the house chores, and try to enjoy the process."

^^^ My restoration mantra right there! Very wise words chem! :nerd: :thumb:
 

laurentide

Lieutenant Commander
Joined
Jul 24, 2011
Messages
1,869
^^^ My restoration mantra right there! Very wise words chem! :nerd: :thumb:


Ha, thanks. The project keeps going long after the initial splash, and I enjoy the small boat projects almost as much as a good day of fishing on the lake.

And launching next to a guy with $100K in combined boat/truck payments feels pretty darn good!
 

Patfromny

Lieutenant Junior Grade
Joined
Dec 2, 2012
Messages
1,197
And launching next to a guy with $100K in combined boat/truck payments feels pretty darn good!

You know, when I tow my little boat upstate or home from the lake it is a four hour trip. Over the course of that 4 hours, I think more than half the people passing me slow up for a looksie of my boat before passing. It makes me laugh that this little 16 footer gets so much attention. When I was towing her home for the first time to restore her she was in real rough shape. I had the engine inside because the transom was so bad and it was just not in good shape. I still had people slowing for a look. I was about 15 minutes away from home on the long Island expressway and this truck is cruising up on me hard. He must have been going 80. He slows, takes a look at the boat and stomps on it roaring by me....it was a brand new extended cab Dualie with like a 20 foot bass boat behind it which also looked very new. I had to laugh that this million dollar set up was slowing to check out my ghetto bow rider with the engine between the back to back seats behind my 06 minivan. Sorry for the hijack, Chem just brought that story back into my old noggin.
 
Last edited:

oldhaven

Chief Petty Officer
Joined
Aug 30, 2015
Messages
568
We got back from a nice stay up on Russell Mountain and I got back to work on the Chief.

With the cabin bulkheads in I fitted the steering console for fasteners. It is off again waiting for longer bolts, and also for me to paint the inside of the cabin extensions so I can put it on permanently.
IMG_0429.JPG


So, with that hanging over my head I got busy on the paint. I was going to paint the splash well separately, but decided after dry fitting it that I would screw up the paint trying to get it in, so I went ahead and installed it. I had been worried that I would not be able to install the cleats, chocks and light after it was in, but the 3 inch vent holes are big enough for me to reach in there and put the nuts on the bolts or I can use sheet metal screws. I washed everything thoroughly with POR-15 metal cleaner/degreaser, which has a bit of an acid etch smell when used. It really cleans up the aluminum nicely. Then a rinse, and I applied PPG DX503 aluminum conditioner. This is a chromic acid based formula that creates a slightly gold colored chrome conversion layer on the metal. It has to be coated the same day, after rinsing off the excess and drying. Then an epoxy primer coating. I had used white primer on the transom skin and found it was hard to cover with the red I am using, so the rest was done with a black MP172 primer. I did notice that the difference in the final color is different with red and white primers, and the white primer gives a kind of candy apple effect, but takes a lot more paint to cover. I rolled on the primer, and that was not a bad way to go, though next time I will spray it. I was racing with the weatherman to get a nice day that was good for spraying outside. today was going to be hot, but dry, and I had to spray in the early morning sun with black primer, so I was very concerned.
IMG_0431.JPG
IMG_0433.JPG
IMG_0437.JPG


It turned out OK, (It sure is red), and the automotive production process paint dried tack free very quickly, (25 min) which was good because the poplars are throwing off their fuzzy floating seeds and I got a few in the paint before it tacked off. but not bad. Nothing I can't polish out. I made a decision to fill some of the holes in the gunwales with solid rivets instead of JB or MT. I am not sure I like that look, but that's how it is now. I wanted to be able to reuse some of them in the future. I will notice that less with all the hardware remounted. The bottom of the hull is the original paint still, though I did clean it up a bit. It is a slightly different red, but looks OK for this year. I will probably strip it eventually, and decide on repaint at that time.

The cabin top and sides will be the same white as the cabin bulkheads. I have to get that knocked out soon so I can mount the top windshield. Now I can start installing things, and that is a good stage to be at. After any more painting, first order of business is anything I need to do to hang the outboard so I can start rigging. With all new systems and nothing left of the old ones, that will be a process.

Ron
 
Last edited:

Watermann

Starmada Splash of the Year 2014
Joined
Jan 12, 2013
Messages
13,753
Paint is looking real good Ron, sounds like you're in the home stretch :thumb:
 
Top