Making a custom trailer guide-in - could use advice

bruceb58

Supreme Mariner
Joined
Mar 5, 2006
Messages
30,478
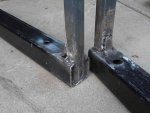
I wasn't thinking you would use horizontal guides. You can use the same concept with a vertical guide screwed into the vertical pole. Of course if your welding skills aren't up to snuff than you won't be able to do this. I have a 220V welder which is what you would really need for my style.

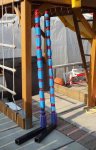
My tubes are 3" and 2 3/8" with 1/8" wall thickness.

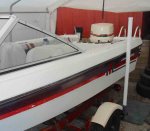
My guides are just guides. They don't do anything to precisely center the boat. They just help when it is windy. There is a big gap between them and the boat so that my cover fits between.

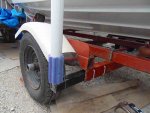
AS far as your tiedown goes, replace the rope with a wide webbing type tie down and you will be fine.
 

fhhuber

Lieutenant
Joined
Jun 19, 2014
Messages
1,365
The side bunks are a really GREAT addition to a boat trailer.
The tall poles at the back really just help you find the back corners of the trailer while its underwater, The boat will still go in crooked. the side bunks will force the boat to straighten out.
 

Joolz

Petty Officer 1st Class
Joined
Aug 13, 2015
Messages
211
No Title

Here it is, my very first welding job. Turned out surprisingly well, pieces seem to be there pretty good. Although I'm sure the experts may not share my enthusiasm based on the crude globs of weld all over the place. Welding sure is harder than it looks. Then again wonder if it's partially due to equipment. This is a very basic 70W welding machine I picked up on sale for $50. Used 1/16" rods (6013) and I was amazed by how fast these burn up. Honestly I don't even know if it melted the steel. Those 1x1 x 1/8" steel is super tough. But seem to be in place pretty good, bet it will take a few bumps and hold up to some abuse. As seen in the pic, had to improvise to get the bars as level as possible. Nothing beats bricks! Both turned out exceptionally straight, despite the crude technique.

The best part: finally put that welder to use. Been sitting still for about 2 years now, waiting for me to get the courage to finally give it a go. So yeah, this is being a lot of work compared to just buying something off the shelf but the experience is proving invaluable. Have tons of small jobs I can do around the house and the cars, so having gotten my hands dirty has been a great experience.

One thing is for sure though: will not be attempting to add bunk guides as Bruce's anytime soon. Not without a proper welder anyhow.
But hopefully these vertical guides and some better loading technique will get that boat centred and in a timely manner.
Picked up the PVC pipe from Home Depot and plan to finish it all tomorrow.
 

Attachments

  • photo271357.jpg
    photo271357.jpg
    42.7 KB · Views: 0
  • photo271359.jpg
    photo271359.jpg
    36 KB · Views: 0

dericke

Cadet
Joined
Jul 17, 2017
Messages
7
Nothing better than the satisfaction of building something from nothing. Great job.
 

bruceb58

Supreme Mariner
Joined
Mar 5, 2006
Messages
30,478
Yank on them like a boat is hitting them. If they break off, you need to weld them again. You need good penetration into both pieces. I would not have used 6013 rod but then maybe your welder doesn't have the power to use a 6010, 6011 or 6012.
 

gm280

Supreme Mariner
Joined
Jun 26, 2011
Messages
14,593
Joolz, everybody had to start somewhere. So if yours are strong enough to do the job, so be it. Practice, practice and practice some more is the only way to get good at most anything. Read some material on welding and watch some You Tube videos to see what others are doing. It never hurts.

I have soldered for well over 45 + years, but I have to admit, I like welding better then soldering now. Something about making a nice quality weld joint. And you will get to the point of hearing if there is anything wrong while you are welding. The sound of the welding will tell you instantly if it is right or wrong. Spitting and sputtering tells you there is contamination and/or other problems. A constant frying bacon type sound mean you are doing good. JMHO
 

Joolz

Petty Officer 1st Class
Joined
Aug 13, 2015
Messages
211
Nothing better than the satisfaction of building something from nothing. Great job.

Yep, couldn't agree more. But in this case, more necessity than anything, as I'm pretty sure the commercial ones wouldn't extend wide enough. Then I'd be stuck with a return or something I couldn't return. This was the kick in the butt I needed in order to finally get the welder out of the box. Win win all over.

GM, I totally understand what you mean. When I was finally able to control the paddle, it was a great feeling. Took a while to get there but seeing the bubbly stuff was a great relief. Now if only it would smell like frying bacon...
I can say that this was a very positive experience and one that I do plan to do as you subscribed: practice, practice, practice. I may also upgrade from this basic welder to something with a bit more heft. 70 watts does seem limiting as I'm sure you'd agree. But like you said, we all start somewhere. If I hadn't found this unit on sale I wouldn't have gotten one at all. And for someone like me that's always fiddling with stuff, a welder is just the thing that was missing. Let new projects come my way, happy to take on the challenge.

Unfortunately I chose the wrong day to get started on something so physical as welding (not the mention the mental toll in learning a new skill), as I had a bit of a cold. By the time I left Home Depot at 10pm (to get the PVC pipe) I was drained. Today I'm badly sick, totally useless. So the rest of the project will have to wait another day. Let me just say a big thanks for all the support I got from the members here. You made it possible with the good guidance and encouragement.
 

Joolz

Petty Officer 1st Class
Joined
Aug 13, 2015
Messages
211
Yank on them like a boat is hitting them. If they break off, you need to weld them again. You need good penetration into both pieces. I would not have used 6013 rod but then maybe your welder doesn't have the power to use a 6010, 6011 or 6012.

Got a box of 6013s on sale, but also because it's deemed the easiest one to start with. But for this project the 1/16" rods seem too thin. Would you agree? They burn up so fast and I still don't know what amount of that heavy-duty 1x1 steel was melted. Attempting to hold the rod in place longer didn't work as it would just create a big puddle. Do you think something like a 6011 would burn slower, thus allowing more time for the heat to melt the steel? Or would I be better off with a thicker rod?

The only 220 volt in the house is for the stove that's no longer being used (replaced the electric stove with gas but connection is still there) and the clothes dryer in the basement. Our building codes don't allow to share the dryer with any other appliance and I'd imagine the plugs wouldn't match. If it did, I'd need a long extension cord and as far as I know, these cost a pretty penny. Would like to stick to 110v for now, do you know if there are units that are more powerful and still work with 110v?

Yes, looking for free advice from those that have the experience. Always learning, even if it's about welding on a boat forum :)
 

bruceb58

Supreme Mariner
Joined
Mar 5, 2006
Messages
30,478
A 110V welder is good for lighter gauge stuff. You would have to look at the specs of the welder. 1/8" is about the thickest you can typically weld with a 110V Mig...not sure about a stick welder. I am not as familiar with stick as I am with MIG or TIG.

How many amps is your welder?

You should go to weldingweb.com excellent welding forum

Here is a chart I found from there:
attachment.php
 
Last edited:

Joolz

Petty Officer 1st Class
Joined
Aug 13, 2015
Messages
211
No Title

bruceb58;n10446081How many amps is your welder?[/QUOTE said:
It's a 70A, sorry, I had that confused with Watts. It has a high and low setting. I'm assuming I'd choose low to do sheet metal welding or some very lightweight steel.

Here's an update on the guides: after a few down days due to a cold finally got one of them installed this afternoon. It looks very nice indeed (better than the poor pic indicates). I had a very hard time locating proper 3" square U bolts, spend 2 days trying to find them but these are simply non existent. But no biggie, the 2 inch ones worked perfectly, despite having to drill holes onto that plate. Guides are adjusted easily, just as long as I have a 15mm wrench nearby. Currently sitting 1" from the rub rail, plus the guides will move another inch with a bit of force. Will fine tune things while at the ramp.

Really pleased with the results. Turned out better than I expected and looks every bit as good as the commercial stuff (aside from that purple foam piece, added to raise things a bit). Best part is I don't have to worry about returning something that likely wouldn't have fit. Best yet, the total cost is a fraction of what I was prepared to spend.

Fyi the blue foam around the metal posts is one of these swimming noodles cut in pieces and held with tuck tape. Why? 2 reasons: one it helped centre the PVC pipe. And also to provide a bit of extra strength as I went with the thin vacuum tubes. These were the only white ones around, didn't care for the schedule 40 that was beige. Also it was 5 bucks compared to $25 for the schedule 40. With the foam inside, it seems pretty sturdy. Bet it will take a few bumps. If not, it's easy to replace. Also attached some wire to the base to hold it in place while in the water.

Big thanks to all for the help with this project and for the encouragement. As a bonus, I now have a bit of welding experience and am really excited about doing more with the welder. So this has been a win win win. Hopefully will be able to take the boat out in a few days and try things out.
 

Attachments

  • photo272061.jpg
    photo272061.jpg
    36.1 KB · Views: 0
  • photo272062.jpg
    photo272062.jpg
    37 KB · Views: 0
  • photo272063.jpg
    photo272063.jpg
    40.5 KB · Views: 0

gm280

Supreme Mariner
Joined
Jun 26, 2011
Messages
14,593
Nice....Joolz. You never know how to do things unless you actually try. You tried and did a good job. If it fits your needs, all the better. And now you have welded something and seem to like that also. So that opens up a new horizon of thing you can built as well.

I never thought that I would like welding as much as I have. But since being presented with a Hobart MIG setup for Christmas one year, I don't think I could do without a welder in my shop now. :thumb:
 

Joolz

Petty Officer 1st Class
Joined
Aug 13, 2015
Messages
211
No Title

Here are the guides at work, however with mixed results.
With advice from the members here plus a bit of digging I parked the trailer up further than usual, which made loading a lot easier. As seen in the pic I stopped the trailer as the rollers hit the water. But you can also see how uneven the ramp is. When I loaded the boat, I drove it straight in (using the trolling motor) and noted how it hit the centre roller just right. Reeled it in and to my surprise the boat was off centre by a couple of inches, with the port side just a couple of mm away from the guide (staying just over 2" away on the other side). Could this be due to the uneven ramp? There was no wind that day and we did a pretty quick job loading it up (contrary to past experiences).

Suppose a couple of inches off dead centre not to be a big deal? Or is there a trick to get the rear to be spot on?

PS: backing up the empty trailer was a lot easier this time around. Guides were a great addition in this regard alone.
 

Attachments

  • photo272495.jpg
    photo272495.jpg
    50.7 KB · Views: 0

bruceb58

Supreme Mariner
Joined
Mar 5, 2006
Messages
30,478
The uneven trailer caused you to be off. 2" is nothing. Even on my 24' boat, it usually centers itself after multiple hours driving down the road. As long as your bunk or roller is not sitting on a strake, you are fine.
 
Top