Intex Mariner 4 modifications and Tips

Starkonian

Petty Officer 2nd Class
Joined
Jul 8, 2009
Messages
156
No Title

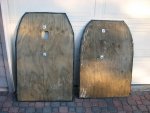
This is a write up I did elsewhere...

"I've read some complained about using 1/2"; too thick/heavy. I used 5/8". It's rigid enough with a tiny bit of flex. I use two sections. I use the original floor still with all the slats removed but the center slat. The boards are cut so they rest on the center OEM slat. I followed the recommendations of someone who experimented with all different configurations; three plywood sections, no OEM floor, all slats kept in the floor etc. He said the configuration I use has caused the least amount of wear/issues with leaking. Also, using only one slat sheds a lot of weight from the boat. I used pressure treated plywood (marine grade) and did not have to treat the plywood with water proofing coatings. Carpeting is not necessary and saves weight should they get wet. I drop the boards in the water and rinse them off after most trips and they are rock solid after 20+ trips. I use the boat in fresh water so don't know if I'd rinse them off in salt water. I suggest you use the oem floor as a template noting where the center slat location is and cut the plywood so it evenly falls on the center slat. Make sure you cut out a hole for the keel valve. I then sanded the boards lightly including slightly beveling the board edges and used a wood filler to fill in any cracks which are common in plywood sheets. That really made the boards more rigid. I then put two strips of duct tape around the outside edges to protect the boat . Once that is done, fit the boards and inflate the raft and determine how much trimming you have to do around the edges so the boards slightly tuck in under the side tubes but don't ram into the floor seams. It took me a couple times to make cuts till I was satisfied with the fit. Once you have a wooden floor, there's no going back. It feels like a real boat you can actually walk around in."

...


I folded the oem floor in two and picked the pocket closest to the middle for the one slat. Not sure I understand you second question but here's how I assemble it. I inflate the side tubes 3/4 and then install the oem floor. I install the front board pushing it forward til it lays on the front half of the one slat. I then install the rear board and slide it back til it's mated evenly with the front board on the slat. I make sure the boards as even as possible width wise and front to rear to prevent over loading a floor seam. Once I'm happy everything looks even, I inflate the 1-4 chambers fully and mount the motor mount. I then slide the boat into the water with a foot or so still on shore. I then inflate the keel chamber just to the point the boat starts to lean off to one side a little. I don't like to inflate it too much. I extended the trolling motor wires 8' or so and I place the battery in the middle of the boat over the board junction. The rest of my gear goes in the middle around the battery leaving the front and rear seating areas clear. I read it's best to distribute the weight around the boat as much as possible to lessen the chance of overloading and tearing open a floor seam in one spot. Using the floor boards with only slat distributes the weight load more evenly on the floor seams. I've never had the boards shift out of place yet. Also note, a sheet of plywood is about 8" or so shorter than the floor of the boat. I've seen some cut a couple pieces to to fill in these two areas but I didn't bother. It doesn't make much of a difference to me. Btw, I looked long and hard for a cheap. light weight, maintenance free seat and found these. They weight next to nothing and although they are plastic, they are big and molded and I can sit in them all day comfortably. I'm 6'5" 215 lbs . Here's the link:http://www.academy.com/.../marine-raider-molded-bucket.
 

Attachments

  • photo232919.jpg
    photo232919.jpg
    99.9 KB · Views: 33
  • photo232920.jpg
    photo232920.jpg
    4.3 KB · Views: 33
  • photo232921.jpg
    photo232921.jpg
    3.6 KB · Views: 32
  • photo232922.jpg
    photo232922.jpg
    3.3 KB · Views: 33

ScottishScript

Petty Officer 3rd Class
Joined
Oct 19, 2014
Messages
79
Hi Scottish- I prefer the trolling motor mount for ease of use, less clutter etc.

http://www.colgardsports.com/product...iations=546276. You can also go with a clamp on extension pole and clamp it to an over hanging board attached to the top motor mount poles

You can also use a bracket clamp setup attached to a board clamped onto the motor mount top support bars:


Hi Stark,

Yeah I've seen those but I'm concerned the transducer could be torn to shreds whenever I strike rocks, but I see your point about reducing clutter. I know there are kits designed to protect motor mounted transducer, but I'll have to finally settle on a make and model of Fishfinder first, as they're not universal. What a pain!
 

ScottishScript

Petty Officer 3rd Class
Joined
Oct 19, 2014
Messages
79
I think it was Jiggy who asked about how my custom transom was holding up and I mentioned I'd made some small modifications and would post pics when I had them. Top half is my original 2 rod setup. Bottom shows how I managed to cram in a third 7 foot rod. So long as the first 2 are positioned at high angles, running three lures this way will work without tangling so long as you run them at varying distance and avoid acute boat turns.IMG_1223-B2.jpg
I use this third rod to run smaller lures designed to hook perch and trout and it's really paid off the three trips I've been out with this setup. I'm using a clip designed for storing garden tools and it works great.
 

Jiggyjay

Seaman
Joined
Oct 12, 2015
Messages
63
Thank you for the help again Stark, Scottish and King. I did get my wood for the floor today 15/32nd sanded plywood from Lowes that came to $35. There was a cheaper one I could've gotten for like $22 but it was sheating and it was bad quality with lots of cracks and such. It was the same plywood I got for my excursion 5 and really wasn't too happy of the quality of the wood that's why I stepped it up on this one. 15/32 seems a little flimsy but i'm hoping once I prime it and put on outdoor carpet it will strengthen it up a little. Will be working on it this week.

So I did a little shopping spree on ebay before I wrote this and bought some glue on mounts which i'm hoping will work out with my mods i'm thinking of doing. First thing I bought was some new oar holder.. I hate how the oar holders are on top so I bought some new oar holder to mount on the outside side walls so I can put the oars on the side like how the excursion 5 has it. Here are the holders I bought.

Also bought I guess its called an engine mount and rope mount kit. I think i'll be using these to either mount side boards and/or cross board. I know some people mount their tables just on top of the mariner or on the floor but If I do the table I would want to mount downriggers on it so having gravity hold the table down isn't going to work. I also dont want to mount too many things on the wooden floors since I will be breaking the boat down and up every time I use it. I'm trying to be as efficient as possible. I can typically have the boat fully setup in 10-15 minutes and the faster I do it the more fishing I can be doing! Here is the link for them.

Rope Mount Kit

Motor Mount

All in all it only came out to about $11 shipped so if they don't work out it i'm not going to feel bad at all. I only ordered 1 set of the oar holder since I want to try them out first before I ordered another set. I'll be using Marine Goop as Stark had suggested to mount these and the extra stock rod holder I ordered. Lets hope it can keep these on stuck on the boat!
 
Last edited:

Jiggyjay

Seaman
Joined
Oct 12, 2015
Messages
63
Scottish- really love that setup. I'm actually rereading this whole thread again and just came to your first post today with your pics.
 

Starkonian

Petty Officer 2nd Class
Joined
Jul 8, 2009
Messages
156
Hi Scottish-


On Minkota units, the transducer sits between the fin and the prop and shallower than the fin. The fin protects the transducer. I'd measure your fin and confirm the measurements of the mount with transducer before buying the mount.
 

Starkonian

Petty Officer 2nd Class
Joined
Jul 8, 2009
Messages
156
Here's a photo of a zip tie/rubber tube method to secure cables. I think this link shows my entire photo bucket album? Anyone else have problems posting photos here? This site blows. No matter how small I make a jpg file, it still won't upload.
 
Last edited:

ScottishScript

Petty Officer 3rd Class
Joined
Oct 19, 2014
Messages
79
Here's a photo of a zip tie/rubber tube method to secure cables. I think this link shows my entire photo bucket album? Anyone else have problems posting photos here? This site blows. No matter how small I make a jpg file, it still won't upload.


Looks like Photobucket blows too, when I click the links all I get is the main page. Ah well.

I usually have to shrink my pics before they'll come up here on this site.
 

KingPhoenix

Seaman Apprentice
Joined
Oct 18, 2014
Messages
33
Hey guys heres a pic of my boat from last weekend.
GvuejnW.jpg


And our haul from that morning
rA0wUX1.jpg
 
Last edited:

Jiggyjay

Seaman
Joined
Oct 12, 2015
Messages
63
Weird because I actually have the yellow ones like you do and it has 1 in the front and back. Wish it was like yours though. I did glue on 2 more so now I have 2 in each side.

Also where you from? Weather still looks great where your at. We're getting pretty cold here in utah.
 
Last edited:

KingPhoenix

Seaman Apprentice
Joined
Oct 18, 2014
Messages
33
Weird because I actually have the yellow ones like you do and it has 1 in the front and back. Wish it was like yours though. I did glue on 2 more so now I have 2 in each side.

Also where you from? Weather still looks great where your at. We're getting pretty cold here in utah.


Toronto, Canada this is on lake simcoe, weather is sturprisingly mild still, high of 12C on sunday, going to try to get out again, hopefully they are still there.
The ice fisherman in me isnt happy that the temps are still so high but hey a couple more trips on the boat arent too bad!

Can you tell me how the glueing extra holders worked out for you(where did you get them, what did you use)? if i could get 2 on the front that would be stellar. When i take my wife and 2 kids out it can get crowded in there, if i can get a couple rods off the floor it would be great.
I find that they only work with my ultalight/kids rods tho, most of my rods have a little bump at the bottom that wont fit.
 
Last edited:

Starkonian

Petty Officer 2nd Class
Joined
Jul 8, 2009
Messages
156
There are some monster Perch there. Nice. I spent some happy days on some wilderness lakes in N. Wisconsin nailing perch.
 

Jiggyjay

Seaman
Joined
Oct 12, 2015
Messages
63
Toronto, Canada this is on lake simcoe, weather is sturprisingly mild still, high of 12C on sunday, going to try to get out again, hopefully they are still there.
The ice fisherman in me isnt happy that the temps are still so high but hey a couple more trips on the boat arent too bad!

Can you tell me how the glueing extra holders worked out for you(where did you get them, what did you use)? if i could get 2 on the front that would be stellar. When i take my wife and 2 kids out it can get crowded in there, if i can get a couple rods off the floor it would be great.
I find that they only work with my ultalight/kids rods tho, most of my rods have a little bump at the bottom that wont fit.


Nice.. not too much of an ice fisherman.. I prefer to stay indoors when its 40* or lower.

these are the rod holders that I got which is pretty much the stock rod holders that came with the boat.

http://www.ebay.com/itm/2Pcs-Inflata...gAAOSwd4tTzcfx

I glued them on with Marine goop that Starkonian suggested. I bought a cartridge of it here at amazon . It got the job done you do need to seal the seams with the glue and it can get a little messy. I don't really know how it compared to the more expensive glues like stabond or hh66 but its kept the rod holder on the boat lets hope it stays that way. I'm actually in the process of glueing on these Scotty Glue On pads you might want to look into that along with scotty rod holders if you want better than the stock ones. the stock ones work great for me and my fishing poles thats why I went with it. I'll be using the scotty mount though to mount a board for my downriggers or options for rod holders as well..
 
Last edited:

midnitegsr

Recruit
Joined
Nov 23, 2015
Messages
3
Nice.. not too much of an ice fisherman.. I prefer to stay indoors when its 40* or lower.

these are the rod holders that I got which is pretty much the stock rod holders that came with the boat.

http://www.ebay.com/itm/2Pcs-Inflata...gAAOSwd4tTzcfx

I glued them on with Marine goop that Starkonian suggested. I bought a cartridge of it here at amazon . It got the job done you do need to seal the seams with the glue and it can get a little messy. I don't really know how it compared to the more expensive glues like stabond or hh66 but its kept the rod holder on the boat lets hope it stays that way. I'm actually in the process of glueing on these Scotty Glue On pads you might want to look into that along with scotty rod holders if you want better than the stock ones. the stock ones work great for me and my fishing poles thats why I went with it. I'll be using the scotty mount though to mount a board for my downriggers or options for rod holders as well..

Jiggyjay, I had to join this forum just because I loved what everyone does here with this boat, I never thought you could do so much! I've been looking for something more portable and easier to take my dad out when I am able to fish with him. Hooking up a boat, docking etc became a pain(I know tuff life). I love your setup the most from what I have seen. Can you do a list of what you did? Thanks
 

midnitegsr

Recruit
Joined
Nov 23, 2015
Messages
3
I think it would be cool if they made like a slip on cover for these inflatable boats. Think of a cell phone rubber case. Anyone ever seen anything like this? it would just be an extra layer of protection against a puncture on the bottom and sides
 

Starkonian

Petty Officer 2nd Class
Joined
Jul 8, 2009
Messages
156
Someone used to make a slip on bottom cover, Sevlor maybe? It had open holes in the fabric and people complained they'd drag in the water. I don't think they make it anymore.

I'm hanging it up for the winter. Went out Saturday and caught 31 bass and 1 bluegill. None over a pound. Anything of size has dispersed and gone deep.

I have a slow leak in the #1 chamber. It needs 4 pumps every couple hours. I was hoping it was the Boston Valve but I filled the valve cup area with water and didn't see any bubbles. I hope it not one of the weird internal tears. Not a drop of water leaking into the boat after my Marine Goop fix early in the season. I've got to locate this air leak over the winter.
 

KingPhoenix

Seaman Apprentice
Joined
Oct 18, 2014
Messages
33
Someone used to make a slip on bottom cover, Sevlor maybe? It had open holes in the fabric and people complained they'd drag in the water. I don't think they make it anymore.

I'm hanging it up for the winter. Went out Saturday and caught 31 bass and 1 bluegill. None over a pound. Anything of size has dispersed and gone deep.

I have a slow leak in the #1 chamber. It needs 4 pumps every couple hours. I was hoping it was the Boston Valve but I filled the valve cup area with water and didn't see any bubbles. I hope it not one of the weird internal tears. Not a drop of water leaking into the boat after my Marine Goop fix early in the season. I've got to locate this air leak over the winter.


I keep planning to hang i up for the year as well but the temps just wont give, next weekend were looking at 13 C. If i cant get on the ice I might as well make use of the extended soft water season!
 
Top