DP-SM Seized to Gimbal Housing

Insanity7

Cadet
Joined
Nov 9, 2014
Messages
11
I attempted to remove my 1999 Volvo-Penta Duo Prop SM 1.95 outdrive today and gave up after I realized there was no way I could get the drive off the gimbal housing. All six bolts are showing heavy corrosion around them. The only thing I can figure is to trim the outdrive up, spray all around the bolts with PB Blaster everyday for a week and hope it works it's way down.

Is there a simpler way to resolve this problem?
 
Last edited:

Saline Marina

Petty Officer 2nd Class
Joined
Sep 9, 2014
Messages
162
That is what I would recommend. Keep spraying it, keep it wet. I would take a sharp point like an ice pick or a carbide scriber point and try to help clean out the interface between nut and bolt. In other words, micro-scrape out as much corrosion as possible so the liquid has the best chance of getting down there where it needs to go to work and doesn't have to penetrate surface layers that you could remove, as above.

I also like Kroil as an alternative to PB Blaster but you have to order that from Kano Labs in Tennessee.

6 point socket for when you get going on removal to avoid round-offs.
 

Insanity7

Cadet
Joined
Nov 9, 2014
Messages
11
Thank you for the suggestion. I did get lucky and the nuts came off without a fight. I will clean up around the bolts as much as possible to get the liquid down there a little better.
 

dypcdiver

Lieutenant Junior Grade
Joined
Nov 1, 2005
Messages
1,018
There are several posts around, about just what your problem is and the solutions using blocks of wood and the boat's hydraulic rams. You might like to use the search at the top of the page whist you wait for the PB to soak in.
 

Insanity7

Cadet
Joined
Nov 9, 2014
Messages
11
I found several of the older posts and tried most of their tricks. No love so far. Sunday I hooked everything up to a tree and put it under tension. I have had it soaking in PB Blaster and Midwest Penetrating Oil for the last week. Put my 3/4 ton truck into 4-Low and gradually applied pressure. Ropes had too much stretch so switched to ratchet straps. Before doing so, I broke one eye bolt. Four ratchet straps and two 2x6 blocks later, I gave up after the last strap broke. Next step is to drop the whole pivot housing and slowly work on separating it on the bench.

Once off, i will be coating liberally with the recommended grease for the prop shaft.

A photo journal of my troubles. Don't worry, I slowly lowered the rams off the outdrive before applying pressure.

IMG_3653_zpsf1bbd6ef.jpg IMG_3655_zpsf588be97.jpg IMG_3654_zps9691adb8.jpg
 

BRICH1260

Lieutenant
Joined
Jul 6, 2011
Messages
1,347
I had a similar problem while trying to separate my drive a month or so ago. After removing all the nuts and connectors my drive only slid out about a half inch or so. I tried pulling on it strapped to my diesel tractor and ended up breaking the straps. I ended up separating the two by using blocks of wood wedged between the drive and the transom plate and used the trim rams to gradually push the drive out. You will need several blocks of wood in various legnths to insert as the drive pulls away. Go slow, if done properly, no damage should result. My problem was that my bellows had leaked and water had intruded, rusting the gimbal bearing the the drive shaft. When mine separated the gimbal bearing came out still attached to the drive shaft. I had to use a gear puller to remove it from the shaft. You might want to make a cart to support the outdrive when it comes out. I would also take the props off to avoid damaging them.
 
Last edited:

Insanity7

Cadet
Joined
Nov 9, 2014
Messages
11
I wish mine would separate at least a 1/2". At least I could work with it then. Will keep the thread posted with any progress made.
 

Lou C

Supreme Mariner
Joined
Nov 10, 2002
Messages
11,855
This has been discussed a few times on here and other boards. These can corrode on for 2 reasons, one, as was noted above the bellows leaks and the driveshaft rusts in the gimble bearing or coupler. The other way it happens is that there is corrosion between the pivot housing on the transom mount (part with the 6 studs sticking out) and the upper gear housing itself. The problem with Volvo's design was that they used the same transom mount as the OMC Cobra. However, design differences between OMC and Volvo resulted in the OMC design needing a gasket between the drive and the pivot housing. The Volvo needs no gasket there. So on the OMC, if you coat that gasket with gasket sealer as directed in the shop manual, the drive will come off easily as long as there was no water in the bellows. On the Volvo, if the last person who installed it did not grease the mating surface between the drive and the pivot housing, you can get corrosion all around the 6 studs. I would try to get penetrating oil in the holes that the studs pass through, to get to the mounting surface if you can. There is a slot between the drive and pivot housing on the lower starboard side that is supposed to let water drain if it gets trapped. If you can get a a wood or plastic wedge in there, it may start to move. In the future coat the mounting surface with OMC triple guard grease and figure on removing the drive at the end of each season. Then you won't have a repeat of this problem. Good thing you didn't yank the tree down LOL....3/4 ton truck and 4x4 low can do some damage....
 

Insanity7

Cadet
Joined
Nov 9, 2014
Messages
11
I wanted to update this thread with the results of everyone's suggestions.

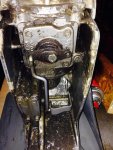
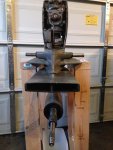
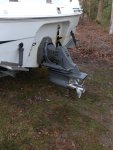
I picked up a MAP gas torch and heated around the six studs. The additional heat did help a little and pulled in some of the penetrating fluid. A hairline, and I mean hairline, gap finally formed between the outdrive and pivot housing. In the end, it took one of my friends and I using Snap On Pry Bars and a couple of beefy screwdrivers working around the hairline joint between the outdrive and the pivot housing. We applied pressure with the trim rams and wedging a block between the bottom of the gimbal housing and the outdrive. The flat blade screwdrivers were used to create a small gap that was big enough to get the pry bars in the gap. Once a gap formed, we worked the pry bars around the entire gap. Over two hours of working around the gap, the space was big enough to change over to bigger pry bars. The bigger bars allowed us to get the leverage to pull the outdrive all the way off. We used an engine hoist to support the outdrive during this process.

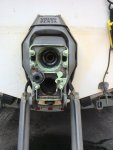
What we found was the penetrating fluid had not worked past the first three to five threads on the studs. Corrosion was thick around all of the studs and around the carrier bearing housing. Otherwise, everything was clear. It really did not make any sense as to why it was so difficult. Clearly it was though. A word to the wise, be extremely careful with where you pry. The metal on the top of the pivot housing is soft and will chip easily.

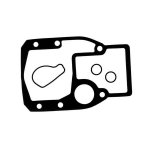
I was relieved to find that the bellows were in good shape and had not allowed water intrusion. That meant my water in lower unit oil problem was isolated to the shift solenoid seal. I was lucky and both props slid off without much problem. I drained the existing lower unit fluid and ran an extra quart through it as a cleanse. Then I rebuilt the shift solenoid, replaced the bellows, lower unit fluid, necessary seals, etc. I cleaned up the stud holes and the studs, pivot housing, carrier bearing housing, etc. with a wire wheel. I then liberally applied Quicksilver 101 Special Lubricant on every possible contact point.

After I put the outdrive on, one of the studs was found to have a boogered thread. That lead to having to pull off the outdrive again. What a difference the 101 made. My friend and I removed the new nuts on the studs and the outdrive literally slid out off the pivot housing. I ran a hex die around the affected stud and put the outdrive back on. New nuts finished off the installation.

All in all, it was not a bad project when you remove the whole part of separating the outdrive from the pivot housing. From here on out, I will pull the outdrive at the end of each season. Never again will I put myself in a position to deal with that mess again.
 
Last edited:

Insanity7

Cadet
Joined
Nov 9, 2014
Messages
11
Before and after of the shift solenoid area.
 

Attachments

  • 90B72F6D-CDCF-42F5-89D8-7F360B9633AD_zps9fvgrklc.jpg
    90B72F6D-CDCF-42F5-89D8-7F360B9633AD_zps9fvgrklc.jpg
    163 KB · Views: 1
  • E5F82CF7-EA5C-4FA2-AC1D-0AC7021AA69E_zpsc3r28vwe.jpg
    E5F82CF7-EA5C-4FA2-AC1D-0AC7021AA69E_zpsc3r28vwe.jpg
    171.7 KB · Views: 1
Last edited:

Insanity7

Cadet
Joined
Nov 9, 2014
Messages
11
All lubed up and the final install.
 

Attachments

  • 397E2657-852F-4F5F-BF85-4002FDC05A95_zpsyeyon1gz.jpg
    397E2657-852F-4F5F-BF85-4002FDC05A95_zpsyeyon1gz.jpg
    172.9 KB · Views: 2
  • 68DA3A53-25B3-4550-81EE-B47DB73DF8A2_zpsjcacvfiq.jpg
    68DA3A53-25B3-4550-81EE-B47DB73DF8A2_zpsjcacvfiq.jpg
    141.4 KB · Views: 2
  • 8AA2F18D-C259-4617-A6AA-2B0FC072E048_zpsgokjuagt.jpg
    8AA2F18D-C259-4617-A6AA-2B0FC072E048_zpsgokjuagt.jpg
    185.8 KB · Views: 2

Lou C

Supreme Mariner
Joined
Nov 10, 2002
Messages
11,855
No Title

Great job now just remove it at the end of each season and grease up the mating surfaces. If I had a Volvo because I boat in salt water I might try using a Cobra transom gasket to prevent metal to metal contact. I have never had a problem getting my Cobra off, even after a season in salt water. You might just have to modify it by cutting out the section that would fit over that slot that is supposed to drain water....
 

Attachments

  • photo215120.jpg
    photo215120.jpg
    25.2 KB · Views: 0

bruceb58

Supreme Mariner
Joined
Mar 5, 2006
Messages
30,478
I wouldn't add that gasket. You do that and you risk not getting a good seal between the nose of the drive and the u-joint bellows.

Take the drive off every year like you are supposed to and there will never be an issue. On mine, I take off the 6 nuts and the drive is practically coming apart by itself.
 
Last edited:
Top