Re: What is the correct heat sender unit
Hi everyone, ive recently posted a thread about the new boat ive just bought, its a 21ft Pride Sea Raider. It has the volvo aq170 motor and volvo270 leg. i havnt had it in the water yet and ive been pulling everything apart and checking things before it gos any in. After alot of poking and proding ive found nothing to worry about apart from the steering bushs on the leg a bit worn. Only other thing is the temp gauge sits just in the red and dosnt move once warmed up. Ive gone through everything, replaced rubber impellar checked, water pump(circulation) checked thermostat, even run without thermostat. ive got good water flow out of rear of transom and even when the gauge shows in the red the water is hot but not to hot to touch. I then removed the temp sensor which looks brand new. the temp sensor has a figure of 120 degrees on it. im just wondering if the sensor could be wrong or the gauge faulty.

Very likely nothing was wrong with your sender or gauge. The AQ170 or B30 is an engine infamously known for its overheating problems. The overheating occurs on these engines because of the direct cooling setup as opposed to the closed cooling setup, and I'll explain why at the end of this instruction. I've read lots of attempts at solutions all over the boating forums, usually with not much success. Just follow along through this write-up and I'll give you a dirt cheap fix to your overheating problem.
First thing, stick to the basics before removing your cylinder head (I didn't remove mine and my engine is just fine):
1. Remove the strainer cap and the raw water pump cover and impeller. Stick a water hose down through the two copper lines that go into and out of the strainer. Turn water on and check that water is going through unobstructed from the strainer to the very bottom of the leg where the water is picked up, and then from the strainer to the raw water pump.
2. Remove the oil cooler. Stick a water hose in and check that water flows unobstructed from the raw water pump to the oil cooler inlet
3. Check that all of the oil cooler tubes are clean. If i'm not mistaken, one of them is soldered shut, or maybe that's just mine.
4. Remove thermostat housing. Put in a NEW thermostat or put the old one in a pot of hot water to make sure it opens. You don't need to drill holes in the thermostat as some of you may have read in other forums. You can try this if you want. I tried it on my engine and it made my engine overheat faster believe it or not.
5. Open your drain valves and plugs ( first while engine is off) and check that the water going through the engine is clean. If you have dirty water coming out of any of the drains, then you have some kind of material stuck in the engine. Usually bits of impeller rubber. There are three drains and three plugs. The drains are located on the oil cooler, at the front of the engine kind of between the circulation pump and crank pulley(it can be kind of awkward to get your hand in there if you have large hands), and on the starboard side of the block tucked in a little above and to the left of the oil filter. If your drain plugs are stuck, break off the little brass handles on the plug so that you can fit a deep socket. These are actually two pieces. One piece is the drain valve itself, then the drain valve screws into an extension which then screws into the block/cooler. Once you remove this assembly, you can separate the valve and the extension with a couple of wrenches. Then go to your local hardware store and you can purchase a replacement brass drain valve. They are called drain cocks. The ones i purchased are brass with steel handle because the brass handle is too soft. The plugs are located at the rear of the cylinder head, and there are two of them on the distribution block at the front of the engine on the starboard side. If you have chunks or dirty water coming out then you need to remove the oil cooler, the thermostat housing, the strainer, and open the raw water pump and remove the impeller. Get a water hose and start flushing water through any open hole. It wouldn't be a bad idea to remove the circulation pump as well. You'll see chunks and dirty water starting to come out of some the holes. Do this until all the water is clean and there is no more chunks or crap coming out.
6. Install a BRAND NEW IMPELLER in the raw water pump
7. Take the drive belt off and spin your circulation pump. If there is any axial "play" in the pulley or if water is leaking through the weep hole, replace it. Do not continue to run the engine if either the raw water pump or the circulation pump is bad.
8. Remove the exhaust downpipe from the exhaust elbow to the transom shield. There may be a ton of rust chunks in there from the exhaust elbow. Clean all of that crap out and make sure water is still being spit out with the exhaust through the leg. Get a screwdriver and hammer, or needle gun, and clean off all the loose rust off the exhaust elbow. You can take off the exhaust elbow if you want but I didn't want to risk taking mine off. Sometimes, the more stuff you take off, the more stuff gets broken. Keep in mind that this engine is about 45 years old. Check your gear cable while the exhaust downpipe is off. If it is bad or old, I'd recommend replacing it while the exhaust downpipe is off.
9. Replace your drive belt. Mine was so old and stretched that my alternator was fully extended on the bracket and there still wasn't enough tension on the belt. When I got a new belt, i could barely re-install the alternator.(Yes, it was the exact same belt number and brand as the old one). You don't want your water pumps slipping because of an old stretched belt.
10. Make sure water comes out of two places on the drive/leg(whatever you want to call it) when looking at the rear of the boat. Water should be coming out of the leg with the exhaust, and it should be coming out at the very top of the transom shield. Where the water comes out from the top, it'll probably be slightly rust stained giving you an indication of where it should come out. If water is not coming out of the top, then remove the small hose on top of the exhaust elbow which connects to a barbed fitting on the inside of transom shield. This hose is probably only about a foot long and kind of "S" shaped. Make sure it is not clogged.
Ok, I'm sure I missed something there, but that covers most of the basics. When you remove the thermostat housing, you will see that the inside of your cylinder head is likely extremely fouled. Mine actually has some small barnacles inside. My budget didn't allow me to remove the cylinder head for cleaning and overhaul. I was quoted about a grand for this, so I had to find another way. I will eventually do this, but for the time being, I just can't afford it.
So the problem i had with my engine, is that the temperature would creep up to as high as 240 degrees. Sometimes very slowly and sometimes fast. Seemed kind of random to be honest. When running the boat, the temperature would creep up, even at slow idle in neutral. When the temp reached about 210 degrees, I would have to come to a halt, drop to neutral, and then run at a high idle between 3500 to 4500 rpms in order to cool down the engine. This would bring the temp down to about 180 degrees. I would have to repeat this process constantly, and just as you've been thinking, it was very irritating to me.
Make sure you have done everything above and put everything back together. Run the engine at idle and physically feel the cylinder head. Near the thermostat, the head is very cool. At the rear of the cylinder head, it is very hot. Someone on another forum did mention this. Because the thermostat is at the front of the engine where the cooling water first enters the head, the cooling water is not very hot, which causes the thermostat to possibly open slower, even though the cooling water at the rear of the head is very hot. Its a good theory, and he suggested to drill holes in the thermostat to get some "pre cooling" before the thermostat even opens. While a good idea, this doesn't solve the problem. The guy who came up this this idea said that his engine would still ride just below red line temperature with the holes. Some guys removed the cylinder head and had it cleaned out with new head gasket, and this still didn't solve the problem. Some guys completely removed the thermostat and had worse overheating problems.
Here's my theory. The flow pattern through the head is ok. The problem is the outlet of the cooling water through the head. On a direct cooling system, the cooling water goes through the head and is then forced to go through a series of several 90 degree angles and upward flow as it makes its way to the exhaust elbow. I think this somehow disrupts flow inside the head and creates a pocket of stagnant water at the rear of the head. This stagnant water collects and retains heat. Only the right speed of flow can push that hot water out, 3500 to 4500 rpm. Too fast or too slow promotes the stagnant water. The temperature sender is located directly above this pocket of hot water. Perhaps the designers had a hunch that this was a possibility and place the sender at the rear of the head. Good thing because if it was at the front of the engine, they would have had even more unhappy customers. When the engine is new you have perfectly smooth surfaces inside the head. As the engine gets older, collects rust, scale, and barnacles it disrupts that flow and promotes the pocket of hot water. Even if you take off the head and get it cleaned, you won't have perfectly smooth surfaces. The study of thermodynamics would tell you that on a micro-level, this does make a difference. This theory may be incorrect.
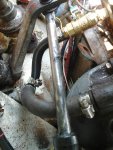
The solution, provide an exit path for the pocket of hot water at the rear of the head. Very simple fix. The plug that you removed earlier at the rear of the head lets that hot water escape. If you take that plug out, it allows the cooling water a direct straight path through the head. You can run the engine with this plug removed and the engine will stay as cool as 120 degrees. Now, with that said, you don't want to run your engine at 120 degrees. That plug is a 3/8" pipe thread. Go to you local hardware store. Purchase a 3/8" brass valve with threaded inlet and outlet. Get a brass hot water valve if you can find one. I couldn't find one, so i stuck with a regular water brass ball valve. A stop or globe valve would be best, but again I couldn't find one. So purchase: 1. 3/8" valve with threaded fittings 2. one 3/8" hose barb fitting with 3/8" threads(to screw into the outlet of the valve) 3. One 3/8" to 3/8" coupler or nipple(to screw into the valve inlet and the cylinder head) 4. One 3/4" x 3/4" x 3/8" Tee 5. One foot of 3/8" ID coolant hose or hot water hose. 6. two hose clamps, approx 7/8" 7. two hose clamps, approx 1/2". You can also do this with a half inch valve, but you get the gist.
Put teflon on all of your threads. Put the valve, barb, and nipple together. Screw this assembly into the cylinder head. Remove the "S" hose that goes from the top of the exhaust elbow to the transom shield. You want to place the tee as low as possible on this hose and re-install. Now, put the 3/8" hose on from the outlet of the valve to the 3/8" tee fitting.
When you start a cold engine, make sure the valve is closed. Allow engine to warm up to about 160 to 180, then crack the valve open very slightly. You only want it about 1/4 open to allow just enough of that hot water to escape. You'll find that this will fix your overheating problem as you run the boat. When you're done for the day, close the valve BEFORE you turn the engine off. This will allow the head to fill with water and minimize air inside the head. If you leave that valve open, water will drain out of the head, fill up with air and start to rust.
Hope this helps. I couldn't stop laughing when i figured it out. Took me some months to figure this out. This should save you a lot of frustration. Once you do this, you'll see that this engine, the "iron pig", is a very good engine and is great because it is very easy to work on. I am currently looking for a normally open 1/4" brass high temp solenoid valve. Once I find one, i will replace the ball valve, put in the solenoid valve, then I will be able to control this valve from the helm. ALOHA!