1963 Gale Sovereign

robstead

Seaman
Joined
Jul 29, 2015
Messages
71
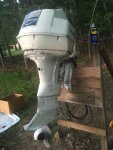
Hello everyone, while roaming through Craigslist I managed to come across this beast for $50.

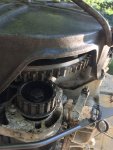
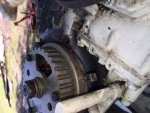
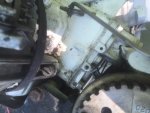
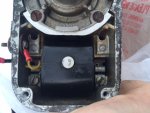
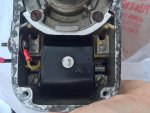
I did the usual when buying unknown motors, but my only question right now is how is this spring supposed to be set up? I've tried doing research and kinda in a clueless rut as this is my first time working with a larger motor.

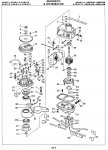
Any insight on this motor also would be very helpful.
 

Attachments

  • photo245789.JPG
    photo245789.JPG
    382.5 KB · Views: 0
  • photo245790.jpg
    photo245790.jpg
    140.6 KB · Views: 0

F_R

Supreme Mariner
Joined
Jul 7, 2006
Messages
28,195
Hm.m.m.m, seems like I just answered that question somewhere else.
 

robstead

Seaman
Joined
Jul 29, 2015
Messages
71
This is closely related to the Evinrude/Johnson of that era.

Yes, I've noticed that it is basically an exact replica of the Evinrude Fat Fifty and all the other HP versions.

After replacing a bunch of wires I ordered a timing belt and did the timing as I believe it should be. I lined up the timing mark on the flywheel and matched it to the one on the flywheel cover. I also lined up the distributor marks and put the belt on.

However when I went to go start the motor I noticed no spark. I took apart the distributor and cleaned the points in there and everything looks good. Tried again nothing. Reset the points in the magneto and set them to .020 as recommended and cleaned the points and reassembled, still nothing. Any suggestions on what else it could be? Also have the recommended spark plugs in, Champion J4C.
 

F_R

Supreme Mariner
Joined
Jul 7, 2006
Messages
28,195
You have to identify where the actual problem is. Do you have spark at the coil button?
 

robstead

Seaman
Joined
Jul 29, 2015
Messages
71
No Title

Most things you need will be in here.

http://www.fiberglassics.com/wiki/images/2/2a/Johnsonservice003.pdf Page 180 fig J81 will show how your throttle linkage goes together

Than you a ton for this, clears up a couple mysteries to me.

My next question that pops to my head after reading through that a couple couples is in the one picture is there a bracket missing? In the book it mentions a breaker plate, is that where it's supposed to be?

Also where the pink mark on the pulley lines up with the metal piece, is that the correct position to put the timing belt on or is the previous mark (second pink hash) the correct one?
 

Attachments

  • photo246483.jpeg
    photo246483.jpeg
    134.4 KB · Views: 0
  • photo246484.jpeg
    photo246484.jpeg
    113.3 KB · Views: 0

robstead

Seaman
Joined
Jul 29, 2015
Messages
71
You have to identify where the actual problem is. Do you have spark at the coil button?

What is the most effective way on doing this? Would any timing issues cause it to maybe ground out?
 

F_R

Supreme Mariner
Joined
Jul 7, 2006
Messages
28,195
1. Remove the distributor cap. Coil is inside.
2. Hold a screwdriver across the top of the coil so that the screwdriver shank is touching the magneto housing and tip is 1/4" away from the button on the coil. Spin belt pulley, and sparks should jump across the 1/4" gap.
3. Timing has nothing whatsoever to do with having spark or not having spark.
4. In your previous post, "Breaker Plate" is the plate that the breaker points and condenser are attached to. I have no idea what those two holes are for.
5. You are nowhere near ready to worry about timing. Get spark first.
6. It is easier to work on that thing if you remove the whole assembly from the motor (3 bolts in black mounting bracket). Then you can access the distributor portion and coil. Clamp the black bracket in a vise---if you have a vise.
 

robstead

Seaman
Joined
Jul 29, 2015
Messages
71
1. Remove the distributor cap. Coil is inside.
2. Hold a screwdriver across the top of the coil so that the screwdriver shank is touching the magneto housing and tip is 1/4" away from the button on the coil. Spin belt pulley, and sparks should jump across the 1/4" gap.
3. Timing has nothing whatsoever to do with having spark or not having spark.
4. In your previous post, "Breaker Plate" is the plate that the breaker points and condenser are attached to. I have no idea what those two holes are for.
5. You are nowhere near ready to worry about timing. Get spark first.
6. It is easier to work on that thing if you remove the whole assembly from the motor (3 bolts in black mounting bracket). Then you can access the distributor portion and coil. Clamp the black bracket in a vise---if you have a vise.

Did what you recommended and no spark on the coil. Could anything else be preventing this or is this a fool proof way to tell me that the coil is dead?
 

F_R

Supreme Mariner
Joined
Jul 7, 2006
Messages
28,195
What this proves is that the trouble is ahead of that location (rules out the distributor portion). Next step is to zero in on the most likely cause. Remove breaker points and individually polish each contact shiny bright, then reinstall and adjust gap to .020" at widest opening. Also remove all wires from the stud that passes through the housing and polish all terminals and the screw and nuts and reassemble tightly. Don't lose the insulators. And never mind worrying about the kill wire that is also attached there.

After you have done all this, recheck spark at the coil.
 

robstead

Seaman
Joined
Jul 29, 2015
Messages
71
What this proves is that the trouble is ahead of that location (rules out the distributor portion). Next step is to zero in on the most likely cause. Remove breaker points and individually polish each contact shiny bright, then reinstall and adjust gap to .020" at widest opening. Also remove all wires from the stud that passes through the housing and polish all terminals and the screw and nuts and reassemble tightly. Don't lose the insulators. And never mind worrying about the kill wire that is also attached there.

After you have done all this, recheck spark at the coil.

Thanks for all the info, will do that and report back if there is spark.
 

robstead

Seaman
Joined
Jul 29, 2015
Messages
71
What this proves is that the trouble is ahead of that location (rules out the distributor portion). Next step is to zero in on the most likely cause. Remove breaker points and individually polish each contact shiny bright, then reinstall and adjust gap to .020" at widest opening. Also remove all wires from the stud that passes through the housing and polish all terminals and the screw and nuts and reassemble tightly. Don't lose the insulators. And never mind worrying about the kill wire that is also attached there.

After you have done all this, recheck spark at the coil.

Almost positive that I have done all this correctly and still no spark. What should be my next step?
Some of the bolts near near the coil that look like it would lead into the magneto a little rusted, is it possible there is moisture in there? Would heating the magneto up clear that up or is the problem most likely bigger then that?
 

F_R

Supreme Mariner
Joined
Jul 7, 2006
Messages
28,195
If you have done all I told you to do, and no spark yet, it could be the coil. After all it is kind of old. Unfortunately, you need a coil tester to thoroughly test it. Meanwhile, how does it look? Any cracks, oozing, or anything?
 

robstead

Seaman
Joined
Jul 29, 2015
Messages
71
If you have done all I told you to do, and no spark yet, it could be the coil. After all it is kind of old. Unfortunately, you need a coil tester to thoroughly test it. Meanwhile, how does it look? Any cracks, oozing, or anything?

It looks pretty solid, shiny black paint and the button looks almost brand new.

I can post a picture tomorrow of the condition if my eyes are fooling me and I might not know what I'm looking at.

Also going to test the condenser later and see the results, could this also lead to no spark at the coil if it's faulty?
 
Last edited:

robstead

Seaman
Joined
Jul 29, 2015
Messages
71
No Title

Here's a picture of the coil, it looks pretty solid to me. Went ahead and tested the condenser and had no reading so I ordered a new one along with some points just to have an extra set handy, will post results when I install the new condenser
 

Attachments

  • photo246854.jpeg
    photo246854.jpeg
    50.1 KB · Views: 0
  • photo246855.jpg
    photo246855.jpg
    54.7 KB · Views: 0
Last edited:

F_R

Supreme Mariner
Joined
Jul 7, 2006
Messages
28,195
No Title

Coil looks like it has been replaced (not the original). They left the insulators out. Item 47, part number 510538. And where did they connect the ground wire?
 

Attachments

  • photo246900.jpg
    photo246900.jpg
    146.8 KB · Views: 0

robstead

Seaman
Joined
Jul 29, 2015
Messages
71
Coil looks like it has been replaced (not the original). They left the insulators out. Item 47, part number 510538. And where did they connect the ground wire?

I'm assuming this could be a huge loss to why there was no spark? Is there any alternative to ordered the insulators or is the OMC part necessary?

And the ground is hooked to the inside of the housing where the kill wire from pulley also comes down
 

F_R

Supreme Mariner
Joined
Jul 7, 2006
Messages
28,195
The insulators are there to PREVENT something bad from happening. That bad something is arcing through the side of the coil to the case. If it is not arcing through, the bad thing has not happened, so is not the problem. But once it does arc through, the coil is shot. It's up to you to decide whether or not to put them in to prevent arcing through in the future.

Upon closer look, I guess I do see the ground wire, under the head of the screw that holds the coil in--where it is supposed to be.
 
Top