4 Winns + 5.0L OMC -- top speed? and bogging..

Offrddrver

Petty Officer 3rd Class
Joined
Sep 19, 2009
Messages
95
Pantz, (About the tachometer picture.)
You said I'd get the short end of the stick in trading information, but your Tachometer picture just solved a mystery that I had for years. "Where does this board attach?" Mine was just hanging down behind my dash when I bought the boat. I neatly wire tied it to a solid point to make things clean and make sure it didn't cause a short. Now I know, but now I have to FIX IT! More work......oh yeah it's a boat.....Ha Ha
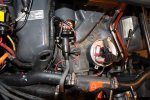
Your wire loom behind the dash looks clean. That is a good thing.

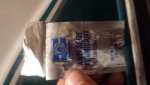
There is a small tag on the side of the distributor, but OMC paints over it, so some of the markings/stamped letters-#'s may be filled in.
I'll send some pics of mine tonight when I get home.
Mine is a Prestolite IDU7806 (B) the best I can tell (numbers are painted in)
It also has MARINE SAE 11171 stamped on it
And it has 986969 stamped on it. (I think this is the OMC part number)
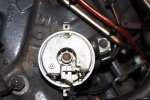
My cap is part number IBM-1008.

I believe yours is a Prestolite due to the screw down cap.
Under that is an electronic pickup sensor (mine is a metal C shape with a little brown sensor in the opening of the C). Prestolite IBD according to the SELOC manual.
Under that electronic sensor is your advance mechanism. Centripetal weights system.
By the way this is just information, don't take this stuff apart unless you have the SELOC manual to investigate. Moving the sensor requires a full setup.
If you want to remove the cap and take a picture that is fine but don't go any further. You will see when I send pics as I have it all apart right now.

Regards,

Offrddrver
 

Offrddrver

Petty Officer 3rd Class
Joined
Sep 19, 2009
Messages
95
No Title

1st picture is the Prestolite IBD (integral breakerless distributor) i.e...Electronic pickup sensor.
2nd picture shows the sensor removed and shows the weighted mechanical advance used by this Prestolite distributor.
 

Attachments

  • photo225715.jpg
    photo225715.jpg
    45.1 KB · Views: 1
  • photo225716.jpg
    photo225716.jpg
    44.3 KB · Views: 1

Offrddrver

Petty Officer 3rd Class
Joined
Sep 19, 2009
Messages
95
No Title

Uprade from Prestolite IBD to Pertronix Ignitor II and Flamethrower II coil.
(first picture is required diode/resistor upgrade *home made*, and second picture is the Pertronix upgrade)
Upgrade installed as old Prestolite unit shows to be shorted internally when measured by the SELOC manual instructions and by testing with Fluke meter.
Old Prestolite metal sensor body shows 12 to 13 Vdc (near battery voltage), which is very bad as it is directly grounded when mounted into the distributor body.

Again, I already checked my grounds and ignition +Vdc wiring and no short shows if the original Prestolite (and gauges) are removed from the circuit.
Testing starts on 7/19/15.

Hope to resolve several issues as noted in my other posting.
1. Holeshot with no skier is slow and shudders.
2. Holeshot with skier is so bad with shudder and lack of power that the boat no longer pulls up light teenage skiers or wakeboarders.
3. Shudders at W.O.T. and holds low RPM for several minutes and then jumps up to normal W.O.T.
4. Motor shudders and loses RPM when trimming up/down. (per Bondo this is believed to be a ground issue. Will address grounds again if this issue is still present with new ignition.)

Pantz, are these the kind of issues you are having (shudder or bogging on holeshot)

My best guess on the cause of the Prestolite failure is that I let my battery go low and it shorted out. (AZ heat sucks batteries dry quick.) This possible short took out a stereo, an amp for base speaker, a depth finder, and fish finder. And yes, all of these components had the factory rated fuses. None of the fuses were blown, but all components are DEAD to this day. Expensive lesson on checking my batteries. And when this happened the 50 AMP circuit breaker tripped, but it didn't save anything as noted above.
 

Attachments

  • photo225712.jpg
    photo225712.jpg
    40.6 KB · Views: 0
  • photo225714.jpg
    photo225714.jpg
    41.4 KB · Views: 0

pantaloonz

Petty Officer 1st Class
Joined
Nov 28, 2014
Messages
237
Hi OffD,

First let me answer the Tach/Board question. You can see by my picture that this board connects - 'horizontally' across the back of the tachometer. The top of my tachometer has a black square type connection to it (the only one on this guage). There are 4 connections :

9, 10, 12, and 2 oclock. The board's connections points are 9 and 2

My issues are similar but not exact.

Regardless of Load, my engine will draw down/bog right after IDLE position, more so when it's cold, much less so when it's warmed up. Load or no Load. Gets better with higher octane fuel. -- Someone has suggested one of the plugs may not be firing well, this could definitely be an advancing issue.

I actually show a higher than normal RPM when 3/4 throttle.. sometimes it pops back to normal.. sometimes not. I did pay attention to this while we did a lot of boating this weekend. While I find no actual pattern here's what I got:

Start the boat : idle RPM reads 1300..., shut it off .. start again.. 1200 RPM.. shut off after it's warmed up a bit .. 1200 for a few seconds then down to under 1000 (estimating ~600)

Cruising along (worse when cold) -- after a minute of cruising, Tach will read close to appropriate (from 5500 down to 4500) RPM at about 5/6th throttle. There appears to be no pattern to this, it will just suddenly bounce down to an appropriate reading.

There is no shudder or shaking however the RPMs do flucuate as I adjust trim.. but I thought this was normal and has helped me establish appropriate trim levels, I use the engines' sound and RPMs(when tach appears to be working right) as my guide. The RPM's should decrease slightly with appropriate trim .. Yes?

Grounding issue?.. I posted a picture a while back when I replacing the trim sensor of a ground cable that sheared off around my lower unit.. I never fixed this.. could this be causing some weird issues possibly?

-Pantz
 

Offrddrver

Petty Officer 3rd Class
Joined
Sep 19, 2009
Messages
95
Sorry Pantz, my writing was confusing. I didn't actually have a question for you about the wire connector board. I have had "that question" to MYSELF about the connection board every since I bought the boat. I am usually very good at fixing/finding location of moved parts, but that was one I had never figured out....until your pics. What I was trying to say is that your pictures SOLVED my question/mystery. THANK YOU!

I'll try to clarify my trim issue. (which in my case proved to be a short internally on the Prestolite sensor)
My issue - When I pushed the trim UP/DOWN button the motor dropped RPM instantly (like a high speed miss). As soon as I released the button the miss went away. I suspect it was the draw from the trim motor combined with the direct short to ground in the distributor.
This is now gone with my new setup.


RPM - My RPM increases from around 4100 RPM up to 4400+ (less than 4500) as I trim up. (as long as I don't trim UP too far....too far and the RPM would go extremely high. Like you I hear the proper sound of the motor.) **Speed increases**
AND
My RPM degreases back down to around 4100 RPM as I trim down. **Speed decreases**
These notes are based on W.O.T. and once I'm at cruising speed.


RPM READING JUMPS - My motor would sometimes feel like it was bogging down (missing spark) at W.O.T. and would only ramp into the 3000's range, and then all the sudden it would jump up to normal 4100 to 4400 RPM for no reason.

Also my holeshot was bad warm or cold.

All I can say is all of this has gone away with the upgrade. However, I only reached the FIX after hours of proper troubleshooting.
My boat ran crummy but good enough to take it out for several seasons until I stepped through the whole Fuel, Timing, electrical troubleshooting.


One more question: Do you have the SELOC OMC maintenance manual? If not I highly suggest buying it ASAP. (not the Clymer manual, it is not very good)
It will take you through timing check and setup.
It will take you through fuel/air mix and idle setup.
It will take you through the electrical troubleshooting of your Prestolite IBD distributor sensor check. (presuming you have the IBD system)

I suspect you have an electrical issue, and yes most likely a ground or short to ground and that is why your tach is jumping around.

I highly suggest you buy or borrow an external TACH/dwell meter. I use mine every time I troubleshoot (and I ignor my dash tach except to compare to the external tach)
I highly suggest you buy or borrow a timing light. You need to find out what the timing is and if the advance is working.

And you need a Fluke meter or other multi-meter for every step of the electrical troubleshooting.

Once you have these things you will have DATA to actually work with. That real data will get you to the fix.

Sorry so long, but best of luck.

Regards,

Offrddrver
 

Offrddrver

Petty Officer 3rd Class
Joined
Sep 19, 2009
Messages
95
One last thing, the broken ground cable (not wire) will not cause this issue. I had one of those wires disconnected and my boat ran great until my distributor failed.
Again, YES on ground or short to ground issue is suspected, but not due to this broken cable on your outdrive.
 

pantaloonz

Petty Officer 1st Class
Joined
Nov 28, 2014
Messages
237
Hi Offd

Ok, I understand what you are saying now!

Yes I have the manual, I bought the manual the next day after buying the boat! ;)

I don't yet know enough to work on the distributor, but I'm learning. Trying to find a timing light and external tach, I don't want to cough up the dough to buy one.

I have to rebuild a hot tub in the next few weeks so I won't get too much time for boating troubleshooting, thank you very much for the extensive info and I'll post back when I get some more work done!

-Pantz
 

Offrddrver

Petty Officer 3rd Class
Joined
Sep 19, 2009
Messages
95
Sounds good, best of luck.

From fixing a boat that you want to keep water out of.....
To fixing a tub that you want to keep water in.....
At least you are diversified in your repairs.

If I can help, just let me know. I'm always happy to post pics or troubleshooting steps to lend a hand.

Best regards,

Offrddrver
 

pantaloonz

Petty Officer 1st Class
Joined
Nov 28, 2014
Messages
237
Hi again Off,

I've unscrewed the distributor cap to be greeted with a black fin like looking object.. I'll take a picture later.

I was going to do a spark plug check... but just looking at the plug locations in and around the manifold, I know I'm in for a major job.

I don't want to remove the manifolds, as I'll have to replace the gaskets I'm sure.. GRRR.

Got any tips for getting at the spark plugs?
 

Offrddrver

Petty Officer 3rd Class
Joined
Sep 19, 2009
Messages
95
Pantz,

Yes, I'll try to send pics later tonight for my tools (you will need to modify some stuff.

First, you don't have to pull any engine parts to get to the plugs. (and yes you would need new gaskets if you did that, but you won't)

What you will need.
 

Offrddrver

Petty Officer 3rd Class
Joined
Sep 19, 2009
Messages
95
Pantz,

Yes, I'll try to send pics later tonight for my tools (you will need to modify some stuff....unless someone out there has special tools for the job)

First, you don't have to pull any engine parts/manifolds to get to the plugs. (and yes you would need new gaskets if you pulled your manifold, but you won't and DON'T)

PLUGS:

What you will need:
1. spark plug socket
1a. remove the rubber boot from inside the spark plug socket as you will need the "slop" to get in/out of the tight space.
1b. I ground down the top edge of my spark plug socket to get in out of the tight space easier.
2. swivel adapter
2a. my swivel adapter is modified.
2a.1. grind off the locking ball so that the swivel adapter slides in/out of the spark plug socket with no pressure.
2a.2. grind down the thickness of the swivel adapter, again for more room.
(I'll send pics later tonight)
3. a standard extender adapter. (no mods here)
4. a standard ratchet (no mods here)

Procedure:
1. remove 1x spark plug boot at a time. (only do one at a time so you never cross up any spark plug wires)
2. Insert the modified spark plug socket in over the spark plug with your fingers.
3. Insert the extension into the modified swivel adapter.
4. slide the swivel into the spark plug socket.
5. Insert your ratchet and start reversing the spark plug (only a couple turns at this point. you don't have room to back it all the way out)
6. Remove your ratchet/extender/swivel and back the plug all the way out with you fingers and pull the plug and socket out together. (don't let your spark plug drop)
7. Check/Set your plug gap. (standard is 0.035) (my modified/upgraded ignition calls for 0.040)
8. put anti-seize on the plug threads (don't get it on any other part of the plug)
9. put the spark plug and socket into the motor by finger.
10. tighten with your fingers first, making 100% sure you don't cross thread (the plug should reach bottom with just your fingers turning the socket)
11. Insert the swivel/extender/ratchet and make your final snug turn of the plug. (you can use a torque wrench if you want, but I just do a solid snug fit.....not to tight.)
12. Remove the swivel/extender/ratchet first
13. Now remove your spark plug socket by finger.
14. lightly grease the inside of your spark plug boot with dielectric grease
15. Install your plug wire.
16. REPEAT for next seven plugs.


CAP & ROTOR: (if all is standard equipment)

The black fin is your rotor.
Inspect inside your cap for dust, cracks, burning marks
Inspect inside the cap on the metal parts to see if there is any rubbing

The rotor has two metal parts that need inspection.
1. Inspect the top thin flexible metal tab for excessive wear (it should only have a little dot on it)
2. Inspect the metal tip for pitting or indication that it is hitting the cap.

Any damage replace BOTH cap and rotor.

The rotor just pulls strait up/off of the distributor shaft.

Under the rotor is your sensor and sensor pickup (If you have my same assembly from my earlier pics.) Prestolite IBD
Inspect that per your SELOC manual. If you are showing low voltage on your positive coil check then you may have a sensor short to ground. (like mine)
If so, your bogging won't go away unless you replace the sensor. (but go through the full checklist to make sure your voltages are good)

Send pics of the inside of your distributor so I can see if you have the standard Prestolite IBD or an aftermarket setup or points.

Hope that helps.

Best regards,

Offrddrver
 

Offrddrver

Petty Officer 3rd Class
Joined
Sep 19, 2009
Messages
95
Pantz,

My Prestolite IBD electrical test results are in my former post.....
[h=1]1992 5.0L Ford RPM shudder and Trim RPM drop[/h]
Lots of details, but main thing to look for were my voltage readings at each step of the SELOC manual Prestolite IBD inspection.

Offrddrver
 

Offrddrver

Petty Officer 3rd Class
Joined
Sep 19, 2009
Messages
95
No Title

See pics of tools.
First pic just shows tools used. (not the good swivel socket)
2nd pic shows new Vs modified swivel socket. (tip is shortened, round ball is shaved flat, front/back edges ground to move of a cone shape)
3rd pic shows my lightly modified spark plug socket. This socket has the rubber sleeve removed from inside otherwise you won't get it off the spark plug once inserted. And back edges are slightly ground down to allow more room and get a grip with your fingers.

It works as listed above. Not easy, but it works.

Offrddrver
 

Attachments

  • photo226393.jpg
    photo226393.jpg
    11.2 KB · Views: 0
  • photo226394.jpg
    photo226394.jpg
    16.2 KB · Views: 1
  • photo226395.jpg
    photo226395.jpg
    15.6 KB · Views: 1

pantaloonz

Petty Officer 1st Class
Joined
Nov 28, 2014
Messages
237
Hi Offd,

I went after it on Saturday..not fun at all. (more on that in a second)

I also wanted to change the wires as the connections are worn. I bought the automotive replacement.. the boots connecting to the spark plugs were extra long just like the existing wires, but sure enough they were not long enough. I knew this was a high probability from another thread. So, I bought some universal make your own.. but those didnt work either, the part that connects to the distributor were too tall (like 4 inches long) they were the wrong style, the boots were not deep enough to make good connections to the plugs. So I was unable to change out the wires. I think I need the OEM wires, or suitable replacement.. maybe that wasn't the issue though...

I took off the easiest spark plug, I think it's #8, facing the stern the plug back on the furthest right. (aft-most, port side) was very accessible. Turns out these are generic champion auto spark plugs.. I think I can do better. I asked about NGK's however the the gentlemen suggested those were more for foreign(toyota,honda) vehicle. So I went for the better quality Autolites - which was the ford recommended plug for this engine.

The remaining spark plugs were a freaking hassle, but I used a combination of long fingers (my own came in handy!) and one or more of these:
20150725_151836.jpg

I prefer the top one for removal as the leverage helps to "CRACK" them. but it's angle is not steep enough.. the 2nd one down worked the best for insertion. But on #6 and #2 it was a massive struggle. Shame on Ford for such a lousy spark plug access, that's very poor design if you ask me, plugs should be MUCH easier to remove, especially since it's a common tune up item.

Here's plug #8 20150725_133016.jpg

this plug and plug #2 had a little bit of Oil on the threads.. maybe my rings are starting to wear out? The rest of the plugs were just dirty/worn but what appears to be normal wear.


The bummer is that it did not fix the issue, though each time it seams to get a fraction better. I would say the performance of the boat improved overall, a bit snappier from the hole, smoother overall hum, but still hesitation after idle less and less as engine warms.

Thoughts?..back to the carb?

-Pantz
 

pantaloonz

Petty Officer 1st Class
Joined
Nov 28, 2014
Messages
237
Woops,

I replied to your posting before seeing you posted more info.. it's funny but I followed your procedure quite the same,.. although I did not spray with anti-seize :embarassed: I guess I may have some hard work next time they come out.

gap was standard, and I added dielectric grease to the boots. I did not grind the tools down, but I'm GOING to so I'm ready the next time. If the the large extension bar was just slightly thinner and rotated another 3 degrees it would work awesome, so I'm going to do that.

I will attend to the distributor this week, following your procedure.(THANK YOU for the specific info)

Got any recommendations for replacement wires? my cap looks fine.
 

pantaloonz

Petty Officer 1st Class
Joined
Nov 28, 2014
Messages
237
OffD

I think I just found a nice replacement wire kit.. I checked right here on iboats, but could not make a good match, wound up finding a nice belden set that seem to even have accommodate for the angle of insertion on the plugs!! (that's a very nice touch)

I'll send some distributor pics tonight or tomorrow night, still need to get going on that hottub, and football camp starts tonight!! Sheesh!
 

Offrddrver

Petty Officer 3rd Class
Joined
Sep 19, 2009
Messages
95
No Title

Pantz,

Sounds like you are a busy man, my sports seasons will start soon as well Twins in fastpitch softball, son in L.L. Baseball, and I play one or two leagues per season and there is always something to fix and then there are boat repairs on top of it all.

A few points on your comments
1. modify your tools until they work for you (I have many modified tools for this boat, all stored on the boat in an army surplus water tight ammo can.)

2. remember, this is an automotive engine modified to meet boat specs, so these plugs are not as hard to get to on a mustang or other 5.0L cars (I had two mustang 5.0's and those plugs were not hard to change.....for what it's worth)

3. anti-seize is a silver paste, not spray, that you can buy in a jar, but I just buy the cheep stuff that hangs on a rack at the checkout at your local auto store (wipe it on with small brush or your finger) it makes it easier to finger tighten and remove your plugs. (See pic)

4. I have autolite plugs (autolite 24) (See pic) (I went to the autolite web site and they call for Autolite 25 for OMC marine, and Autolite 24 for FORD marine.) Both are D15 heat range, so I'm not sure the difference. **Its a FORD OMC, so maybe 24.5 plugs...just joking**

5. My plug wires are the angled type boots and they don't touch any part of the motor block or exhaust (See pic)

6. Please let me know the new plug wire make/number when you find one that works. I have never changed mine. I have two minor repaired wire boots that I often think about replacing. I had spark jump from a plug wire in the past, and I know that can cause performance issues.

7. Due to your oiled plugs I would borrow a compression kit from Autozone or Orileys auto store (FREE as long as your return it). ("good times", you'll have to pull plugs again, AND get the compression kit to fit also) All of your pistons should have close the same compression, if not.....oh boy, you'll have bigger choices to make! Chasing fuel or spark no longer makes sense if your compression is shot.

8. Distributor..... If you have the Prestolite BID setup then check your sensor gap as noted on SELOC page 10-24.
9. Distributor..... If you have the Prestolite BID setup then following SELOC page 10-24 PRIMARY VOLTAGE TEST & VOLTAGE DROP TEST. If you have around 8 to 10 Volts in Primary Voltage Test step 3, then let me know ad we will discuss this further. (just go through the whole test and write down every reading you get)

Enough said, continue the battle as you will feel very accomplished when she is running like a champ. And you will get to know your boat inch by inch.

Offrddrver
 

Attachments

  • photo226567.jpg
    photo226567.jpg
    19 KB · Views: 0
  • photo226568.jpg
    photo226568.jpg
    20.4 KB · Views: 0
  • photo226569.jpg
    photo226569.jpg
    16.9 KB · Views: 0

pantaloonz

Petty Officer 1st Class
Joined
Nov 28, 2014
Messages
237
I got to thinking last night.. what about those flexible socket extensions? ... anyone got those to work? I know there is very little room from the head of the sparkplug socket wrench but I know a couple plugs where that kind of device would work fine.

When you said I had bigger choices to make.. if my compression test shows unreliable compression in one or more cylinders I could be looking at a much larger job?

I've inquired with some more mechanically inclined folks who all told me the same thing.. (which makes me a little sad) -- "That's a 1992 engine? .. drive it until it dies, and if you still love the boat, put a new engine in it" .. I'm a sucker for the old engines, the less electric 'do-dads' the better. Also being that I only paid $1,400 for this boat and trailer, I'm not opposed to a 'labor intensive job' -- but I wouldn't sink more than $500.00 more into it.

I will post again after I can get the distributor test done. Last night I moved her into position so I can get the muffs on it.

-Pantz
 

JJBoatr

Petty Officer 2nd Class
Joined
May 3, 2011
Messages
144
Just had to change my plugs on the dock over vacation and I used the following to get to them. This list is from the socket out...5/8" spark plug socket, 1/4" to 3/8" step up adapter, 1/4" universal, 1/4" extension (3"), 3/8" to 1/4" step down adapter, 3/8" ratchet. It sounds ridiculous, but it puts the smaller universal in the perfect spot to effectively loosen or torque the plugs. Best thing is no grinding required on any tools. I only found this method because I had to work with what I brought to an island.
 

Offrddrver

Petty Officer 3rd Class
Joined
Sep 19, 2009
Messages
95
Thanks JJB for the tools suggestion. Always looking for suggestions to make life easier.
What plugs do you run?
And have you replaced your plug wires? If so any manufacturer or part number?

Thanks,

Offrddrver
 
Top