A How to... Installation of CMC PT-130

Piece715

Senior Chief Petty Officer
Joined
Jan 26, 2009
Messages
757
I'm about to tackle this part of my restore and as always have been doing some research and asking around for help hints and suggestions. (Mods if you think this post may do better in another section please feel free to move.)

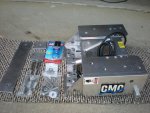
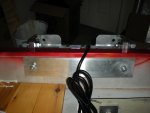
These units are fairly popular but I have no experience with them. All the threads I've looked at say follow the manufacturer's instructions and it'll roughly take 4 hours. I figured a "how to thread' could prove beneficial.

Suggestions for posts:
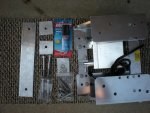
1) Links to other threads with useful info on mounting/wiring
2) Helpful hints and suggestions for ease of mounting (pics always welcome)
3) Positioning for performance
4) Hardware used (bolts, nuts, sealant, etc)
5) Best method for re-mounting outboard
6) Any other pertinent info

Please refrain from compatibility questions as I would like to keep this an informative thread for anyone wishing to tackle the installation/wiring of one of these units.

I'll start with a link to the PT-130 Owners manual
http://www.cook-mfg.net/PDFs/PT-130 Owners Manual.pdf
 

Piece715

Senior Chief Petty Officer
Joined
Jan 26, 2009
Messages
757
Re: A How to... Installation of CMC PT-130

Here was a useful article for help with wiring originally posted by rsimmons42
http://www.arcomarine.com/xhtml/tech tilt trim motor tips.pdf

Helpful Post by SuzukiChopper..
The relay should have the poles labeled... 85, 86, 87, 87A (or 87Q), and 30.

Relay 1
30 - One wire from the PT130
87A - Ground
87 - Constant 12v
85 - Ground
86 - Power from one On position of your switch

Relay 2
30 - OTHER wire from the PT130
87A - Ground
87 - Constant 12v
85 - Ground
86 - Power from the OTHER On position of your switch

When the switch is pushed one way it will switch one relay to provide power to one wire of the PT130. When the switch is released, it defaults to ground. Push the switch the other way, polarity is reversed.

Original thread of this info
http://forums.iboats.com/showthread.php?t=295376&p=1985374&highlight=CMC+PT130#post1985374
 

Piece715

Senior Chief Petty Officer
Joined
Jan 26, 2009
Messages
757
Re: A How to... Installation of CMC PT-130

Here is some information that was given by Huron Angler. He is currently performing his restore on his SS and is to the mounting of the CMC. http://forums.iboats.com/showthread.php?t=365995 the CMC talk starts around page 68ish

"I ordered a 16"x3"x1/4" piece of 6061 aluminum, and 2 pieces of 3x3 to use as backing plates for the bracket bolts.
With the added leverage of the bracket they will help a bunch. My dad's 24' Seaswirl has the same, installed at the dealer with his 225hp Yamaha.

With the 6" set back...we can get away with mounting the motor a tiny bit higher, since the prop gets "better" water(less air bubbles, etc) further back from the stern.

There's a formula out there somwhere that tells you for very 1" set back you can raise the motor XYZ sixteenths of an inch or something."

EZ had also mentioned this formula but didn't remember it exactly... Now I know that its best to perform sea trials at different heights to find the "sweet spot" for performance with min cavitation on turns but this formula could be a great starting reference. Anybody know this formula?
 

AmigoAzul

Seaman Apprentice
Joined
Sep 23, 2009
Messages
44
Re: A How to... Installation of CMC PT-130

The installation instructions that came with mine and from others here say that it can be raised between 1 and 3 inches. Once I have the motor mounted I will give the results. Without the CMC the boat maxes out at 38mph(gps) with a 1986 85hp Force.
 

Piece715

Senior Chief Petty Officer
Joined
Jan 26, 2009
Messages
757
Re: A How to... Installation of CMC PT-130

The mounting of the PT 130 was pretty straight forward. The bolts that came with the unit were too small to fit through both unit and transom... but you're suppose to use the bolts that held the motor on... went with 1/2" diameter 4in bolts washers, lock washers, and nuts.

With my set up i measured from the top of the engine bracket to the cav plate and it was about 21 inches. On the TnT unit there are two levels u can set the unit at... two holes for top bolts in standard BIA configuration and a slot as bottom hole for adjustments.

My motor when the unit was mounted at the lowest setting would have the cav plate even with or just above the keel. So in light of this I mounted the TnT on the high setting for proper clearance and to give me just a lil play with engine height.

I prepped all transom holes and bolts with Loctite Marine epoxy couldn't find 3M 5200 but that is the most recommended. The washers on the TnT side of bolt could not be used as they wouldn't fit... the bottom bolt was at the bottom of adjustable slot and washer was hitting side.

I also used 6061 aluminum stress plates to distribute the stress from each bolt. The top plate used was a 16"x3"x0.25" for the top two bolts. The bottom two bolts used a 3"x3" plate each.

I have yet to wire the unit and all of this was installed without need of powering unit. It was very straight forward and easy to trouble shoot. Measure your engine mount to cav plate and mock up TnT before install for best settings. MAKE SURE TO USE ALL SS HARDWARE... BOLTS MINIMUM OF 1/2"

Here are some pics of the work. If ya have a question please ask... Ill answer the best of the my ability
 

Attachments

  • 341.jpg
    341.jpg
    148.2 KB · Views: 1
  • 342.jpg
    342.jpg
    146.3 KB · Views: 1
  • 343.jpg
    343.jpg
    127.2 KB · Views: 1
  • 347.jpg
    347.jpg
    130.3 KB · Views: 1
Last edited:

Piece715

Senior Chief Petty Officer
Joined
Jan 26, 2009
Messages
757
Re: A How to... Installation of CMC PT-130

Pictures of the 6061 aluminum stress plates... Here is the specs on 6061 aluminum

6061 Aluminum is, by most any measure, the most commonly used aluminum alloy. It is specified in most any application due to its strength, heat treatability, comparatively easy machining, and weldability. It is also capable of being anodized, adding a layer of protection for finished parts.

The main alloy ingredients of 6061 aluminum are magnesium and silicon.

6061-T6 Aluminum
Physical and Mechanical Properties Ultimate Tensile Strength, psi 45,000
Yield Strength, psi 40,000
Brinell Hardness 95
Rockwell Hardness B60
Chemistry Aluminum (Al) 95.8 - 98.6%
Chromium (Cr) 0.04 - 0.35%
Copper (Cu) 0.15 - 0.40%
Iron (Fe) 0.70%
Magnesium (Mg) 0.8 - 1.2%
Manganese (Mn) 0.15% max
Silicon (Si) 0.4 - 0.8%
Zinc (Zn) 0.25%
 

Attachments

  • 344.jpg
    344.jpg
    129.1 KB · Views: 1
  • 345.jpg
    345.jpg
    129.3 KB · Views: 1
  • 346.jpg
    346.jpg
    134.4 KB · Views: 1

Piece715

Senior Chief Petty Officer
Joined
Jan 26, 2009
Messages
757
Re: A How to... Installation of CMC PT-130

Has anyone found any gauges that are compatible with the cmc pt-130. I remember reading a thread a while back stating that the trouble was that the unit when ordered without the gauge doesn't have the right relays/or sending unit to run a gauge... I figured I'd add to this thread to see if you could get some more information out there for anyone wanting some info on the PT-130.

If you have helpful hints and tips post em, all info is welcome!
 
Top