CDI no spark - 1995 3cyl 60hp - ELPTO 2-stroke (Mariner)

LundTamer

Cadet
Joined
May 13, 2015
Messages
22
CDI no spark - 1995 3cyl 60hp - ELPTO 2-stroke (Mariner) s/n:0G268097
Very strong cranking;
Removed bullet connector inside switch box = wire circuit - black with yellow stripe;
Jumped across starter solenoid to crank (with Key-on);
With all plugs removed tested one at a time with ground strap touching block ground, no visible arc in daylight.

Going to read the Seloc manual but don't have a DVA adapter for my DVOM... appreciate any help on next steps to isolate the issue. I don't have the money to throw parts at it. I want to fix it once and right.

Thanks for any info or insight...
 

Texasmark

Supreme Mariner
Joined
Dec 20, 2005
Messages
14,558
Look in the archives for the DVA subject. I have described the circuit several times. Only takes 3 components: diode, storage capacitor, and bleeder resistor. Radio shack has/used to have the parts. Sizes are not critical as long as you get enough of a voltage rating.
 

Texasmark

Supreme Mariner
Joined
Dec 20, 2005
Messages
14,558
Thanks... I see... the capacitor stores the voltage a little longer to get a reading...

Yepper. The diode is to ensure only dc is fed to the cap and the resistor slowly bleeds off the charge keeping the voltage "fresh" and discharging the C after the test. Without the adapter, the pulses are too thin and occur too seldom for the meter to be able to read them. Other name for the circuit is "sample and hold".
 

LundTamer

Cadet
Joined
May 13, 2015
Messages
22
Although an oscilloscope with a high sample rate and a record function you could probably catch it just fine, but those are alot more expensive than 30-40 bux in project parts...!..... I tried to order a pre-built dva but found the lead time mid June for shipment... canceled that order, road my bike to radio shack.... out of business sale all of the damn parts were gone from their bins.... plan C... ordered a project box, pcb, standoffs, binding posts, screws, banana to alligator cables, diodes, resistors, cap(s) from parts express... looks like I should be soldering by Friday... then can finally get some readings to isolate my ignition fault... I need to beaf up my parts bins to have more of this stuff lying around when I need it....

I think after I'm done I will make a flow chart showing the steps to troubleshoot the ignition.. it seems very similar between different motor models and even other manufacturers...
 
Last edited:

gm280

Supreme Mariner
Joined
Jun 26, 2011
Messages
14,592
Sad to read so many CDI, Thunderbolt, Quickfire ignition modules that crap out, And knowing they are usually the capacitor that breaks down making them junk, it would be interesting to be able to open them up and replace those toasted caps repairing those ignition units. But seem the manufacturers love using epoxy to encapsulate their ignition modules and therefore will sell you a new one... If there were something to dissolve that epoxy, you could fix so many modules and make then useable again at a mere fraction of new cost. Such a waste of electronics...
 

Texasmark

Supreme Mariner
Joined
Dec 20, 2005
Messages
14,558
Sad to read so many CDI, Thunderbolt, Quickfire ignition modules that crap out, And knowing they are usually the capacitor that breaks down making them junk, it would be interesting to be able to open them up and replace those toasted caps repairing those ignition units. But seem the manufacturers love using epoxy to encapsulate their ignition modules and therefore will sell you a new one... If there were something to dissolve that epoxy, you could fix so many modules and make then useable again at a mere fraction of new cost. Such a waste of electronics...

There is an epoxy dissolver. It's used in industry on assembly lines where at final test a module of a sort fails and has to have a component replaced considering that task is cost effective vs just trashing the failed unit. No idea as to source or price as I didn't do the work. But I'll bet a quick search on www will find some for you.

Yes any old scope and I'd say any scope and voltmeters like some of the Fluke brand have digital readouts that can show you the fast rising, narrow, low rep rate pulses. But like scopes they are pricy too.
 

LundTamer

Cadet
Joined
May 13, 2015
Messages
22
In any case, I took readings with my home made DVA and it works great.. Thank you TexasMark.

I'm getting around 53-54 volts at the green/white wire at all three coils while jumping battery voltage to the connection on the starter solenoid that has the yellow/red wire (ignition). Motor cranks over fast. I have zero spark at all three spark plugs. (using both a spark gap check tool and a spark plug to a ground)

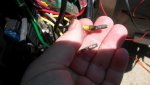
I went to disconnect the two yellow wires / bullet connections they were tucked in behind and I did not notice before..... the insulation near the bullet was "burned"!!!!.... and some corrosion was seen on some areas of the bullets. Looks like I should find some 12 gauge wire.... and solder in some new sections with shrink tube.

I'm somewhat at a loss at this point because between the CDI information I looked up for the 3 cylinder motors, and the seloc manual... I don't know which set of measurements really apply to my engine. So I don't know if the 54 vdc is adequate. The CDI chart talks about measuring a blue wire to engine ground, it doesn't say where to take the measurement... i.e. close to the switch box? with the circuit disconnected at a bullet juncture? and it talks about a power pack... where is this power pack? Is this the switch box?
It would be a strange coincidence that that all three ignition coils would go bad at the same time, so I'm thinking maybe the voltage is supposed to be more like 150vdc, but that is a guess (I don't like guessing). Is a mercury manual a better option? I'm not liking the Seloc nor CDI manual, but maybe after I can learn some items between the lines it will make more sense.

After disconnecting the yellow wires (stator to regulator) I did again confirm "no spark" on all three cylinders per the CDI instructions, I tested the reading at the coils again as well, all around the same voltage as before.

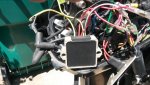
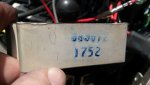
Now I was looking in the seloc manual and trying to find the correct pin-out for the regulator/rectifier and there is nothing in the book that matches... there are no A,B,C labels on the wires coming out of my regulator. Can anyone give me a hint on how to test the regulator? mine has a grey wire for the tack, black-ground, two red wires (one to fuse, one to solenoid connection) and two yellow wires (stator).
I can tell already the the resistance reading fluctuates when I move one of the yellow wires coming out of it... so there must be some heat damage to the wire. I can potentially cut off enough of it to repair it but I'd like to confirm the device itself is ok to use, I'm leaning towards replacing it.

I will post a picture in case any of you guys have any pin-out or test information.... resistance from yellow to red, or to the black ground... I don't know if this is an original mercury part or an aftermarket part (bought the boat used). None of the wires are showing a dead short to ground, but I'm getting wildly different resistance readings in the k oms or mega ohms depending on which circuit.

Thanks in advance for any info..


20150522_123927_zpsx6d9vtcy.jpg 20150522_124014_zpsgmstmmxy.jpg
 

Attachments

  • 20150522_124014_zpsgmstmmxy.jpg
    20150522_124014_zpsgmstmmxy.jpg
    169.7 KB · Views: 0
Last edited:

LundTamer

Cadet
Joined
May 13, 2015
Messages
22
here is the regulator......... 20150522_134411_zps4unbpw55.jpg 20150522_134439_zpsmalynsej.jpg image_221339.jpg
 

Attachments

  • 20150522_134411_zps4unbpw55.jpg
    20150522_134411_zps4unbpw55.jpg
    58.5 KB · Views: 0
  • 20150522_134423_zpsd4vh8imw.jpg
    20150522_134423_zpsd4vh8imw.jpg
    190.5 KB · Views: 0
  • 20150522_134423_zpsd4vh8imw.jpg
    20150522_134423_zpsd4vh8imw.jpg
    190.5 KB · Views: 0
Last edited:

Texasmark

Supreme Mariner
Joined
Dec 20, 2005
Messages
14,558
I no longer have my manual as I gave it away with my boat. The yellow wires are ac input voltage from the stator as stated. If you experience a high current, like attempting to charge a dead battery, or have corrosion at those bayonet connections causing high resistance then under normal operation you can over current/generate enough current from the stator input just like any part of the regulator system, and burned wiring/connectors are the result. I would think if the yellow wiring connections are burned and none of the other red or black wires/connections show problems, either your rectifier/regulator is malfunctioning (internal short suspected) or your yellow connections are corroded.

The voltage output of the rectifier/regulator maxes out at about 14.5v when you have a near to fully charged battery and the engine rpm is above 1000 per the manual recalling. Only way the rectifier/regulator would affect your CDI's is if the red wire to them is low on voltage; red wire coming from the input terminal to the starting solenoid which is commonly used as a convenient junction point for 12v distribution, besides having the high current wire from the battery present to send high current through the solenoid, when energized, to start the engine.

The trigger circuit is a separate circuit under the flywheel with a couple of separate wires. On my 90 the triggers are a daisy-chain wiring system where the triggers from the flywheel stator go through all 3 CDI's "in series". I'm speculating here as I never popped a flywheel on that engine but I am going to guess that there is one sense coil but 3 magnets imbedded in the flywheel, 120 degrees apart. As the flywheel completes one revolution, 3 pulses will have been generated on this one set of wires going to/thru all the CDI's.

Further speculating, each CDI gets hit 3 times per rev with a trigger, but only one makes sense to each CDI because only one of the 3 occurs when the piston for that cylinder is approaching TDC and is ready to ignite and produce a power stroke. Numerous engine types have a system like this and if the combustion chamber is not prepared to fire it just comes and goes and to no consequence. Makes the design of the system easier.

Therefore, if you have an open in this circuit loop it will kill all the CDI's.

Digest that and come back.
 

LundTamer

Cadet
Joined
May 13, 2015
Messages
22
Thanks... I spent 5 bux to download the Mercury/Mariner manual and it has much more specific information which gives much more confidence that I'm looking at the right information/pin-outs etc, and now I'm making better sense of the setup after reading through it.
Unfortunately alot of the stator tests for mine require the flywheel to be pulled off to verify which part number stator is installed!!! yipes!!! I'm hoping some of the readings come back good and show which design is installed (matching the charts). If not I will be investing in more tools, atleast I will know this thing inside and out by the time I'm done.
Now I understand the regulator is mostly for the charging system, although it can screw up the switch box but should be eliminated with the the yellow wires disconnected. Now I have to narrow down between the stator, trigger, and switch box. I'm leaning towards a switch box but it could just as easily be a weak stator / windings if they got too hot when the yellow wiring was burned... given the 54 volts at each coil... instead of 150-200 volts something is a miss between the magnets and the ignition coils. I'll be measuring more things out next week after some parts come in as I decided to swap out the regulator anyway. Thanks for the explanation on the function. I never realized that damage could occur from a deeply discharged battery I always put a trickle charger on mine bit I have no idea what the prior owner did, I will be load testing my batteries at the start of every season from hear on out... cheap insurance!
 
Last edited:

Texasmark

Supreme Mariner
Joined
Dec 20, 2005
Messages
14,558
Bought a replacement alternator for my car once from Autozone with a guarantee. In the box was a note that said to charge your battery before you use it. Much bigger charger and battery could be smaller than yours but they are made to maintain a charged battery.....period.

I use an impact tool to remove the flywheel nut. 3 threaded holes for puller installation on the last one I did. Banging on the wheel with a hammer is really not a good idea as you can demagnetize the magnets embedded in it and there goes your triggers and charger.

5 bucks for an OEM download is a deal.
 

LundTamer

Cadet
Joined
May 13, 2015
Messages
22
Ok well cause and effect I don't know who shot who first.. The stator is bad.

So I measured the blue to red wires coming out of the stator itself (disconnected from the switch box) and I'm getting 7.6 mega ohms...(bingo) this reading does not match any charts.
*This is with the stator still grounded, on the low speed side and everything else disconnected (switch box, regulator, coils, etc). On the high speed resistance reading (red to ground) the reading is good just over 100 ohms.

Stator has to go... fly wheel removal tool ordered from ebay for 25$.... gotta wait to pull that off to get the part number off the stator before ordering a new one. It's looking highly probable that the part number for the replacement will be: 174-9710K1
Prices are between $200-300 gulp!
After I'm done there will be all new wiring and ignition system components except for the trigger, and coils. Hopefully it will be good for 20 more years. If one of the coils goes I'll swap all three and keep two for spares / troubleshooting. Atleast if the trigger goes they are only about $70.

To document the readings for future reference I did check the coils and trigger. The coil + to - resistance readings all checked out around .2-.3 ohms, as did the trigger resistance readings around 1200 ohms +/- 100. I'm not bothering with any further cranking voltage checks until the new stator is in.

Thanks for the help, it cost me some time and cost in parts and tools but the knowledge gained is invaluable for future issues. I'm wondering what else might be due after 20 yrs;
I'm sure the impeller has been changed but I might pull that apart just to inspect it and make sure its not due for cleaning/gaskets/replacement.

I'm liking that the powerhead on these is only around 1200-1500 range vs some of the newer engines this is a small fraction of the cost to do that job! (I've heard $5-6k!!!! on larger engines of course)...
 
Last edited:

LundTamer

Cadet
Joined
May 13, 2015
Messages
22
Update: To double check I also read the CDI guide, and it had some extra tests from the stator blue wire to ground (tested bad confirming the stator should be replaced); In addition the CDI guide recommends to check each trigger wire to ground, the white wire had some super high resistance to ground fluctuating but well into the mega ohms. Although this is probably fine and would probably check-out on a cranking voltage test, I'm not going to risk further collateral damage to the switch box and I don't like to see any continuity there (could get worse at temps). New trigger on the way, and I found that the CDI stator replacement part actually covers all of the potential part numbers that could be stamped on the stator. Stator on the way. By next Friday it should have an entire new ignition system minus coils and wires!!! cha ching! Might be a good time to find and clean out the fuel filter...
 
Last edited:

LundTamer

Cadet
Joined
May 13, 2015
Messages
22
new parts are in... decided to test before routing and tie strapping everything... motor started right up on the first crank.... bad news is it wanted to idle at 2k rpm!!!! noticed I had gotten a step ahead of myself and I did not ground the regulator black wire... so shut it down and spend time re-checking all the grounds and bolted everything down.. will try it again tomorrow. Although the rpm reading could have been off on the tach... the engine was revving a bit high It did not want to shift into reverse at that rpm.. I never touched any idle screws so it is very strange that it would try to idle so high... have not touched the carbs or anything fuel related yet.
 
Last edited:
Top