60hp Mercury (1990?) shift shaft bushing removal

Status
Not open for further replies.

fukes123

Cadet
Joined
Oct 18, 2013
Messages
6
Good afternoon, first time posting to the forum (that I can remember). I have a 60hp Mercury SN 0D186494, which I believe is a 1990. Came on a boat just purchased and when checking some items prior to handing over money, found water is gear housing. I was able to knock $1200 off the originally agreed upon price after that.

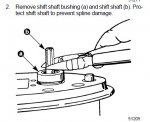
So first I did a pressure test on gear house per manual. Pressure did not hold as expected. I dropped the lower end and used soapy water spray top isolate leak. Too make doubly sure it was the only leak I did submerge in water test. Only leak found is at shift shaft. Parts diagram shows a shift shaft bushing that has an oil seal on inside and o-ring around bottom. The repair manual covers complete disassembly of gear housing and shift shaft is the last thing it covers. I can see removing the shift shaft potentially causing an issue if it is the only thing pulled out since the shift cam could potentially move when the shift shaft is pulled out of it.

Ideally, since I found no other leaks, I would like to not have the take apart the whole gear housing so I was wondering, before I start, if it is possible to remove the shift shaft bushing without removing the shift shaft so I can replace the oil seal and o-ring only. I dont know what it looks like yet since I will have to remove the water pump cover, gaskets, impeller and plate before it is exposed. So if it is something easy to just pop out or if there is a trick to getting it out without pulling the shift shaft, I would appreciate anyone who could tell me.

Thanks in advance.
 
Last edited:

emckelvy

Commander
Joined
Jan 16, 2004
Messages
2,506
Merc makes a special tool for this, and iboats sells the Sierra Marine equivalent:

http://www.iboats.com/Search/dm/?keywords=18-9817

If the website parses the link, just plug in "18-9817" into the Parts & Accessories search box, and it'll show up.

The important thing to remember, as you mentioned, is to never allow the shift shaft to move upwards as you're removing/reinstalling the shift bushing, or when you're working on it. Best to have the L/U secured in a vise so it doesn't move about and jar the shift shaft. Push down firmly on the shift shaft as you're pulling the bushing up-and-off.

Otherwise, Bad Things will happen! Never Fear, it is a recoverable error, and there is a way to get the shift shaft reiinstalled without dismantling the L/U.

But we're going to assume that's not gonna happen, eh?!! ;)

It's good shop practice to spread a thin layer of Permatex No. 3 brushable gasket dressing on the new bushing's threads and also a bit on the O-ring (or you can apply marine grease as desired). This keeps salt from building-up and locking the bushing threads. It'll always come out again with no fuss or muss if you do this.

HTH & let us know how it goes............ed
 

fukes123

Cadet
Joined
Oct 18, 2013
Messages
6
emckelvy , I wasnt aware that the bushing was threaded. The repair manual seems to indicate that it just pulls out. It appears there is a circlip that stops it from traveling further down the shift shaft. Here are some screenshots of the manual.

shift shaft.jpg

shift shaft 2.jpg
 

Attachments

  • shift shaft.jpg
    shift shaft.jpg
    40.2 KB · Views: 6

emckelvy

Commander
Joined
Jan 16, 2004
Messages
2,506
Yeah, you're right on that one. Looks like the pump plate holds down the bushing; that's a newer design which presses into the gear housing. The shoulder on the bushing should keep it from going deeper into the gearcase.

The retaining clip on the shift shaft keeps the shaft from pulling out when the lower unit is removed.

I suppose it's also a convenient way to leverage the bushing out of the gearcase (with other bad results, however!).

I expect you'll find that once you pull things apart, there's probably enough room between the bushing and gear housing to get some very small prying tools into there and pry the bushing upwards.

I've attached a pic of the shift shaft bushing, P/N 23-813696A 2.

HTH..........ed


23-813696A 2 - BUSHING_2.jpg
 

fukes123

Cadet
Joined
Oct 18, 2013
Messages
6
Thanks emckelvy, it's hard to tell from blow out parts diagrams...since everything is blown out. I've found the part number on this sight and on boats.net. They both say "bushing assembly" so would that mean it has the oil seal and o-ring included? Out of curiosity, where did you get your part number? Neither of these sites includes the "23-" as part of the number.

I know I can get the o-ring (P/N: 45258) and oil seal (P/N: 816464 1) separately so that's why I'm not sure if the bushing includes them or is just the bushing.

Thanks.
 

fukes123

Cadet
Joined
Oct 18, 2013
Messages
6
I managed to find out the bushing assembly includes the oil seal and o-ring. I was checking out other forums and found a reference to emckelvy who apparently gave step by step instructions on how to get the shift shaft back in without taking apart the gear box. Slightly different motor than mine, had the screw in type shift shaft bushing, but otherwise sounds like what I would need to do if mine comes out. :)
 

emckelvy

Commander
Joined
Jan 16, 2004
Messages
2,506
The prefix on Merc part numbers denotes the classification of the part. In this case, "23-" denotes "Bushings and Spacers". "25-", for example, is for "O-rings and Grommets" and "26-" stands for "Seals (oil, grease, and water)"

When you look up parts you don't need the prefix, but the suffix (usually separated by a space) does have meaning. Some sites don't leave a space between the part number and the suffix.

The oil seal and O-ring are probably used in other applications besides the shift bushing, and thus are commonly available. Normally a shop would replace the entire assy as it's faster and pretty much guarantees no issues with the replacement.

Sometimes the assy is cheaper than the individual parts, I expect not in this case but you'd just have to decide for yourself whether you want to spend the time driving out the seal and reinstalling a new one.

OK for working on your own motor, but if you're a shop charging $90+/hr for labor, you're not gonna spend the extra time doing so. The O-ring, of course, is a piece of cake and should always be replaced.

You'll note that if you click on the parts numbers you posted, the site is parsed. That's due to the software on this site.

I've been looking up parts at marine engine.com and the only way I could get this posting to show that site was to leave a space in the name. Copy that, paste into your browser's address bar, and remove the space. They have excellent parts listings with lots of diagrams. And actual pictures of many of the OEM parts, which I like.

eBay is always a good source for looking up OEM & aftermarket parts BTW, once you know the part number.

Sounds like you should be all ready to roll on your repair, G'luck!.........ed
 

fukes123

Cadet
Joined
Oct 18, 2013
Messages
6
Thanks for the help so far emckelvy. I think I have the parts issue down. Now for the advice on what to do part. Like I originally posted, I found water in the L/U. And it wasnt just a little water. Like the whole thing was filled with water, with just a little oil once all the water drained. It was fresh water. When I removed the L/U after the initial pressure test failure, the area around the shift shaft was pretty thick with grimy grease, I assumed from the gear oil leaking out when the water went in. I hosed all that off before doing the "submerge unit in water" pressure test and only found air bubbles escaping from the shift shaft.

So, best practice. Should I just replace the bad seals where the leak is or should I replace all the seals? Since I have to remove the water pump to get to the leaky seal, all those gaskets will be replaced, and I figure I will go ahead and replace the impeller too since I am not sure how long ago the guy changed it. But should I also go ahead and replace the oil seal on the water pump base and the oil seals and O-rings from the bearing carrier assembly? There is a water pump seal kit (P/N: 814669A 2) that has all those seals in it. Including the ones for the shift shaft. That would mean reusing the shift shaft bushing and just replacing the seal and o-ring. An ounce of prevention equals of pound of cure? Or save the hassle of getting a puller to get the bearing carrier assembly out?

Thanks again.
 

emckelvy

Commander
Joined
Jan 16, 2004
Messages
2,506
If you had no indication of leakage on the propshaft seals or around the bearing carrier, it's up to you whether or not you want to tear it apart and R/R all the consumables.

The most common place to find leakage is at the driveshaft seal area; with a leaky seal, gear oil is sucked out and displaced with water. A leaky shift shaft seal takes a while longer but can do the same thing. I can see with that design of shift bushing, it probably would be more prone to leakage at the O-ring area than the older style that was screwed-into the L/U.

If you got the all-inclusive seal kit and just didn't do the prop-end, if it ever did leak you'd have the parts and could worry about it at that time. Propshaft area leaks are a lot easier to spot, as you'll usually get stinky gear oil all over the floor!

Not a bad idea, though, to renew the pump end. Most of the time, if you have water in the L/U, and it's not something simple like fill/drain screw gaskets, bet on the driveshaft end and you'll win.

Even though you don't indicate you saw any leakage there, probably not a bad idea to pull the pump base, inspect, and renew seals, O-rings, gaskets.

And always a good idea to replace the impeller when you drop the L/U, especially when you don't know how long it's been in there!

BTW I don't imagine that the shift bushing seal would be a tough replacement, being that the bushing is plastic. I'd just be careful not to damage the bushing when removing the old seal.

HTH..........ed
 

yeocokent

Recruit
Joined
May 17, 2020
Messages
1
emckelvy , I wasnt aware that the bushing was threaded. The repair manual seems to indicate that it just pulls out. It appears there is a circlip that stops it from traveling further down the shift shaft. Here are some screenshots of the manual.


I know this is an older thread but I just completed this work and thought I would add to it in case someone else is using the search function to do this. I have a 2014 Mercury and had to replace the shift shaft. I used the same diagram above when doing the repair. The problem is that the bushing part is not that easy to get out. I definitely couldn't pull the shaft our with a pair of pliers. I ended up carefully drilling the shift shaft bushing out. The shaft was already needing replacement so I drilled close to the shaft until I could get into the bushing assembly with a screwdriver. Even after I removed it i had to put a lot of muscle into getting the shift shaft removed. Luckily, I didn't have the issue with the cam that is described. I installed the new shaft and with a little jiggling it went into place and shifts properly.

This obviously isn't the ideal way to remove the bushing but the thing is really frozen in there and I can't see how it could have been easily pulled out like the manual says.
 
Status
Not open for further replies.
Top