1969 Mercury 7.5 HP Drive Shaft . . . .

tpenfield

Moderator
Staff member
Joined
Jul 18, 2011
Messages
17,705
My 1969 Mercury 7.5 started puking oil today. (I use it for my dinghy) So, I took it back to the house and took off the lower unit and started disassembling stuff. . .

It looks like the drive shaft has become pitted in the area of the drive shaft seal, so oil was escaping up into the water pump. (Drive shaft is Mercury Part # 45-39078)

Of course the drive shaft for these things are "NLA" . . . . I am wondering what the options may be to rework the driveshaft so that it once again forms a nice seal :noidea: . . . or perhaps fabrication of a new drive shaft :noidea: Maybe JB weld or something to make a new surface . . .

There are one or two of these things available on eBay . . . but they appear to be used or of unknown identify, so not sure if it is the correct part.

I just wanted to see what advice some of the vintage mercury experts may have for this situation.

TIA
 

tpenfield

Moderator
Staff member
Joined
Jul 18, 2011
Messages
17,705
So, far, I have found that in various years the Mercury 4, 7.5 and 9.8 HP shared the same drive shaft, but not all at the same time (figures . . .)

The part numbers that I have found so far are:

45-39078 (used on 1969 7.5 and 4 HP)
45-64257, replaced by 45-75034A1
45-74851, replaced by 45-75034 (which was also used on the 9.8 HP)
45-95873A1 (Stainless Steel upper portion, used on 4.0 and 9.8 HP)

I am wondering (hoping) that these part numbers may all be basically the same thing with non critical variations :noidea:
 

tpenfield

Moderator
Staff member
Joined
Jul 18, 2011
Messages
17,705
Well, I do have a drive shaft . . . , so I could repair it. That stuff looks OK. Perhaps better than JB Weld. It looks like folks want $150 and up for the few drive shafts in existence, so repairing the current one will be tried first. Thanks for the link . . . I think I would only need about 1/4 ounce of whatever I use.
 

Scott Danforth

Grumpy Vintage Moderator still playing with boats
Staff member
Joined
Jul 23, 2011
Messages
47,537
Enecon needs to be machined once it cures. since it contains ceramic, you will need carbide to cut it.

I would do a search of craigslist. I bet you can find an entire lower unit for under $100
 
Last edited:

racerone

Supreme Mariner
Joined
Dec 28, 2013
Messages
36,287
Have you looked into a " speedy sleeve " to repair this.--I have machined thinwall stainless sleeves to repair this.
 

tpenfield

Moderator
Staff member
Joined
Jul 18, 2011
Messages
17,705
Yes, I did a little bit of research and came across Speedi Sleves, also a similar sleeve from another company (Parker ?). I would assume that I would have to get the repair area ground down and a suitable sleve put on in order to get back to the original shaft dimension (+/-) ?

Also there is something called "Plasma Spray" where metal is deposited onto the area and then machined to a final diameter and smoothness.
 

tpenfield

Moderator
Staff member
Joined
Jul 18, 2011
Messages
17,705
first things first though . . . I am searching for the special tool to take the bearing carrier out of the lower unit, so I can get the drive shaft out.

Perhaps that went the way of the dinosaurs too :noidea: I've seen the ones of the larger motors and I have the one for my Mercruiser Bravo, but I have yet to see /find the special tools for that small Mercury's.
 

tpenfield

Moderator
Staff member
Joined
Jul 18, 2011
Messages
17,705
Looks like I have a temporary propulsion system for the remainder of the season, then I'll look into fixing the driveshaft in the off season.


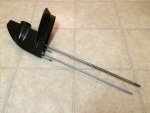
127-bw5012_5.jpg


127-bw5012_5.jpg


I probably will try the epoxy/steel approach and see if I can get the shaft back smooth in the area of the oil seal and water pump. I wonder how much a machine shop would be to make one out of stainless steel rod :noidea:
 

Chinewalker

Fleet Admiral
Joined
Aug 19, 2001
Messages
8,902
You can swap in a driveshaft from a later 7.5/9.8 and get the stainless steel upgrade. Mercury was very late to the stainless game, with Evinrude having used it on some models in the late 1940s, and Johnson shortly thereafter. Be careful getting a complete later lower unit, as the shift pattern is different. Some innards may be swappable, but not as a complete unit.
 

tpenfield

Moderator
Staff member
Joined
Jul 18, 2011
Messages
17,705
You can swap in a driveshaft from a later 7.5/9.8 and get the stainless steel upgrade. Mercury was very late to the stainless game, with Evinrude having used it on some models in the late 1940s, and Johnson shortly thereafter. Be careful getting a complete later lower unit, as the shift pattern is different. Some innards may be swappable, but not as a complete unit.

Hey CW, thanks for that info. I did see the later model driveshaft on eBay last week, but I was not sure if it would fit. Got any model year or part number specifics?

It seems like the 4.0, 7.5 and 9.8 all use the same driveshaft. 45-95873A1 is the only one that I have found that has the "stainless steel lower portion" . . . not sure if there are other part number variants that would be stainless.
 

schematic

Lieutenant Junior Grade
Joined
Jan 12, 2008
Messages
1,102
If it was mine....I would machine the seal area down .010 with a slight taper at the ends, then build it up with silver solder, then remachine to standard size. Not huge horse power so it would last.
 

Mi duckdown

Commander
Joined
Apr 14, 2007
Messages
2,575
^ That what I did on Three old motors 20 years ago still running. Speedi sleeves is what I would use today.
 

tpenfield

Moderator
Staff member
Joined
Jul 18, 2011
Messages
17,705
UPDATE:

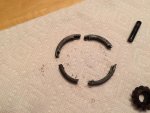
After much trail and effort to loosen & remove the retainer nut (aka bearing cover) I finally decided to drill into it and break it apart. . . making sure, of course that I could buy a new one.

Here is the retainer nut all busted up . . . IMG_5886.jpg


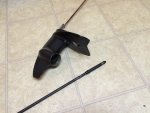
Disassembly of the lower unit was fairly quick. I had a little trouble pulling the drive shaft out, but got by that obstacle. IMG_5882.JPG


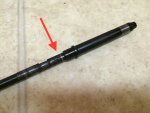
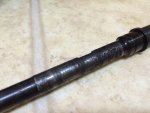
Salt water use really pitted the shaft in the area of the impeller and oil seal. It eventually started leaking oil. IMG_5880.JPG


Here is a close-up of the pitted area IMG_5883.JPG


I was able to find a stainless steel shaft from a 1980 motor on ebay. So, I ordered it and also the retainer nut and new seals. Total damage was about $200.

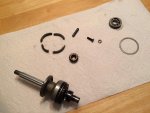
Here are the parts from the lower unit. I assume I should get a new o-ring, as it is probably original . . . 46 years old . . . IMG_5885.jpg


Anyway, I could not find the special tool to remove the bear retainer nut, and it is fairly soft material and my other attempts had pretty well trashed it.

Anyone know where I can get the special tool for the Late 1960's - 1970's small Merc lower unit? Now that I am moving forward, I have hopes of getting the old outboard running again for the boating season.
 
Last edited:

emckelvy

Commander
Joined
Jan 16, 2004
Messages
2,506
Ah, Yes, the curse of the Old Merc steel driveshaft! Done so many of those that I couldn't possibly count. Back in the Day I had an excellent machinist that would take those old, rusty, pitted shafts & weld 'em up, turn 'em down to original size, and straighten. All for a price that was way cheaper than a new driveshaft. If you could find a decent machine shop they could probably fix the old one. But probably a big-$$$ repair nowadays.

But, far better to have a newer stainless shaft which won't corrode away before your eyes!

Here's a gearcase cover tool here for your 7.5 (warning, it ain't cheap!!):

http://store.oldmercs.com/product_p/91-99222t.htm

Here's one a bit cheaper:

http://www.crowleymarine.com/parts/322124.cfm

Here's a tip for a home-made tool that will suffice for a one-time job:

Take a suitable chunk of pipe; drill & tap (4) holes, diametrically opposed, close to one end of the pipe.

Use square-headed bolts with a head sized to fit the slots in the gearcase cover; adjust them in-and-out on the pipe for a snug fit into the cover. Loctite the bolts in place so they won't move.

Drill the end of the pipe for a handle, or weld a bolt to the end (even better) so that you'll be able to use a torque wrench to tighten the gearcase cover to specs.

Another way to make a tool would be if you could find a pipe with the correct diameter, then cut it down to (4) tabs which engage the slots in the cover nut.

HTH & Have Fun gettin' 'er back together...........ed
 
Last edited:

tpenfield

Moderator
Staff member
Joined
Jul 18, 2011
Messages
17,705
Thanks for the info on the tool. :thumb: $60 is not too bad, considering it might be $10-20 to make something. I did try the home-made approach, but all I had was PVC pipe . . . not strong enough.
 

tpenfield

Moderator
Staff member
Joined
Jul 18, 2011
Messages
17,705
Yaaaayyyy . . .

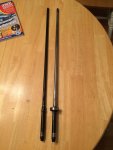
The drive Shaft arrived today IMG_5892_2.jpg


I checked various dimensions with my digital caliber and it measures out as the same. I was a bit concerned since the parts are 11 years different and not called the same number. (45-39078 vs 45-95873)

So, once the other parts arrive, I should be able to put this bad boy back together. Of course, I am not sure about the process for shimming the new shaft/bearing. I suppose I could do it by 'feel' :noidea: I got 3 shims from the original shaft & bearing to work with. IMG_5893_2.JPG
 
Last edited:

emckelvy

Commander
Joined
Jan 16, 2004
Messages
2,506
Nice driveshaft! I would try the new shaft/bearing with all the original shims and see how the pinion-to-forward-gear backlash is. If it turns smoothly, and has a few thousandths of backlash (i.e., slop or free play), it's probably good to go. The spec on backlash is .003"-.005". If too tight, you'll need more shims under the ball bearing.

They are NLA from Merc, but I found a set on eBay:

http://www.ebay.com/itm/111614264737

If there's too much backlash, take out the thinnest shim and try again.

Once the backlash is sat, torque the pinion gear screw to 90 inch-lbs and bend over the locking tab(s).

Keep the original shimming for the bearing carrier as well. I expect you'll find that once you have a good pinion-to-fwd-gear backlash, the reverse gear lash will come in OK as well.

HTH.......ed
 
Top