Mercury 7.5 HP Motor Refresh (1969 model year)

tpenfield

Moderator
Staff member
Joined
Jul 18, 2011
Messages
17,696
I have a 1969 Mercury 7.5 HP outboard that I use for my dinghy/tender. It seems to be seeping through the gaskets around the water jackets over the past couple of years. So I thought I would do a refresh of the motor and share some pictures of the project. I also plan on a bit of cosmetic work, re-painting and new stickers on the engine cowl, etc.

The spark plugs at the end of the season looked remarkably clean . . . too clean . . . so my thoughts were that water was getting into the cylinders. However, based on the design of this engine, I'm not sure how water would get into the cylinders, unless it were reversion from the exhaust at the bottom of the power stroke. . . but I'm not even sure that would apply to a 2-cycle engine, since the intake side is under pressure at that point :noidea:
IMG_8918.jpg


Anywhere else that I should look for water getting into the combustion process? Salt water BTW. . .

Anything else that would result in such clean plugs?

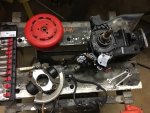
I started tearing the engine down, at least the water jackets, as that is where the corrosion is showing up The side panel was pretty easy . . . only snapped the head of 2 of the bolts :eek: IMG_8954.jpg


Lots of salt/calcium build up in these water passages . . . So, I probably need to do a CLR flush after each season.

The cylinder cover plate . . . not so easy. I was able to get 1 screw/stud out intact. The rest had to be drilled out. I drilled through the head of the Phillips bolt until the head broke off. This allowed me to pull the cover plate off and then I could try to back out the remains of the bolts. . . . at least that was the plan.

The gasket holding the cover plate on had different ideas and it took a lot of tricky cutting work to be able to get enough of the gasket separated in order to get some leverage to pry the plate off. I was concerned about breaking the plate in two, if I applied too much force in one area.

Here is the plate with the bolt heads drilled out IMG_8955.jpg


Here is the cover plate once it finally gave up . . . IMG_8958.jpg


Here is the innerds of the cylinders with integral cylinder head. A very 'cool' design for a 1969 motor, as there is no separate cylinder head and the top of the cylinder is surrounded in the cooling water. IMG_8959.jpg


There is also a smaller plate on the other side of the engine that covers the intake ports. That plate seems fine, so my plan is to leave it alone, unless someone has reason that I should remove it :noidea:

I have prepped the cowl and the external surfaces of the engine for re-painting. I found a set of re-production decals online that I ordered. So, hopefully I can make the engine look and act like new again.

image_253691.jpg


FWIW - a year or 2 ago, I replaced the carbon steel drive shaft on this motor with a stainless steel shaft from a 1980 motor . . . yea it had not changed much over the course of the 1970's.

Anyway, my main concern right now is if I am missing something as to how the spark plugs are getting so clean ???

. . . the first picture is how they looked when I took them out of the engine. Last year, only the bottom plug was showing signs of cleanliness, this year it is both plugs.
 

Texasmark

Supreme Mariner
Joined
Dec 20, 2005
Messages
14,557
Pin hole in cylinder wall. I had a 1950-60's era Scott Attwater 22 HP that had that occur from salt water corrosion. Other possibility would be exhaust manifold cover plate pin hole allowing exhaust manifold cooling water to enter combustion chamber. I think this would clean up your lower cylinder moreso than the upper. The left hand plug in your first picture is the tattle tale; wherever that was installed.

On your carbon steel vs SS drive shaft, I recall seeing a 90 hp Merc in a shop on the gulf coast during the calendar years '65-68, don't know what year the engine was made, that had a carbon steel drive shaft and I literally couldn't believe my eyes; carbon steel used in salt water environments, and did it for how many years? I know OMC had used SS for a long time and wondered why it took Merc so long to come up to speed. Couldn't imagine being a mechanic of the time and having to work on that thing.
 

tpenfield

Moderator
Staff member
Joined
Jul 18, 2011
Messages
17,696
Yes, back in the day, the Johnny's and Evinrude's were the pick of the ocean. Merc's were more the fresh water engine. 1978-79 is when they got on board. My carbon steel shaft lasted 1 season in the salt.

The cleaner of the 2 spark plugs was the lower plug. . . . it looked slightly clean last year, but this year is really clean . . . both plugs this year.

I ran a compression test, just to see if there was anything obvious . . . I am getting 83-85 psi (cold) on both cylinders.

I also removed the intake side cover plate to see if there were any signs of water/cracks, etc. Nothing that jumped out. Here are a few pictures

Intake side exposed . . .
IMG_8969.jpg

Closeup of intake side. I noticed that the intake side of the piston is pretty clean . . . that may be a normal condition. The exhaust side of the piston is carboned.
IMG_8973.jpg

Here is the exhaust ports. I cleaned them up a bit they were more carboned and oily than this. . .
IMG_8977.jpg


IMG_8975.jpg

Here is the lower piston . . . I noticed some carbon flaking off on the edges of the piston.
IMG_8971.jpg

Here is the upper piston
IMG_8970.jpg

Anyway . . . if it were a 4-stroke engine, I could do a cinder leak test, but I'm not sure I could do one that showed much on a 2-cycle.

I'm wondering if I can/should pressurize the crankcase to see/hear leakage :noidea:
 

tpenfield

Moderator
Staff member
Joined
Jul 18, 2011
Messages
17,696
Update:

I think I found a crack in the side of the top cylinder. Not that it would contribute to water inhalation, but an issue nonetheless.

It is on the intake side and is visible at the middle port. Here are a couple pictures.
IMG_8982.jpg

I made those up/down scratch marks running a needle over the crack. The needle catches on the line . . .

IMG_8983.jpg

the crack does not look like it goes to the top of the piston and I'm not sure it goes to the bottom of the piston.

wonder what to do at his point , what are my options with such an old motor. :noidea: eBay here I come :rolleyes:
 

racerone

Supreme Mariner
Joined
Dec 28, 2013
Messages
36,269
I see a score mark on the top piston.-----A motor like that should be taken apart to refurbish it.----Likely the lower crank seal is rotton / dried up from time.----Reed valves may also be cracked / chipped.-----Other opinions will vary !
 

tpenfield

Moderator
Staff member
Joined
Jul 18, 2011
Messages
17,696
I see a score mark on the top piston.-----A motor like that should be taken apart to refurbish it.----Likely the lower crank seal is rotton / dried up from time.----Reed valves may also be cracked / chipped.-----Other opinions will vary !

Yes, I think I should take it apart and see what it needs. Seems like there are plenty of used parts on eBay.
 

tpenfield

Moderator
Staff member
Joined
Jul 18, 2011
Messages
17,696
Questions Du Jour:

#1) I am wondering if I should just buy a used powerhead off of eBay, or rebuild the one I have, getting individual parts as needed ??? :noidea:

My concern with buying a used powerhead is that it may too have some issues that need fixing, eventhough they are believed to be operational.

#2) What should the compression be +/- on these engines (Merc 7.5 or 9.8) ??? I am thinking that 90-100 psi would be about all you can get (using the pullcord start) because of the 2-cycle design (ports). I see some eBay adds with seemingly ridiculous compression readings . . . 115, 130, etc. :rolleyes:
 

racerone

Supreme Mariner
Joined
Dec 28, 2013
Messages
36,269
I know what goes wrong with these motors.-----I pull them apart all the time.---No need to try and do a " crank and hope " repair on these.
 

Texasmark

Supreme Mariner
Joined
Dec 20, 2005
Messages
14,557
I see a score mark on the top piston.-----A motor like that should be taken apart to refurbish it.----Likely the lower crank seal is rotton / dried up from time.----Reed valves may also be cracked / chipped.-----Other opinions will vary !

Well, how about the lower crank seal as the smoking gun. I too was going to suggest a pressure test to check for cylinder wall pit hole but not on a 2 stroker, for me anyway. I'd think a close examination of the water jacket side of the cylinders would tend to give one an idea. If there is not much scale and it doesn't go very deep where you can get to it, one might forget the pits and go for the seal. Seems like a place to start.
 

tpenfield

Moderator
Staff member
Joined
Jul 18, 2011
Messages
17,696
Would the lower crankcase seal being bad allow water to be sucked into the crankcase ? Or would it have to be a crack or pin hole somewhere?

I'm dividing my time between Mercruiser and Mercury . . . so I have not removed the 7.5 engine yet, but probably will do that later today. I'll post pictures once I get it apart, etc.
 

tpenfield

Moderator
Staff member
Joined
Jul 18, 2011
Messages
17,696
I got the powerhead removed from the shaft/housing . . .

Here is the base . . .

IMG_8990.jpg

The underside of the powehead

IMG_8991.jpg


Not sure on the next steps to open up the crankcase.

IMG_8996.jpg


Area of lower seal.

IMG_8998.jpg

Nothing jumps out at me, but maybe once I open up the crankcase I'll know more.
 

tpenfield

Moderator
Staff member
Joined
Jul 18, 2011
Messages
17,696
I know what goes wrong with these motors.-----I pull them apart all the time.---No need to try and do a " crank and hope " repair on these.

racerone , I'm still not quite understanding what you are trying to tell me here. Help me out, if you will. Thanks. :)
 

tpenfield

Moderator
Staff member
Joined
Jul 18, 2011
Messages
17,696
Also, looking for any advice on removing the bolts that hold the crankcase together. They are a Phillips screw head with a captive nut on the other side of the casing flange. So, the only way to loosen them is via the Philips head. My concerns are that the Phillips heads are not all that durable and may tend to strip. The bolt/nuts are painted so I am thinking that the paint itself will put up some sort of resistance to loosening. My plan is to soften the paint in that area with solvents before I try to loosen the bolts.

The bolts are the same sort of thing that were on the cylinder cover plate, and I had to drill most of those out. I would like to remove the crankcase bolts intact, if at all possible. Just wondering if there are any tricks to make this more of a certainty.
 

racerone

Supreme Mariner
Joined
Dec 28, 2013
Messages
36,269
Flywheel has to come off furst.---Then top bearing housing bolts come out.
 

tpenfield

Moderator
Staff member
Joined
Jul 18, 2011
Messages
17,696
Flywheel has to come off furst.---Then top bearing housing bolts come out.

OK, thanks, makes sens. I got to find my flywheel puller.

I got most of the motor apart at this point. Trick is not breaking anything. I'm not sure that I will be able to get the Phillips head bolts off, so maybe I will drill the heads off and replace them.

IMG_9002.jpg

The steering swivel has been quite a problem over the past few years. The salt seems to get up into the pivot shaft and bind the thing up to the point where it becomes immovable. I had to heat up the surrounding metal quite a bit to get it to break break free.
 

racerone

Supreme Mariner
Joined
Dec 28, 2013
Messages
36,269
I often use an impact screwdriver to take those bolts out.-----Easy job with the right tools.
 

Texasmark

Supreme Mariner
Joined
Dec 20, 2005
Messages
14,557
I often use an impact screwdriver to take those bolts out.-----Easy job with the right tools.

Over the years, impact and a good penetrating oil saved the day for me too. If I can't get a pneumatic or electrical impact in tight spaces, I use a boxed end wrench and impact it with a hammer. Obviously the amount of whoopie depends on the size of the bolt.
 

tpenfield

Moderator
Staff member
Joined
Jul 18, 2011
Messages
17,696
Thanks, guys. I'll get an impact driver and see what I can do. Since the bolts are in the crankcase portion of the engine, I assume they will have oil that seeped into them to some extent . . . as opposed to the water jacket covers which had corrosion.

I brought the powerhead and the swivel bracket back to my year-round home to continue to work on them. I was able to pull the flywheel with the flywheel puller that I have. Not sure about the swivel bracket . . . I'd like to disassemble the main 'tube' that provides the axis point, but it seems '47 years' corroded in place. :eek:

Here is a picture of the flywheel and ignition components removed.
IMG_9006.jpg

I still have to get a couple of 'keys' to come out of the top of the crankshaft . . . they are in there pretty good.
 

Attachments

  • IMG_9006.jpg
    IMG_9006.jpg
    111.1 KB · Views: 2

tpenfield

Moderator
Staff member
Joined
Jul 18, 2011
Messages
17,696
UPDATE:

I got the powerhead apart . . .

The impact driver did the trick. :thumb:

Here are a few photos . . . The 'crack' turned out to be nothing more that a scratch on the piston wall and the pistons have little if any scoring on them. The cylinder walls are smooth.

I did see some rust on the upper and lower ball bearings. More rust on the lower cylinder and connecting rod fasteners. So, I am wondering if I replace the crankshaft seals and go with a new gasket set to put the engine back together. Maybe a new set of piston rings and hone the cylinder walls a bit.

The connecting rods feel firm . . . no play in them.

Should I see about getting new ball bearing for the upper and lower :noidea:

IMG_9045.jpg


IMG_9061.jpg


IMG_9052.jpg


IMG_9060.jpg


IMG_9054.jpg


I did not see any hard evidence of water ingress when I took the engine apart, but it may not be obvious to me. The rust on the bearing etc. could be from lack of use over the engine's life, just not sure.

TIA for any advice at this point.
 
Top