1987 Mercury ELPTO 115HP 6cyl Carburetor Rebuild Question

Joined
Jul 18, 2016
Messages
26
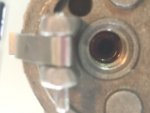
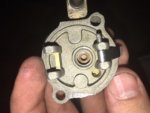
I have my carbs all apart I want to replace the Needle inlet seat and gasket, but seems I can not get to it without punching out the pins to the float levers. Just curious if this is the correct way of doing it, or if anyone can offer advice. Thank you. IMG_1270.JPG IMG_1271.JPG
 

GA_Boater

Honorary Moderator Emeritus
Joined
May 24, 2011
Messages
49,038
That's what I had to do and it's the only way. If I remember the pin is knurled on only one end. It's been a while. I used a pair of needlenose pliers to push the pin on the protruding end and grabbed to other end to pull it out. I guess a punch could be used, but I didn't want to bang on 50 year old fragile parts.

Set the float level after putting it all back together.
 
Joined
Jul 18, 2016
Messages
26
That's what I had to do and it's the only way. If I remember the pin is knurled on only one end. It's been a while. I used a pair of needlenose pliers to push the pin on the protruding end and grabbed to other end to pull it out. I guess a punch could be used, but I didn't want to bang on 50 year old fragile parts.

Set the float level after putting it all back together.


Yes they are knurled on one end. I could not get it out with pliers, I'm gunna try a tapping with a punch. How do you set the float level?
 
Joined
Jul 18, 2016
Messages
26
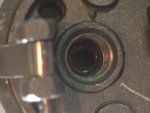
Update. I got the float lever pins out very easily with one light tap of a punch. My next issue is #7 on this schematic the little copper gasket. No copper gasket came out upon removal of the old needle and seat. However I do see some old 'copperish' looking stuff down in the hole, but I can not remove it with a pick/hook. My question is what is the purpose of this gasket, do I need to remove the old one and install the new one? Should I just use the old one because I can not get it out, or should I install the new one on top of the old one? Or find a way to get the old one out like with an EZ Out screw extractor and install the new one correctly. Of course I buy a boat with a completely different carburetor than anything I have ever seen before. If someone could help me I would greatly appreciate it! Thank you in advance!
 
Joined
Jul 18, 2016
Messages
26
NEW QUESTION FOR CARBURETOR REBUILD OF 1987 MERCURY 115HP OUTBOARD

My issue is #7 on this schematic https://www.perfprotech.com/mercury-...0?umodel=15757
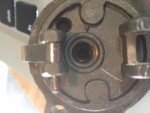
No copper gasket came out upon removal of the old needle and seat. However I do see some old 'copperish' looking stuff down in the hole, but I can not remove it with a pick/hook. My question is what is the purpose of this gasket, do I need to remove the old one and install the new one? Should I just use the old one because I can not get it out, or should I install the new one on top of the old one? Or find a way to get the old one out like with an EZ Out screw extractor and install the new one correctly. Most importantly Im not 100% convinced that previous owners installed a copper gasket and what I am trying to remove at the bottom of this hole is a non removable piece of the carburetor. I included pictures and really hope someone can offer some advice!Of course I buy a boat with a completely different carburetor than anything I have ever seen before. If someone could help me I would greatly appreciate it! Thank you in advance! IMG_1275.JPG
IMG_1274.JPG
IMG_1273.JPG

old.JPG

^ Those are picture of the old one, or one maybe not installed considering I cant get it out.
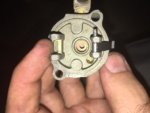
new.JPG
^ This is a photo of what the new #7 copper gasket looks installed on top of old one.
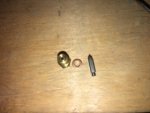
IMG_1277.JPG
^ And this is what the parts look like individually, concerned about the middle copper washer/gasket.
 
Last edited:

GA_Boater

Honorary Moderator Emeritus
Joined
May 24, 2011
Messages
49,038
I couldn't get the copper seal out either. I left it in and put the new one in. Then adjusted the float level per the instructions in the kit.
 
Joined
Jul 18, 2016
Messages
26
I couldn't get the copper seal out either. I left it in and put the new one in. Then adjusted the float level per the instructions in the kit.

Could you share the instructions that you received by chance, my kit did not come with anything except parts. Thank you.
 

GA_Boater

Honorary Moderator Emeritus
Joined
May 24, 2011
Messages
49,038
Lets keep this all together.

The rebuild instructions only had an exploded diagram, needle adjustment and float level adjustment. All the same stuff was in my manual.
 

Chris1956

Supreme Mariner
Joined
Mar 25, 2004
Messages
27,158
Not all inlet needle seats require a gasket. Try one and see how far the seat sticks out of the cover. That should tell you if you need it. The old copper gaskets should be removeable, but if not, tighten the seat securely and it should not leak.
 
Joined
Jul 18, 2016
Messages
26
Lets keep this all together.

The rebuild instructions only had an exploded diagram, needle adjustment and float level adjustment. All the same stuff was in my manual.


I got the gaskets out and installed the new ones. Could you please assist me on proper way to adjust the float level if you have the manual or knowledge of the top of your head. Ive never worked on a carb like this, and do not have instructions or a manual. Thank you
 

Chris1956

Supreme Mariner
Joined
Mar 25, 2004
Messages
27,158
OK, to set float level...Invert carb cover and observe the top lever. It needs to be parallel to the carb cover. If not bend the lower lever to make it level.

Now turn carb cover over so it is right side up. Measure between lever ends. That measurement should be 1/4". Bend lower lever until the measurement is correct.

Make sure spring on top of float is in good shape, or better yet, replace floats.
 
Joined
Jul 18, 2016
Messages
26
OK, to set float level...Invert carb cover and observe the top lever. It needs to be parallel to the carb cover. If not bend the lower lever to make it level.

Now turn carb cover over so it is right side up. Measure between lever ends. That measurement should be 1/4". Bend lower lever until the measurement is correct.

Make sure spring on top of float is in good shape, or better yet, replace floats.


Thank you so much! Floats have also been replaced!
 
Top