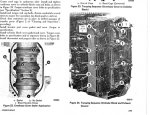
1973 Mercury 650 head gasket

derrhalt

Cadet
Joined
Sep 6, 2013
Messages
20
I was hoping someone could help explain how to replace the head gasket on my motor. Noticed water coming out of top spark plug and from what i read it is most likely a blown head gasket. I am somewhat mechanically inclined but would appreciate some advice especially on what the to tightening pattern is for the bolts and the torque once the new gasket in installed. Thanks.
 

racerone

Supreme Mariner
Joined
Dec 28, 2013
Messages
36,288
Sorry, but there is no head gasket on that motor.---There is a water jacket gasket.----Just remove the 1/4" bolts.---Scrape surfaces clean and replace it.-----Easy gasket to make if you can not find a new one !
 

Chris1956

Supreme Mariner
Joined
Mar 25, 2004
Messages
27,146
Unless the leak is real bad, I would recommend you use some silicone to seal the leak. Those 1/4-20 bolts break real easy, especially if that motor has seen some salt....
 

derrhalt

Cadet
Joined
Sep 6, 2013
Messages
20
Thanks. On the picture, I do not see #3 in the tightening sequence for the cylinder cover.

Is this the right gasket I need?

A-27-60310 Gasket, cylinder block cover.
 

racerone

Supreme Mariner
Joined
Dec 28, 2013
Messages
36,288
Dealer will change that to the latest part # when you order that #---------Start in the middle and work your way out.---Be sure to inspect the top cylinder dome for cracks.----very common if water pump is neglected.
 
Last edited:

derrhalt

Cadet
Joined
Sep 6, 2013
Messages
20
do i need to use a gasket sealant for the gasket? if so, what would you recommend?
 

Texasmark

Supreme Mariner
Joined
Dec 20, 2005
Messages
14,558

  • In answer to your question: The difference between what you are doing and what Mercury did when they built the engine is that you have a corroded water jacket. Therefore it is NOT in your best interest to follow manufacturer's recommendations. Clean off the surface corrosion (flakes primarily) best you can on both surfaces then coat with a thin layer of Blue RTV silicon. Let it sit for a few minutes and button it up, torqueing while still curing. Pattern on any "plate" of sorts including heads for engines, is as racerone said, start in the middle, in a criss cross x pattery working your way out which makes the x pattern longer as you go. Best to make 2-3 passes.
    ---------------------------------------
    As Chris stated, the bolts are almost always corroded and when you think you have the bolt starting to move, what's moving a lot of times is the bolt material separating on the way to breaking. The best solution is to soak the best you can with a premium penetrating oil. Kroil is perfect, but a professional product and you may not have access. PB Blaster is readily available and a good second, reasonably priced. Let it sit over night and shoot again when you start the removal.

    Get a 4 oz or so ball pien hammer and a quality box end wrench. Starting in the center like your tightening sequence will be when closing it back up, install the wrench on a bolt head and whack the end of the wrench moderately. No manual twisting, just IMPACT whacks initially. Expect to hit it 5-6 times before you see any movement, all moderate hits. Once it moves, go to the next one. Continue the process till all are done. Soak it again and wait overnight again.

    When you come back the next day, they should be ready to be removed in the conventional manner. If any act like they aren't ready to move, back to the hammer and then return to them later.

    I guarantee you that attempting to remove a SS bolt in a corroded, cast alum block that has broken and sheared off flush with the casting is no picnic and the time you take in removal will pay you huge dividends.

    Clean up the threads on the bolts prior to reassy with a wire wheel and when re-installing coat with blue thread locking compound )Locktite brand is one). The blue is for later removal if necessary. The Merc manual says to use Red but Red is permanent and I'd like to have an eye ball to eyeball chat with the birdbrain that put that in the manual and in the engines. The thread locker keeps them from vibrating loose but the main thing is that it coats the threads and if you have to go back in, you will not have a corrosion problem between the threads and the alum casting like you are going to have right now!

    On the block cleanup, I like to use more penetrating oil and use a tap and chase the threads to clean out the crud left in the block and then take a block of wood or such and some 100 grit sandpaper and just do a finish sand on the mating surface to aid in cleaning things up. Last a shot of Disc Brake Cleaner aerosol to knock off the oil prior to the application of your sealant.

    Good luck,
    Mark


Post Reply
 

Texasmark

Supreme Mariner
Joined
Dec 20, 2005
Messages
14,558
Free factory outboard service manuals at www boatinfo.no/lib/library.html

Yeah and in there they will talk about RED locktite and DRY gaskets. People who write service manuals are not ex mechanics who have walked the walk. They are literary or business majors right out of college! How do I know that? I taught tech school and wrote electromechanical technical manuals for lotta years! However, I do refer to the manual most of the time, but I do have my limits on acceptability of the contents.
 
Last edited:

derrhalt

Cadet
Joined
Sep 6, 2013
Messages
20
Been awhile since i posted about this motor. Did not use much this year. I would like to get it running strong. I remove water jacket cover and gasket was shot. Had water coming out of spark plug holes. I did compression test and all 3 cylinders are 120. Had the motor for 3 years now and replaced water pump twice and winterize and replace lower unit oil. I want to know if i am wasting my time with this motor especially with water coming out spark. I replaced gasket but over tightened and blew it out. I plan on putting new one on again. Couple questions.

1. Will new gasket fix water from spark plug? motor starts right up and has a steady stream out of pee hole and 120 compression.
2. Should i use gasket sealer and gasket and if so how to i go about installing correctly?
3. How hard is it to rebuild carbs?
 

jimmbo

Supreme Mariner
Joined
May 24, 2004
Messages
12,961
I had to replace that gasket on my inline 6 3 times. Installing it dry, without sealer, it took longer before the leak reoccurred. It turned out the cover had warped and since there are no fasteners close to the plugs to clamp hold it tight that's where it leaked. Mercury provided me a new cover N/C but that was 30 yrs ago. New covers for you engine are probably pretty rare. You could try without the gasket using a good RVT rated for High temp, it will be messy and a real pain if you need to remove the cover at a later date. If you try the sealer method, let the sealer cure a bit before final tightening of the bolts
How hard it is to rebuild carbs depends on your mechanical ability and experience. Fortunately these carbs are very basic, but have plugs that need to be removed to access areas that need cleaning. The hardest part of the whole operation is doing the link-n-sync
 
Top