Mercruiser 7.4 Won't Start After Rebuild

Lucrative

Petty Officer 3rd Class
Joined
May 8, 2015
Messages
96
Alright gang, I've finally finished my top end gasket overhaul and riser/manifold/t-stat & t-stat housing replacement. I'm trying now to get the sucker started and am not having a lot of luck. Let me add for most everyone who didn't see or read my other topic, I AM VERY NEW TO THIS! This is really the first engine work I have ever done in my life, so I have learned a lot, but will probably be asking some dumb questions.

Engine info:
7.4 L MPI BRAVO GEN VI - L29 Serial number: 0L609594

Here's what I've done. I didn't know enough when I started out to mark my distributor, so I have to start from scratch. Had a buddy over to help find hold his finger over the #1 spark plug hole and cranked till the compression stroke, thought we had it at TDC and the distributor rotor pointing at #1. I will say, it did seem to be in between 2 possible spark plug wires, but it seemed to be close.

Question #1: Is it possible that I will need to move all of my spark plugs one position over after this rebuild? Just not sure why it was pointing in between the two plug wires.

Tried firing it, and it seemed to be just cranking, and having a pretty tough time cranking, too. Went back to make sure we were at compression stroke on #1 and it seemed ok again. Tried firing, more slow, labored cranking. Thought maybe it was 180 off, so we rotated the gear 180, and tried again. More labored cranking. Throughout the process, we tried adjusting the distributor to retard or advance firing, but no luck. The only real action we got was a backfire.

Question #2: Anything I'm overlooking here? I have fuel in my fuel rail, and spark from the spark plugs.

I really think it is just a timing issue at this point and that I must be doing something wrong, but I can't figure it out. My buddy has a timing light I can use once she gets going, but I can't seem to get her to start.

Question #3: Need advise on what I should be doing upon starting a rebuilt engine. Will it need "broken in" for any period of time? Anything special I should be doing besides getting the timing light and making sure it's timed right?

Question #4: Since I replaced the exhaust risers/manifolds, I'm somewhat nervous that my seal between the two could be bad and I could get water in my exhaust manifold like I had previously. Is there a way to know at this point if I'm getting water in my exhaust manifold or will I just have to start it up and see if I'm getting water in my oil again? I do have the superflush system installed on my boat, so I can get a thorough flush without starting.

Thanks for all your help!
Luc
 

Watermann

Starmada Splash of the Year 2014
Joined
Jan 12, 2013
Messages
13,753
Do you have the OD off still? Just wondering about the larbored cranking. The backfire would most likely have occurred when the dizzy was 180 out. Recheck the positioning of your plug wires. Check the TDC mark on the damper pulley with the pointer when you have the rotor pointing at #1 to verify TDC. #1 is of course the front right when standing at the front of the motor.

If your worrying about leaking and hydrolock it wouldn't crank over since the water won't compress so it would be a sudden piston stop. One would have to assume you found the reason (manifolds and risers) why the motor was ruined to begin with and made those repairs. If you used the gaskets supplied and applied the correct torque then you shouldn't worry.

I forgot to mention that there is a base timing mode for most modern engines. Take a look at this PDF.
http://www.boatfix.com/merc/Servmanl/16/16B4R2.PDF

Didn't the rebuilder supply you with a break in procedure for their motor? Give them a call and ask them to email it to you.
 
Last edited:

Lucrative

Petty Officer 3rd Class
Joined
May 8, 2015
Messages
96
I may have used the "rebuild" term in error. I took apart the top end to replace all the gaskets and clean it out. I got water in the oil previously, which brought me to that point, although I probably took apart more than I really needed to. Anyways, I ordered all the parts individually, not as part of a kit or something, so there's no instructions.
 

Lucrative

Petty Officer 3rd Class
Joined
May 8, 2015
Messages
96
Got it started!!! I guess maybe while I thought I was TDC, I wasn't. I cranked it until the TDC mark lined up with the pointer and found that at that point, I was 180 off. Flipped it around 180, cranked and got it going right away.

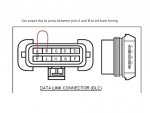
Having an issue now with the timing light. I hook it to the spark plug, hook it to the battery, and it's not flashing while I'm running. I see in that link you posted it talks about running a jumper wire to connect the ignition system timing lead to an engine ground. Is that necessary?
 

Watermann

Starmada Splash of the Year 2014
Joined
Jan 12, 2013
Messages
13,753
Now there's some good news! Yeah you have to set the ignition in base timing mode, the PDF has a pretty decent tutorial.
 

alldodge

Moderator
Staff member
Joined
Mar 8, 2009
Messages
40,751
Got it started!!! I guess maybe while I thought I was TDC, I wasn't. I cranked it until the TDC mark lined up with the pointer and found that at that point, I was 180 off. Flipped it around 180, cranked and got it going right away.

Having an issue now with the timing light. I hook it to the spark plug, hook it to the battery, and it's not flashing while I'm running.


If your using an inductive timing light I don't know why it won't flash, may just be your light. If it is running rough then maybe your plug or plug wire is bad.

I see in that link you posted it talks about running a jumper wire to connect the ignition system timing lead to an engine ground. Is that necessary?

You have an MPI engine and you need to put the engine in base timing mode to set the timing correctly. If your engine does not automatically go to 1800 rpm when in base timing, idle it up to 1800 rpm.

To set timing, connect jumper as illustrated below or connect the DLC connector. Start engine and let it warm up to operating temp. Set timing, once set shut engine off and remove jumper or DLC.
DLC base timing.jpg
Plugs MR43T
Gap .040
Timing 8 BTDC
 

Lucrative

Petty Officer 3rd Class
Joined
May 8, 2015
Messages
96
I have run into an issue here. I was running the engine to get it warmed up for timing and did a once over. Noticed some water collecting around a few of the bolts to connect the exhaust to the head. Took out the spark plugs and found a little water in #5. Still had the muffs running and shined a flashlight in #5 spark plug hole and saw water dripping down in there. Shut down the water, and pulled the drain plug on the exhaust manifold. After the water drained, the dripping stopped. Does this simply mean I have a problem between my head and exhaust? I did notice when I had it apart that the ports in my head had rusted a little and protruded out. I sanded them down, but maybe not perfectly flat.
 

Lucrative

Petty Officer 3rd Class
Joined
May 8, 2015
Messages
96
I took of the riser on that side and found water sitting down in the port by #5. Does this mean I was leaking from my riser? Are there other possibilities? I'm thinking to try and replace the riser gasket and try again. Is this the best course of action at this point?

Pretty lost as to where the water is coming from.
 

Lucrative

Petty Officer 3rd Class
Joined
May 8, 2015
Messages
96
Need some help guys. About to lose my mind. Took off exhaust manifold and found water sitting in all ports. Looked in all the ports going into the head, #1, #3, and #7 looked like they just had some carbon build up, but #5 had water on the push rod. What's going on? Where is the water coming from?
 

alldodge

Moderator
Staff member
Joined
Mar 8, 2009
Messages
40,751
Sorry was out of town

Took out the spark plugs and found a little water in #5. Still had the muffs running and shined a flashlight in #5 spark plug hole and saw water dripping down in there

You looked inside the spark plug hole and saw water dripping inside the cylinder.

Took off exhaust manifold and found water sitting in all ports. Looked in all the ports going into the head, #1, #3, and #7 looked like they just had some carbon build up, but #5 had water on the push rod.

Had water on the push rod??? I thing you may have meant that there was water on the valve? (push rods under the valve cover, valves seen through spark plug holes)

If the riser or the manifold is leaking in #5 this can cause the water to fill the other cylinders when the engine is not running. If the water is dripping in the exhaust port only when removed, then you just need manifolds and/or risers. You should pressure test your exhaust
 

Lucrative

Petty Officer 3rd Class
Joined
May 8, 2015
Messages
96
My exhaust manifolds and risers are brand new. I just realized now that my exhaust manifold gasket put on wrong (last time I have anyone else "help") which was why the water was dripping from there, but obviously I shouldn't have water there to begin with.

I think I'm seeing the push rod? I'm looking in the port of the head, not the spark plug hole......ugh I'm so tired right now I can't even think through it.
 

Lucrative

Petty Officer 3rd Class
Joined
May 8, 2015
Messages
96
I guess it's possible that I messed up my connection between my risers and manifolds. When I got them, I thought I was supposed to take the paint off the surfaces where the gasket goes, so I did that with a circular sanding bit on a dremel tool (fine grit). I really didn't think I removed any material there, but I guess it's possible that I did, and that's not allowing for a good seal and letting water in.

The thing that's scaring me here is that before this rebuild, I had what appears to be the same issue, which is making me think I might have a cracked head or something. Would that make sense? The head gasket was fine when I took the old one off, I cleaned and inspected the head, ran a straight edge over it, and it looked fine, but I dunno. Frustrated.
 

Watermann

Starmada Splash of the Year 2014
Joined
Jan 12, 2013
Messages
13,753
Sounds to me like your riser to manifold gasket is not sealing. What's the brand of your new exhaust manifolds and risers?

With the exhaust manifold off you can see into the exhaust port in the head and the 'rod' you're seeing is the exhaust valve stem with water on it. Did you torque everything to correct specs?

After taking them apart I would for sure get new gaskets and not try to reuse the old ones.
 
Last edited:

Lucrative

Petty Officer 3rd Class
Joined
May 8, 2015
Messages
96
Yes, I torqued it all to specs listed here https://www.perfprotech.com/blog/articles/mercruiser-bigv8-fastener-torques I really hope the seal between riser/manifold is all it is. I have Sierra manifolds and risers, bought the metallic looking gaskets, not the greenish paper ones that came with the Sierra manifold.

Maybe I might need to get a metal file and make sure all my surfaces are flat on the riser/manifold. I ran over them with a straight edge and I can just barely see daylight when I get to one section on the inner lining of the riser (not sure how to put that better)....So if it was leaking there it would leak in, but not out where I could see it.
 

Bondo

Moderator
Staff member
Joined
Apr 17, 2002
Messages
70,525
Maybe I might need to get a metal file and make sure all my surfaces are flat on the riser/manifold. I ran over them with a straight edge and I can just barely see daylight when I get to one section on the inner lining of the riser (not sure how to put that better)....So if it was leaking there it would leak in, but not out where I could see it.

Ayuh,.... Sounds like ya found the Leak,....
 

Lucrative

Petty Officer 3rd Class
Joined
May 8, 2015
Messages
96
Still having a leak....went and got a flat metal file and filed down the surfaces of both the exhaust manifold and the riser until they were perfect when I put the straight edge across them. Re-installed risers with new gaskets. Torqued down. Started it up and ran it for a few minutes on the hose then shut it down and kept the water running. Pulled #5 spark plug and there was some water on it. Looked in the plug hole and didn't see anything at first, but after a minute or so I saw the water beginning to fill up in the cylinder. I also pulled #7 plug and there was a little water on the plug, but it wasn't filling the cylinder like it was in #5.

I don't know. It seems that I can't possibly be that bad at installing risers, but I guess anything is possible.

What are some other causes of this leak?
 

Bt Doctur

Supreme Mariner
Joined
Aug 29, 2004
Messages
19,111
sending a message, Being a BB motor do you have the intake gaskets installed correctly and the intake manifold torqued correctly? you say you did a top end, did you remove the heads? Did you recently have a major overheat condition? Was the motor ever taken apart, head removed, etc?
 

Watermann

Starmada Splash of the Year 2014
Joined
Jan 12, 2013
Messages
13,753
You originally had water in the oil is why you took it apart and replaced the top end gaskets. I'm thinking you aren't that bad at the riser gasket work, rather something else has happened to just those 2 cylinders. Do you live in a below freezing in winter section of the country?
 

NHGuy

Captain
Joined
May 21, 2009
Messages
3,631
Do those intake manifolds have the water passage across them? If yes perhaps that's leaking, but it should not get in to the combustion chambers.
 

alldodge

Moderator
Staff member
Joined
Mar 8, 2009
Messages
40,751
Do those intake manifolds have the water passage across them? If yes perhaps that's leaking, but it should not get in to the combustion chambers.

They do, this is how water gets to the thermostat housing
 
Top