1989 Mercruiser 3.0 carb rebuild

johnnypac

Seaman Apprentice
Joined
Sep 8, 2013
Messages
32
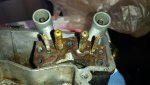
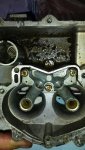
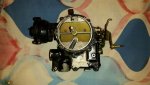
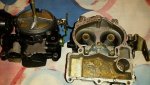
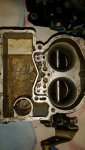
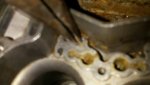
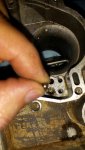
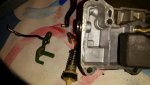
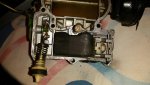
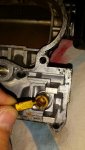
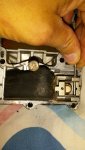
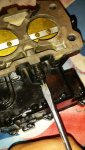
I'm at the end of a loooong transom rebuild project on a 89 Searay bowrider I bought 3 yrs ago which was said to be "water ready".... Engine all buttoned up, new gas, wires, plugs.... Still won't start... Hmmm... So I pull the carb and this is what I find... (Pics below)


So, since I've gained great insight from this forum over the last 3 yrs, I thought I might document my rebuild for the next poor soul who gets sold a carb like this....

Of course I have questions too.

First, any tips? I've rebuilt motorcycle carbs, never boat.

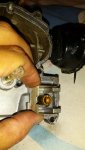
Second, what solution should I soak it in, and for how long?

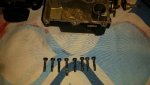
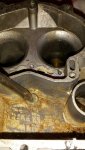
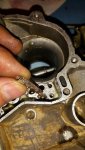
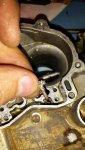
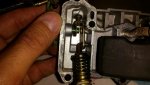
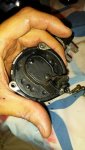
Third, my rebuild kit does not have the spring that holds the filter/basket in place... Where the fuel first enters the carb from the gas line... I can't find it sold individually... Any recommendations?

Thank you guys for any help you might offer.
 

Attachments

  • photo219413.jpg
    photo219413.jpg
    80.6 KB · Views: 2
  • photo219414.jpg
    photo219414.jpg
    73.6 KB · Views: 2

achris

More fish than mountain goat
Joined
May 19, 2004
Messages
27,468
Mercarb or Rochester? (1 idle mixture screw or 2?)
 
Last edited:

achris

More fish than mountain goat
Joined
May 19, 2004
Messages
27,468
Spring, Fuel strainer, part# 3302-9032. $2.25 at any Merc dealer or on-line shop....

When cleaning the carb, soak overnight in Carb-cleaner. Blow out with DRY compressed air. No real difference between a bike carb and a boat carb, just bigger, that's all...

Good luck...
 
Last edited:

johnnypac

Seaman Apprentice
Joined
Sep 8, 2013
Messages
32
No Title

Made some progress today, got my rebuild kit in the mail so I tore it down.

Mercarb comes in 2 sections (Rochester, the throttle body separates making 3 pieces)
7 screws, one longer than the others... Keep track of where that one goes.
 

Attachments

  • photo219508.jpg
    photo219508.jpg
    76.2 KB · Views: 2
  • photo219509.jpg
    photo219509.jpg
    52.8 KB · Views: 2

johnnypac

Seaman Apprentice
Joined
Sep 8, 2013
Messages
32
No Title

This is the 2 sections divorced. Looking into the bottom... Float bowl and Venturi mech. The cylindrical hole on the right is where the accelerator assembly goes, the spring remains in that hole in this pic.
 

Attachments

  • photo219510.jpg
    photo219510.jpg
    60.8 KB · Views: 3

johnnypac

Seaman Apprentice
Joined
Sep 8, 2013
Messages
32
No Title

Venturi cluster comes out with 3 screws. Gasket between the cluster and the body of the carb, remember to replace. Note that the enter screw is shorter and will require a fiber washer on re install. Also you can see a better shot if the accelerator pump assembly spring in the chamber.
 

Attachments

  • photo219511.jpg
    photo219511.jpg
    65.7 KB · Views: 1
  • photo219512.jpg
    photo219512.jpg
    47.9 KB · Views: 0
Last edited:

johnnypac

Seaman Apprentice
Joined
Sep 8, 2013
Messages
32
No Title

Power valve assembly coming out.... I didn't get a pic, but the main jets are just above. Remove main jets.
 

Attachments

  • photo219513.jpg
    photo219513.jpg
    78.6 KB · Views: 3

johnnypac

Seaman Apprentice
Joined
Sep 8, 2013
Messages
32
No Title

Metal T comes out (this is just under the Venturi cluster) then a spring and then a stainless steel check ball. This was a booger to get out. Be patient.
 

Attachments

  • photo219515.jpg
    photo219515.jpg
    109.6 KB · Views: 2
  • photo219517.jpg
    photo219517.jpg
    82 KB · Views: 2
  • photo219518.jpg
    photo219518.jpg
    87.6 KB · Views: 2
  • photo219519.jpg
    photo219519.jpg
    84.1 KB · Views: 3

johnnypac

Seaman Apprentice
Joined
Sep 8, 2013
Messages
32
No Title

Next, on to the bowl cover assembly... The upper half.
I removed the accelerator assembly. some are straight, some are 90*. Mine is 90*
Note, after you remove the assembly, there is a small c clip holding the plunger to the bracket that must be removed to put on the new plunger.
 

Attachments

  • photo219520.jpg
    photo219520.jpg
    74.5 KB · Views: 2
  • photo219521.jpg
    photo219521.jpg
    191.9 KB · Views: 2
  • photo219522.jpg
    photo219522.jpg
    68.5 KB · Views: 2

johnnypac

Seaman Apprentice
Joined
Sep 8, 2013
Messages
32
No Title

Next, I removed the float and needle and seat assembly. On reinstallation, there is a spring needle and a straight needle. From what I gather, spring is recommended but may cause stalling on hard L or R turns. Solid needle is used if you are having carb flood at idle. Pros and cons for both. Do some research before you decide.
 

Attachments

  • photo219523.jpg
    photo219523.jpg
    170.7 KB · Views: 1
  • photo219524.jpg
    photo219524.jpg
    72 KB · Views: 1
  • photo219525.jpg
    photo219525.jpg
    81.9 KB · Views: 1
  • photo219526.jpg
    photo219526.jpg
    183.8 KB · Views: 1
Last edited:

johnnypac

Seaman Apprentice
Joined
Sep 8, 2013
Messages
32
No Title

Lastly, the electric choke came off. Then the idle mix screw.... All metal parts are now sitting in Chem Dip carb cleaner over night. Reassembly tomorrow.
 

Attachments

  • photo219527.jpg
    photo219527.jpg
    75.6 KB · Views: 2
  • photo219528.jpg
    photo219528.jpg
    75.6 KB · Views: 2

searaytn

Cadet
Joined
Mar 16, 2015
Messages
8
Good stuff. I rebuilt my mercarb a few weeks ago. I have the same set of pictures and experiences. Couldn't agree more about the metal T being tough to get out. I ordered the kit from Mikes Carburetor and followed his videos. They are very good. Put the carburetor back on and boat cranked right up. Found other problems, but those are now fixed. However, put the boat in the water and runs great, but will not take full throttle. I can slowly accelerate and get up to speed, but if I give it the throttle it seems to be starving for fuel. I'm thinking I either screwed up the accelerator pump or did not set the float level correctly.

Good luck with the reassembly.
 

achris

More fish than mountain goat
Joined
May 19, 2004
Messages
27,468
... I can slowly accelerate and get up to speed, but if I give it the throttle it seems to be starving for fuel. I'm thinking I either screwed up the accelerator pump or did not set the float level correctly.....

Accel pump...
 

johnnypac

Seaman Apprentice
Joined
Sep 8, 2013
Messages
32
Yea, I've read those symptoms are consistent with something being wrong with the accelerator pump.... But what achris? I just want to make sure I get it right the first time.

And SEARAYTN, y didn't you do a write up on it? I searched on here and didn't find any, that's why I'm doin this one.... Although it's pretty straight forward, if there are others out there like me, I wana see it in pics before I do it.
 

johnnypac

Seaman Apprentice
Joined
Sep 8, 2013
Messages
32
ACHRIS, you mind giving me some insight on the spring needle vs solid needle? I'm thinking I'm going solid, just because that's what came out of it, and don't want to chance stalls on sharp turns. I'm open to some guidance/insight if you have any.
 

achris

More fish than mountain goat
Joined
May 19, 2004
Messages
27,468
Could be a faulty diaphragm, a check ball not seated properly, a spring missing. Without being the one who assembled it, it's difficult to say which, just look at everything associated with the accel pump circuit.
 

johnnypac

Seaman Apprentice
Joined
Sep 8, 2013
Messages
32
This is the vid SEARAYTN was referring to. Great info.
 
Last edited:
Top