1997 Mercruiser 5.7 Overheat / Coolant Coverflow Issue

hookemdano

Cadet
Joined
Jul 21, 2009
Messages
16
The engine driven pump is mounted on the lower starboard side of the engine. It is nice not to have to split the drive to change the impeller.


yes..I do agree with your point about the ease of changing the impellor on an engine mounted sea water pump...I am just noting that the notion that an engine mounted sea water pump is required when ya have a fresh water cooling system...it is not...I think its one of those internet myths....does anyone know of any one that actually had to mount an engine mounted seawater pump for a merc 5.7 with the alpha1? I dont know of any one, nor do my 3 buddies with the same basic setup as mine...
 

Speakrdude

Ensign
Joined
Feb 25, 2004
Messages
942
I never thought you could "Full Cool" a 5.7 with only an alpha pump. Only "Half cool". But, if it works, so be it. The Heat exchanger brand, (Seakamp), I sell/install, does not recommend.
 

alldodge

Moderator
Staff member
Joined
Mar 8, 2009
Messages
40,721
I tend to agree, while it would be nice to have the engine mounted secondary sea water pump I don't know that this is the route of the issue. Heat exchanger and thermostat housing come out for pressure testing and inspection tomorrow afternoon, will update you guys on what the outcome is.

One point of clarification, if you do decide to mount a belt driven pump later, do not run it with the one in the drive. The impeller in the drive should be removed if you go that route
 

jackalu

Cadet
Joined
Oct 31, 2014
Messages
23
Thanks for all your contributions, The other interesting point is that this has a cuddy cabin heater which I've read could be causing the issue as well. I am going to look at bypassing this to eliminate it as a possible culprit- anyone have experience with this?
 

Fishermark

Vice Admiral
Joined
Oct 19, 2003
Messages
5,617
One point of clarification, if you do decide to mount a belt driven pump later, do not run it with the one in the drive. The impeller in the drive should be removed if you go that route

Actually Mercruiser recommends you do not remove the impeller in the leg. You would cut the hose and block the hole into the transom. That way the water will still travel up the leg to help cool the outdrive. Now in the real world how much cooling to the outdrive it actually provides is up for debate... but this is what Mercruiser recommends.

On a related note - I would actually keep the impeller and hose intact and install a Y valve. One side would simply pump the water back overboard through a hull fitting, while the other side could be used as a wash down type of thing. I don't know if you need the engine mounted pump or not... but this gives you some things to think about if you choose to go that route.
 

alldodge

Moderator
Staff member
Joined
Mar 8, 2009
Messages
40,721
Actually Mercruiser recommends you do not remove the impeller in the leg. You would cut the hose and block the hole into the transom. That way the water will still travel up the leg to help cool the outdrive. Now in the real world how much cooling to the outdrive it actually provides is up for debate... but this is what Mercruiser recommends.

Only do that if a thru hull was used, and the first mention of it was by BtDoc in post 11. There was a mention of cutting the hose nut no mention of thru hull that I read. Sure old eyes but still didn't see it. Now if a belt drive pump is used and draws water thru the leg, then the impeller should be removed.

On a related note - I would actually keep the impeller and hose intact and install a Y valve. One side would simply pump the water back overboard through a hull fitting, while the other side could be used as a wash down type of thing. I don't know if you need the engine mounted pump or not... but this gives you some things to think about if you choose to go that route.

Don't see a need for a Y valve. Only reason for something like that is so if you overheated from a damaged impeller, you could switch over to the other, but this would mean the impeller which was closed off would hydo lock. That is unless you use 2 Y valves and one Y fitting to go overboard.
 

Fishermark

Vice Admiral
Joined
Oct 19, 2003
Messages
5,617
Only do that if a thru hull was used, and the first mention of it was by BtDoc in post 11. There was a mention of cutting the hose nut no mention of thru hull that I read. Sure old eyes but still didn't see it. Now if a belt drive pump is used and draws water thru the leg, then the impeller should be removed.

:confused:
Not sure what you mean by that? In re-reading the posts, I guess it was not clearly pointed out that yes, if the OP does install an engine mounted pump, then he will need to install a through hull fitting with the associated items that go with it. A shut off valve for safety, and may want to consider a sea strainer.

Here's the engine I bought with the pump it came with:

enginewithnotes.jpg


A different pic showing the sea strainer:

DSCF1149.jpg


I would NOT recommend simply adding the engine mounted pump and then trying to draw it up through the leg of the Alpha.


Don't see a need for a Y valve. Only reason for something like that is so if you overheated from a damaged impeller, you could switch over to the other, but this would mean the impeller which was closed off would hydo lock. That is unless you use 2 Y valves and one Y fitting to go overboard.

Keeping in mind, this is an option only if the OP decides to go with an engine pump and thru hull for the main cooling. Then the impeller is kept in the leg. Only instead of cutting the hose, he keeps it intact and runs the inside hose to the Y valve. One end goes back overboard through another fitting in the transom, the other goes to a wash down hose. The water would not dead end or hydrolock with this scenario.
 

jackalu

Cadet
Joined
Oct 31, 2014
Messages
23
Alright Gents, some updates here:

Did the following:

1. Completely drained coolant as per mercruiser manual
2. Removed heat exchanger took to rad shop and pressure tested, cleaned- all was fine.
3. Removed thermostat and replaced (was a 140 degree thermostat, replaced with a 160 as per mercruiser manual)
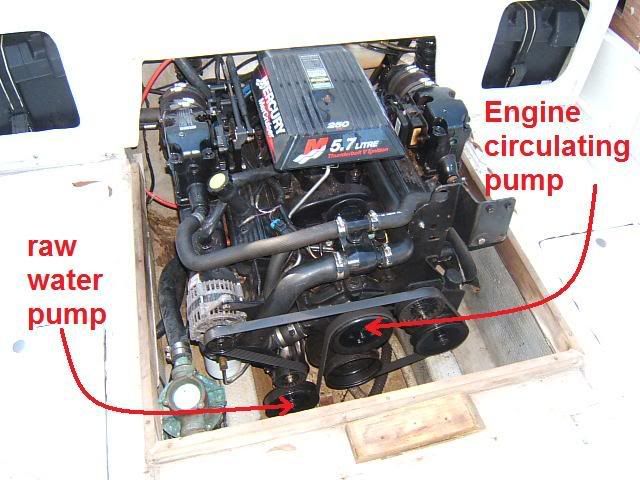
4. Bypassed cuddy cabin heater by running a 1 foot hose from water pump to thermostat
5. Reassembled everything, and filled coolant back up. There is no bleeding valve on this engine setup, so I followed steps in the manual which essentially was to:
a. fill to 1" below heat exchanger neck, start engine and run at 2000RPM for 10 minutes adding coolant as required to maintain 1" below neck. (didn't need to add much)
b. fill heat exchanger to bottom of neck.
c. install heat exchanger cap
d. fill coolant reservoir to full mark

After having done all of this, I took the boat out for a run to see how would do. It didn't take long before I started to see the heat exchanger pushing bubbly/frothy coolant into the overflow reservoir, and it eventually filled up and began to overflow into the bilge, here is a video (flows stronger at times but to give you an idea):

https://drive.google.com/file/d/0B1Q9WJpTJdJlV0tnR3p4R2hBa00/view?usp=sharing

I am not sure what to think here, I was speaking to a mechanic who was down at my marina and he mentioned that there is likely still some air in the system based on how I "burped" it. He thought that it could simply be air pockets in the cooling system which expands and pushes the coolant into the overflow reservoir. He suggested that I find a better way to purge the system of air, and even suggested I install a small bleeder valve on the thermostat housing. Not sure what to think of his recommendations, he was insistent that it couldn't be a head gasket, especially after learning I did the block test and that there is no contamination in the oil.

Any suggestions? I guess it is probably time to pull out the boat and do a compression and leak down test.......
 

Bt Doctur

Supreme Mariner
Joined
Aug 29, 2004
Messages
19,111
Can only be a few things,
the head gaskets are leaking combustion gasses into the coolant
a crack in the head leaking combustion gasses into the coolant
a crack in the block is leaking combustion gasses into the coolant
To escape from under the cap into the res you need 12- 14 lbs of pressure in the system. Try running it with the cap off. If you see bubbles, that's compression bubbles
 
Last edited:

jackalu

Cadet
Joined
Oct 31, 2014
Messages
23
Thanks, can I run it under load (actual sea test) with the cap off? At the dock I get zero bubbles with the rad cap off (regardless of rpm) when revving in neutral.
 

Bt Doctur

Supreme Mariner
Joined
Aug 29, 2004
Messages
19,111
should be under load, you will see a slight expansion of the A/F and a bit may overflow but there should be no bubbles visable in the heat exchanger.
If you have it up to normal temp , install the cap and check for pressure build up in the hoses, There should be none.
 

jackalu

Cadet
Joined
Oct 31, 2014
Messages
23
should be under load, you will see a slight expansion of the A/F and a bit may overflow but there should be no bubbles visable in the heat exchanger.
If you have it up to normal temp , install the cap and check for pressure build up in the hoses, There should be none.

with regards to checking for pressure build up in the hoses, can you elaborate what you mean and how to do that?
 

tpenfield

Moderator
Staff member
Joined
Jul 18, 2011
Messages
17,703
I've been following this thread for a few days. My original thoughts were head gasket, not a cooling system issue. Based on what you have done so far, I'd chasing the head gasket, as the cooling system may be fine.
 

alldodge

Moderator
Staff member
Joined
Mar 8, 2009
Messages
40,721
with regards to checking for pressure build up in the hoses, can you elaborate what you mean and how to do that?

Checking pressure on the hoses is grab and squeeze them. BtDoc is indicating they should be easy enough to squeeze
 

rick3452

Petty Officer 1st Class
Joined
Oct 26, 2010
Messages
282
With mine it was a bad Heat Exchanger I know you tested it but........ The raw water (in my opinion) is mixing with the closed water because of leaking tubes (adding) and its forced out the overfull
 

jackalu

Cadet
Joined
Oct 31, 2014
Messages
23
Compression test done, doesn't look good:

1 - 149
3 - 136
5 - 132
7 - 151

2 - 159
4 - 139
6 - 40!!!!!!!!!!!!!!!!!!!!!!
8 - 151

Here are some pics of the plugs:

https://drive.google.com/file/d/0B1Q9WJpTJdJlNXBtXy1wV3BCUTA/view?usp=sharing
https://drive.google.com/file/d/0B1Q9WJpTJdJlNFc4WlZnOEd5ZFE/view?usp=sharing

So obviously a serious issue here, let me know your thoughts all around. I have access to a used motor for $1500 (complete with manifolds and closed cooling system) and I can probably install on my own, which is starting to look like the best option.
 

tpenfield

Moderator
Staff member
Joined
Jul 18, 2011
Messages
17,703
Do a cylinder leak test on #6 . . . look for air bubbles in the coolant. If it is a head gasket, it might be easier/less expensive to fix this engine.
 
Top