Bellows full of water

bspeth

Senior Chief Petty Officer
Joined
Aug 30, 2013
Messages
756
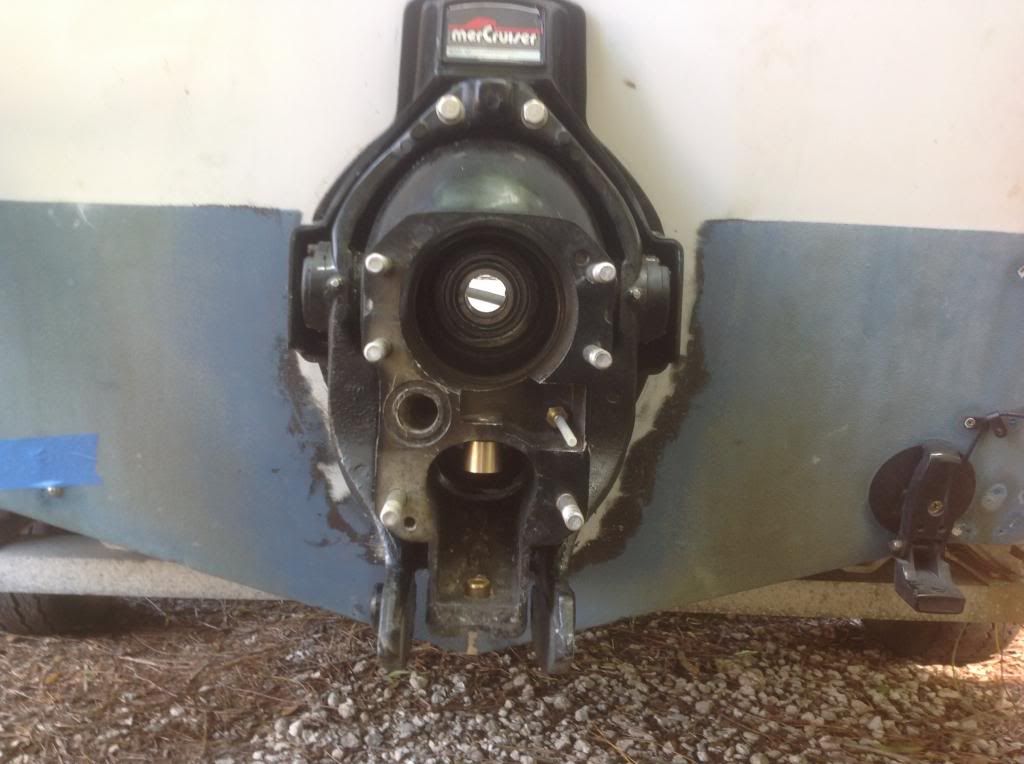
I am going to be learning how to install a complete transom kit and cable.I think either the drive gasket leaked due to being over torqued,or the shift shaft bushing which I had planned to replace anyway.Last year I had a table spoon of water in the shift cavity,didnt know where it came from. Can someone give me a part number of an OEM transom kit that includes the cable and slide for my drive.R 6683545.Engine 6681735. Also I need the tool for the cable right?Will I have to replace the u joints also? I pumped grease into them and water came out. Bearing is rough and I blasted it with WD 40 to help out with removal when I can get to it. Thanks-Blair
 

Fishermark

Vice Admiral
Joined
Oct 19, 2003
Messages
5,617
On your shift cable, is your current cable threaded in from the forward or aft on the bell housing? The old, original cable would have threaded in from the forward part, while the new replacement cable will thread in from the aft. If it has not already been changed out to the newer style, you will need to get the right tap to make threads go all the way through.

You do not need the shift cable tool. A 9/16" 12 point deep well craftsman socket will work if you unscrew the plastic end from the cable. Then once the cable is installed you can screw the plastic guide back on.

I don't have a part number... but others will chime in soon.

I cannot imagine the water coming in from the outdrive being torqued down too tightly... but you are replacing the bellows anyway, so that is a good thing. Go ahead and install the revised shift shaft bushing as well and you will be good to go.
 

thumpar

Admiral
Joined
Jun 21, 2007
Messages
6,138
I would probably replace the u-joints just to make sure. You can get replacement part numbers for those in the adults only section. You don't need to buy OEM for those. You may need to tap the threads for the shift cable for the new style cable. To get the bearing out just do the rent a tool program at autozone. It is free. They have a 2-3 jaw puller. Mine came out in 2 whacks. When you do the exhaust bellows you can make the expander that is in the adults only thread for a couple bucks. It work for mine.
 

Fishermark

Vice Admiral
Joined
Oct 19, 2003
Messages
5,617
I would probably replace the u-joints just to make sure....

Yep. Agree.

On the shift shaft bushings - the revised style hangs down like this. Has extra sealing to help keep water out:

2014-03-30155008_zps2e0554fb.jpg
 

bspeth

Senior Chief Petty Officer
Joined
Aug 30, 2013
Messages
756
already did the bushing, can the ujoints be removed with out removal of the bearing retainer?,I think I read that you could but don't quite see how.The driveline shop said they would do em for 75 bucks if they can get to them.
 

Fishermark

Vice Admiral
Joined
Oct 19, 2003
Messages
5,617
Yes - you may need to grind a little off of one of the "ears" - but they will come out.
 

bspeth

Senior Chief Petty Officer
Joined
Aug 30, 2013
Messages
756
Is there any reason not to do the grinding method?
 

bspeth

Senior Chief Petty Officer
Joined
Aug 30, 2013
Messages
756
That 2 or 3 Jaw didn't work for me, the cone wouldn't fit around the back of the jaws in either configuration.I am going to give the pilot bearing puller a shot but after I get back from fishing in the tinny.
 

thumpar

Admiral
Joined
Jun 21, 2007
Messages
6,138
That 2 or 3 Jaw didn't work for me, the cone wouldn't fit around the back of the jaws in either configuration.I am going to give the pilot bearing puller a shot but after I get back from fishing in the tinny.
It worked fine for me and they are all the same.
 

bspeth

Senior Chief Petty Officer
Joined
Aug 30, 2013
Messages
756
I will get the bell housing off for the next attempt,ran out of time today and working through the bell housing is tight,that may have been my problem.I am looking at 30-803097T1,19543A4,and 805320A03. Any thoughts on the parts selection?
 
Joined
Mar 27, 2010
Messages
3,008
Those parts look good to me. Exactly the ones I would go with. Don't forget the bellows adhesive. I also used a slide puller but my bellhousing was out.
 

bspeth

Senior Chief Petty Officer
Joined
Aug 30, 2013
Messages
756
Hey Thump,I took off the bell housing and got all the crap outta the way.That gd puller will not get small enough,or the cone is too small. Gimballed the s--t out of the bearing every time it slipped out of the inner race.I am going to try the pilot bearing 2 jawer.If you got anything,I'd love the help.Not against ordering the actual puller but not if I don't have to.It did budge I believe,so I don't think its too stuck.Thanks again.-B
 
Last edited:

BruKen

Seaman Apprentice
Joined
Feb 26, 2014
Messages
48
if the gimbal bearing has corroded in (white galvanic powder round outer race and the gimbal starts pulling skew you can land yourself in a whole heap of difficulties by trying to force in out any more. Drive it back in if you can. I had a similar issue when I purchased my old wreck. In the end I applied heat very gently and evenly to the transom assembly that the gimbal bearing fits into. This creates a mild "donut effect" and allowed the bearing to come out much easier. Keep the bearing cool, heat the transom assembly area externally. And be very even and gentle with the heat to avoid warpage or cracks. It does not have to be water blistering or cherry red hot. Somewhere between too hot to touch and boiling point is plenty to take that last nip out.
The seal behind the bearing in my case also caused the tool to grab unevenly. Tear it out if you can if it is causing you problems. If all else fails dont go beserk on force, you may need to lift the engine and punch it out from the engine bay or you'll be replacing the transom assembly too.
 

BruKen

Seaman Apprentice
Joined
Feb 26, 2014
Messages
48
alternatively, if your gimbal bearing has now pulled skew, then the last resort is to carefully drill the outer ali race of the gimbal bearing just shy of the transom at 3 or more points. The ali is very soft and easy to drill without the drill bit wandering skew and scoring / drilling into the transom (if you line up correctly!) Starting with a small bit well away from the transom wall slowly increace drill bit size until you are sattisfied that a) you havent hit the transom, b) you can fit a small cold steel punch in to the hole and crack off the last bit of race without beating the chisel so hard you are going to damage the transom. The bearing should pull out easily now.
 

achris

More fish than mountain goat
Joined
May 19, 2004
Messages
27,468
I will get the bell housing off for the next attempt,ran out of time today and working through the bell housing is tight,that may have been my problem.I am looking at 30-803097T1,19543A4,and 805320A03. Any thoughts on the parts selection?

30-803097T1 is the transom kit. Included Gimbal bearing, gasket, 3 bellows, water hose and a few other bits and bobs.
-19543A4 supersedes to -865436A02 (Shift cable, new style, without bellows and gasket)
-805320A03 Trim limit and sender kit.

I'm say you have it covered. A few other things I'd look at while you have it this far apart. Check the upper swivel shaft and its bearing and the wear between the upper swivel shaft and the steering arm, the synthane washers for condition, and the hinge pins. Also, if you still have the cable that comes in from the front of the bell housing and need to run a tap down the threads for the new cable (goes in from the aft), the tap MUST be a parallel. Use a taper tap and you risk damaging the bell housing beyond repair. You may find a few people will tell you it's ok to use a taper tap (as they are more common and easier to obtain), but that is wrong.... Use the parallel tap, nothing else. Can not stress that anywhere enough....

Chris......
 

bspeth

Senior Chief Petty Officer
Joined
Aug 30, 2013
Messages
756
Thanks,got the gimbal bearing out.The auto zone puller was crap,the oreillys one worked well.There was no corrosion around the outer race. One thing I did notice is that the housing was quite scored from the tolerance ring of the bearing.Going to leave the old grease seal in place.Shift cable is new style already and although it had me worried initially it was very easy to understand after disassembly.So I am fully disassembled now and ready to go after some parts.I will inspect the areas you have mentioned Achris.This is coming along pretty good to this point and I would not be as far without all of your help in knowledge and in building confidence.I very much appreciate it! I will keep this thread updated. Would anybody suggest the transom kit that comes with the exaust tube instead of the bellows for any reason other than ease of installation?Engine is in my sig.-B
 

achris

More fish than mountain goat
Joined
May 19, 2004
Messages
27,468
Exhaust tube is noisier, and for that reason alone I would always put the bellows on, more difficult or not!
 

Fishermark

Vice Admiral
Joined
Oct 19, 2003
Messages
5,617
If your original exhaust bellows is still in one piece and in relative good shape I would suggest reusing it. If for no other reason that it will be easier to put back on. ;) Now if it is a complete shambles and disintegrating, then you can go with the new bellows. But as you already know, this is not a critical component.
 

bspeth

Senior Chief Petty Officer
Joined
Aug 30, 2013
Messages
756
It is in good shape,just installed it last year when I replaced the water pickup hose.I think I will keep it in the shop bin and use the new one since I am already here.
 

bspeth

Senior Chief Petty Officer
Joined
Aug 30, 2013
Messages
756
How do I go about the inspection of the upper swivel shaft and steering arm? Is disassembly required for this?Or do you guys know a simpler procedure?I am ready to start reassembly and have the new gimbal bearing in and a mouse for the shift cable and trim switches in.
 
Top