Mercruiser exhaust Y pipe leak... or bellows needing replacement?

diver94

Petty Officer 2nd Class
Joined
Jun 7, 2010
Messages
191
Hello,

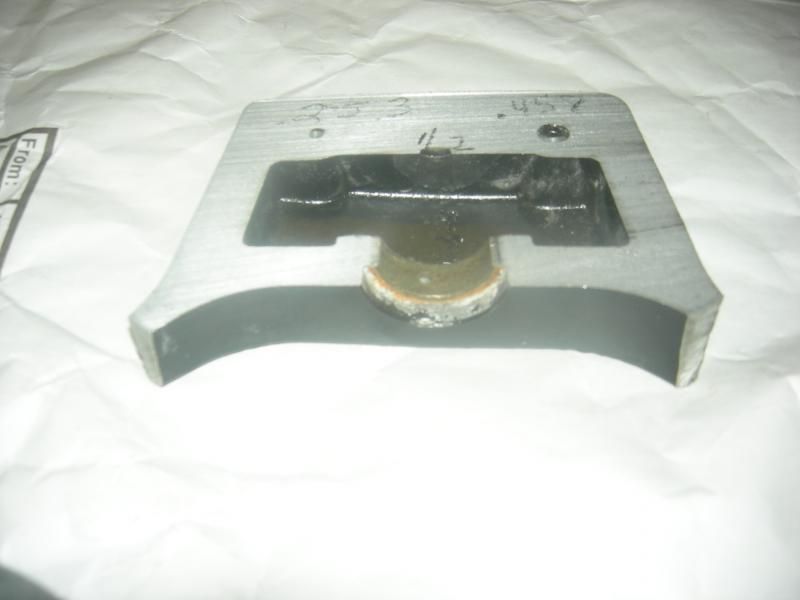
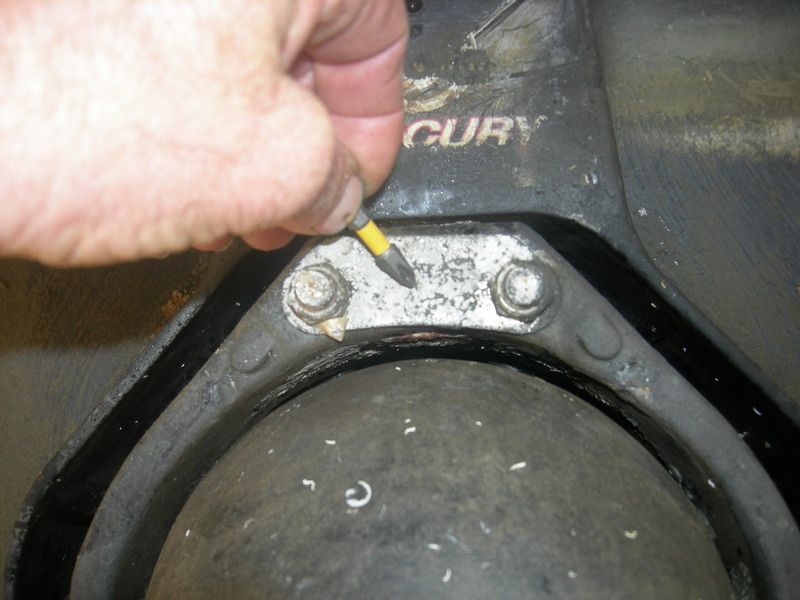
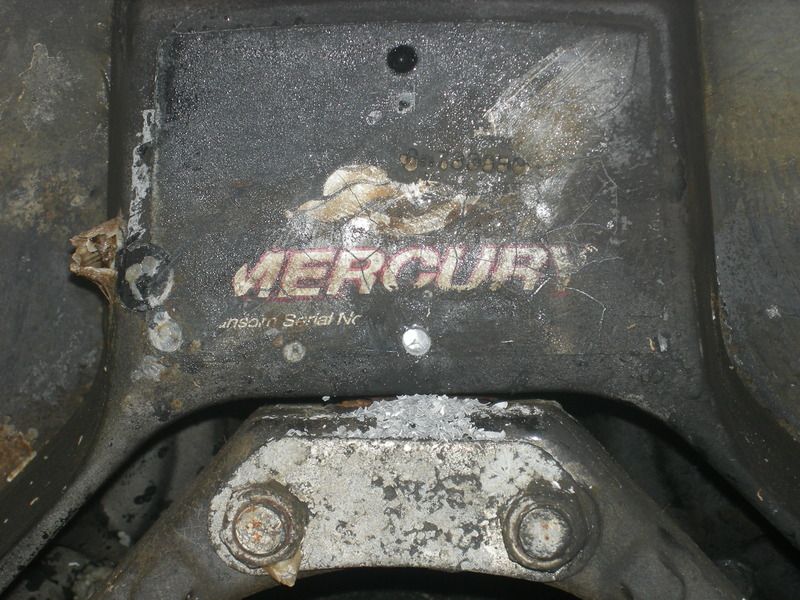
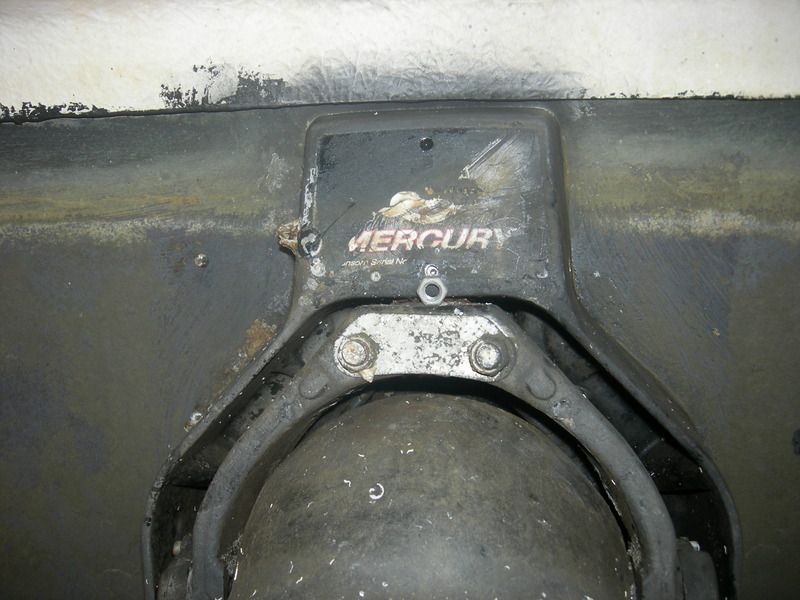
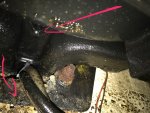
I have a 2003 Regal 2860 with twin Mercruisers 4.3 MPI, Bravo III. I just noticed the bilge pump working every 5 minutes or so (just pumping a little water). I went under the engine and I saw water slowly dripping ( coming from the port engine...under the exhaust Y pipe). See attached picture.

Background: I bought this boat last year and used it for 3 months with no issues. I did not replace the bellows this spring. Note: A mechanic at a local marina replaced the steering cable last week (he had to remove the port engine exhaust hoses to access the cable area (but he forgot to tighten the exhaust clamps). The port exhaust hose was leaking when we launched the boat and he had to come back to tighten the clamps (not sure if this could cause a leak). I am 2 hours away from that marina and Im trying to avoid going back there. Terrible experience!


1- I just dont know if this leak is coming from the Y-pipe or (maybe) from the shift cable bellows. Can we tell the difference based on the origin of the leak?

2-If the problem is the exhaust (not the bellows) does it leak while the engine is off. I though the exhaust only leaked when you are running the engine.

Your input will be appreciated.
FullSizeRender.jpg FullSizeRender.jpg
Luis
 
Last edited:

diver94

Petty Officer 2nd Class
Joined
Jun 7, 2010
Messages
191
here is the picture
 

Attachments

  • FullSizeRender.jpg
    FullSizeRender.jpg
    107.3 KB · Views: 67

alldodge

Moderator
Staff member
Joined
Mar 8, 2009
Messages
40,718
If it is leaking from where the arrow is pointing to, then the motor needs to come out and the Y-pipe is replaced. The way to find out is pull the boat from the water and remove the drive. If the drive bellows is dry then its not leaking from there. If your shift boot has cracked then it could be coming from it. The main point is the boat needs to come out of the water so other things can be checked

fetch
 

diver94

Petty Officer 2nd Class
Joined
Jun 7, 2010
Messages
191
AllDodge. THANKS! I will pull the boat from the water as soon as possible.
 

diver94

Petty Officer 2nd Class
Joined
Jun 7, 2010
Messages
191
Do you know (ball park) how much will that cost in labor? replacing the Y pipe
 

alldodge

Moderator
Staff member
Joined
Mar 8, 2009
Messages
40,718
Do you know (ball park) how much will that cost in labor? replacing the Y pipe

Most cases if its easy to get at the motor, then its a 2 to 3 hour job to remove the drive and the motor. Then remove/replace the Y pipe another hour. Reinstall start and test. For twin engine installs, many are made were one comes out easy but the other has to have the easy one out first before the other can be removed.

The harder it is to get at the motor, or if the other motor needs to be pulled first to get at the one with the problem. Shop hours vary depending on your location. I would estimate.

So I would estimate 6 to 10 hours for an easy one, up to 14 hours for a difficult one for remove and replace. A new Y pipe is around $700 but also note all the modern Y pipes are the same. So find one for a V6 or V8 and they are the same
 

diver94

Petty Officer 2nd Class
Joined
Jun 7, 2010
Messages
191
Quick update. I went back to the boat and found water coming in from the top area (right under the steering level/where the steering level enters the outdrive). See attached picture. I will have the marina staff pull me out of the water. Lets hope its just the bellows!
FullSizeRender (1).jpg
 

alldodge

Moderator
Staff member
Joined
Mar 8, 2009
Messages
40,718
That spot is coming from the upper steering pin seal. The gimbal ring will need to be removed to replace pin, seal bushing and nut. If the ring was warn to much it to will need to be replaced. There are three ways to fix this issue.

1) Can have holes cut in the upper housing and the work is done from the outside of the boat.
2) pull motor and work from the inside
3? pull the motor and replace the entire transom assembly
 

diver94

Petty Officer 2nd Class
Joined
Jun 7, 2010
Messages
191
Got it, AllDodge. I will try to find a marine mechanic willing to cut the upper housing.
Thanks again!
 

diver94

Petty Officer 2nd Class
Joined
Jun 7, 2010
Messages
191
sand unnamed.jpg Quick question: Is there a good reason for all the amount of sand I had to take out of the upper housing (upper seal area)? I wonder how the sand got there. See picture.
BTW, I ordered the stainless plate from JRmarine and made the cutout. Im waiting for the marine mechanic to help me remove the gimball.
 
Last edited:

diver94

Petty Officer 2nd Class
Joined
Jun 7, 2010
Messages
191
Please help. Im just surprised to find a lot of sand in the upper housing area. I have to assume that the sand (thats what it looks like but it could have been a dry powder/chemical) was place there for a reason. BTW, the other engine also has sand-like powder inside the upper housing area (I can touch it with my hands if I come from inside the boat engine's compartment.

PLEASE NOTE: I had problems with the marina and the marine mechanic that was working on my boa a few weeks ago. They charged me over 5,000 for work that I did not authorized. I was very upset and it got really nasty. At the end I had to pay them or they would put a lien on my boat, but the mechanic and the marina service manager are shady. I didn't know them but know I dont trust those guys.
I wonder if they put some chemical there to accelerate the rust and damage the seal. Just in case, I will clean the upper housing area, remove all that powder and put some heavy duty WD40.
I wanted to know if you guys have heard to anything like that before.
Thanks!
 

Scotvl

Cadet
Joined
May 9, 2017
Messages
26
Use mercury extreme grease or whatever grease you may have on hand, wd40 is not a lubricant.
 

Bt Doctur

Supreme Mariner
Joined
Aug 29, 2004
Messages
19,111
the powerdy sudstance is aluminum corrosion from a leaking seal . Install the grease fitting to help stop the leak
 

Bt Doctur

Supreme Mariner
Joined
Aug 29, 2004
Messages
19,111
its all in the video. I install them on every customers boat that wants it. No need to remove anything
Get a SS zirc and the correct drill bit and tap. drill the hole a 1/4 inch deep with the tap drill bit. now drill a 1/16 hole into the housing CAREFULLY
You will see aluminum then brass, once you penetrate the brass you will find steel filings stop drilling
Tap the hole and install the zirc and grease.If you did it correctly you will see grease between the steering ring and housing
Heres a cutaway of a housing, Bravo is the same
DSCN2601_zps86400dcd.jpg

DSCN2597_zps4f0baaf0.jpg
 

Bt Doctur

Supreme Mariner
Joined
Aug 29, 2004
Messages
19,111
http://i57.photobucket.com/albums/g219/BtDoctur/DSCN3599_zpsnwjdlud1.jpg[/IMG
[IMG]http://i57.photobucket.com/albums/g219/BtDoctur/DSCN3595_zpsvjho7uqq.jpg
DSCN3594%20-%20Copy_zpsigt0x4sp.jpg

DSCN3596_zpssshslnyc.jpg

DSCN3598_zpsvoabnrlx.jpg

DSCN3601_zpsbd6k7xav.jpg
 

Bt Doctur

Supreme Mariner
Joined
Aug 29, 2004
Messages
19,111
The nut shown is for the drilling location ,just happens to be a 5/16 hex nut
 
Top