Rebuild trim cilinders

Hoosmatroos

Petty Officer 1st Class
Joined
Jul 11, 2011
Messages
250
Hello Guys,

Bravo one:

I've just rebuild both my trim cylinders, and replaced all the seals and O-rings, easy job, will open a separate "how to" topic with pictures soon. I dropped the floating piston in the cylinder and pushed it in a couple of inches. Then pushed in the rod. Mounted everything, so far so good. But I'm not sure if it matters that I pushed in the floating piston first. The other cylinder I've pushed the floating piston in with the rod. Off course I have to bleed the system (manuals are all present) but does that position the rod and piston the correct way on both?

Can anybody explain how this internal works with the check balls and floating piston?

And last, can't find the max trim distance for the Bravo One. Thought it was 21-3/4 inch?
 

alldodge

Moderator
Staff member
Joined
Mar 8, 2009
Messages
40,747
The trim limit is 21 3/4 max, can be less (If you don't need it to go all the way up, for trailering and such, I would make it a bit less). The dimension can be found in manual 28 on page 5D-8 and manual 11 on page 4A-17

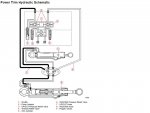
The check balls stop fluid from returning. Doing this holds the piston and rod in place. If the drive is struck while moving, the piston does not move but the rod can because of the spring. The floating piston keeps the spring around the rod centered, so in use and during an impact it keeps everything centered

Trim System.jpg
 

Hoosmatroos

Petty Officer 1st Class
Joined
Jul 11, 2011
Messages
250
Thanks but still not entirely clear, if the drive gets hit then the rod is moving backwards and oil comes between the floating piston and the rod. Does it all "resets" if the drive is tilted up and down again? And found the measurements (manual 11), don't know how I could missed that :)
 

alldodge

Moderator
Staff member
Joined
Mar 8, 2009
Messages
40,747
Sorry a bit mis-speak on my part. The check balls keep the lines full, but also open when pressure gets higher then the preset value.

First law of hydraulics: Pressure is exerted equally and acts with equal force on all areas.

For the up function, the pump starts pumping fluid which pushes the shuttle vale over to the right, and it pushes the right poppet valve opening the fluid to return to the tank. The pump is pushing fluid under high pressure which start lifting the drive. When position is reached, the pump stops, pressure is reduced and the poppet valves on each side slide closing off the up and down lines. The shuttle valve returns to enter.

For down just the opposite happens.

The float valve has small holes in it so when pressure is pushing the drive up, the fluid flows a bit slower then on the face IF (big if, First law of hydraulics) there is any air behind it. So this air pushes it against the bolt. Once all air is out, it just floats along with the fluid and will stay in position due to slight friction and the smaller holes.

Now if something hits with the drive moving is a bit different then when its not moving. If a valve is open in the direction the ram will move, then the pressure may exceed the pump and who knows what happens. The weakest part may break. If the drive is struck when not moving the spring takes the initial load, and may be enough to save it, but maybe not.
 

Hoosmatroos

Petty Officer 1st Class
Joined
Jul 11, 2011
Messages
250
OK, thanks. So it doesn't matter how far I push in the floating piston? When refilling and bleeding them, everything is positioned the correct way?

Because now there is air between the piston and the check balls / spring.
 

alldodge

Moderator
Staff member
Joined
Mar 8, 2009
Messages
40,747
Yes basically, after running the rams in/out a few times the air will be gone and life is good
 

JoLin

Vice Admiral
Joined
Aug 18, 2007
Messages
5,146
Hello Guys,

Bravo one:

I've just rebuild both my trim cylinders, and replaced all the seals and O-rings, easy job, will open a separate "how to" topic with pictures soon.

I'd be very interested in seeing that. I bought a pair of SEI trim cylinders and hoses from a guy who had them on his boat for one season. I'd like to rebuild the ones I take off, and use them to replace the pair on the second drive. Did you use an aftermarket rebuild kit?
 

Hoosmatroos

Petty Officer 1st Class
Joined
Jul 11, 2011
Messages
250
I've used an OEM kit. They are cheap. around 20-30 dollars. For met they cost around 15 Euro's.

I'll open a new "how to" topic later today and post a link here.
 
Top