470 mercruiser rebuilt engine install questions

alldodge

Moderator
Staff member
Joined
Mar 8, 2009
Messages
40,750
My replacement carb has an extra tube out the bottom. I'm not sure what it's for, it hits my valve cover. The tube elbow is pressed in I can't unscrew it for a shorter radius elbow. I could cut it but it would be a pretty short nub?

Im guessing it goes to the air cleaner? I don't remember how the origional carb hooked up, or should say where.

That is for a line which goes to a PVC valve which is connected to the valve cover. If your motor did not come with a PVC valve then you have the wrong carb. I cannot say because I'm not a 470 guy

I'm also not finding the thread outlet on my power steering actuator by transom, to run my power steering hose to.

The PS hoses go to the steering ram, and there should be two places to connect. Take a pic and post
 

stonyloam

Vice Admiral
Joined
Mar 13, 2009
Messages
5,827
As far as I know, there is no PCV valve on the 470. On mine there is a hose that runs from a fitting on the valve cover to the flame arrestor that vents fumes from the crankcase. I have no idea what to do with that carburetor fitting. If it vents directly into the carb., seems like it would need to be plugged but I don't know. Do you have the original carb?
 

aarons 470

Petty Officer 1st Class
Joined
Aug 29, 2012
Messages
351
Yes, now that you mention this I remember, both my engines had that hose from the valve cover to the air cleaner. I do have an original carb.
It is still have it at the shop where I was going to have it rebuilt. Shop informed me It had a bad plunger of some sort, and it was a part that isn't made after market. So It's not going to get rebuilt.

This replacement carb is the exact same, other than it has the extra tube opening.

So this carb has the PCV hookup, (And it does vent directly into carb) So I guess I need to find out if I can just plug it without it affecting carb performance. I could cut it short so it wouldn't be in the way and cap it.

Power steering-
I did find the 2 hookups on the power steering ram. Smaller and larger holes. I hooked up the smaller one as the power steering pump had this Hydraulic type hose attached with that size fitting. The other hose off of the pump is shorter (approx 16" long) and its a standard rubber type hose. It still has a hose clamp attached to its end, so it probably went to the cooler, then there must be a hose that goes from cooler to ram? I'll take some pictures.
 
Last edited:

stonyloam

Vice Admiral
Joined
Mar 13, 2009
Messages
5,827
Bad plunger? Are they talking about the power valve spring plunger (that, you can't get as far as I know)? The only other plunger would be the accelerator pump, which is easily available. Watch this https://m.youtube.com/watch?v=JHjjAz367Ng about 5 min in they talk about the power valve plunger (rod with spring).
 
Last edited:

aarons 470

Petty Officer 1st Class
Joined
Aug 29, 2012
Messages
351
It's is probably the power valve spring plunger. The person has been building carbs along time so it would
Def be the part that is hard to get.

If I end up needing a new carb, Is there any reason I can't just buy a rebuilt one from auto parts store? They are cheap, but they were on cars.
 

alldodge

Moderator
Staff member
Joined
Mar 8, 2009
Messages
40,750
If I end up needing a new carb, Is there any reason I can't just buy a rebuilt one from auto parts store? They are cheap, but they were on cars.

No. you must have a marine carb for safety. Google 3310-860071A4 and you can find them on ebay and such
 

aarons 470

Petty Officer 1st Class
Joined
Aug 29, 2012
Messages
351
Ok, good to know.

Want an opinion on my alternator bracket. I'll attach a couple pictures.

To keep The bracket and alternator inside the engine box so I can still use it, I have to move the bracket to the point where I only have one of the 5/8ths bolts going into block that hold it as opposed to 2.

Seems like with cut washer and locktite it would be ok? Or do I need to attach another chunk of metal and drill new hole? Hopefully I don't lol.

Not sure if you can tell in pics, but when both holes line up it puts the arm and alternator significantly out.
 

aarons 470

Petty Officer 1st Class
Joined
Aug 29, 2012
Messages
351
No Title
 

Attachments

  • photo259276.jpg
    photo259276.jpg
    88.4 KB · Views: 0
  • photo259277.jpg
    photo259277.jpg
    89.3 KB · Views: 0

aarons 470

Petty Officer 1st Class
Joined
Aug 29, 2012
Messages
351
No Title
 

Attachments

  • photo259278.jpg
    photo259278.jpg
    85.9 KB · Views: 0
  • photo259279.jpg
    photo259279.jpg
    84.5 KB · Views: 0

aarons 470

Petty Officer 1st Class
Joined
Aug 29, 2012
Messages
351
No Title

And this picture is the other inlet for the power steering. I don't have a hose for it so trying to figure out its plumbing. I have the smaller connection plumbed up. The larger one is approximately 3/8ths pipe size.

Sorry it's a bad picture. Hard to get a good one when using the reverse shot on the phone so it isn't to much data to load on site.
 

Attachments

  • photo259280.jpg
    photo259280.jpg
    93.9 KB · Views: 0

alldodge

Moderator
Staff member
Joined
Mar 8, 2009
Messages
40,750
Your ALT bracket looks like a tack weld, so not much strength. Add some vibration to it and not sure it will last. Just my opinion

Don't have a clue with your last pic, is that a fuel filter housing on the left?
 

aarons 470

Petty Officer 1st Class
Joined
Aug 29, 2012
Messages
351
Electronic fuel pump. I thought I had it all figured out from your info. I'm wiring it up finally.

On the oil pressure switch.

According to the diagram you gave me- "I" on switch goes to ignition switch. So is that the positive coil?

And the "S" goes to solenoid. Where do I run that, to the slave on starter or slave on block, and what posts?

Or is there something closer I can run to, on other side of engine by switch?

Thanks
 

aarons 470

Petty Officer 1st Class
Joined
Aug 29, 2012
Messages
351
Bracket is tough, pic doesn't show the welds in back. I'm wondering if the one engine bolt will hold it on place and not slowly rotate once belt is on and running. With both bolts on it swings the alternator out to far for engine box. Or by tach weld, do you mean tach weld is the way to go to hold it?

Yes that is a fuel filter housing but it's moving down close to tank level. If you look below it you'll see the silver hydraulic hose clamp end. That one is the smaller connection going to steering ram. You'll see the open hole beside it.

I don't have the routing from the larger hole. I'm assuming it goes from that hole to the cooler then back to steering pumps other side. But the cooler has multiple outlets, so not sure what to do.
 
Last edited:

aarons 470

Petty Officer 1st Class
Joined
Aug 29, 2012
Messages
351
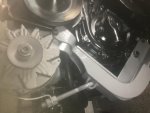
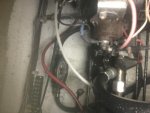
Hi guys, I am back on project and was hoping to wrap this up by the weekend, but have a problem. Riser elbow/ manifold aren't matching the rear pipe with flapper. ( Not sure what this is called). I'll try and attach some pictures. To tight to fit something up, and you have the reducer also which doesn't help. its 3" o.d off of the elbow and the rear tube is 4" o.d.

I could make it work but I would have to cut down the rear piece, but then I'd be destroying the check/flapper assembly.

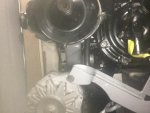
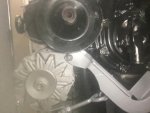
My engine serial number is 6123990, its a 1982. The manifold is the aluminum type which I was able to salvage from a boat from 1987. I'll have to look back in forum I have that serial number somewhere. The elbow is very nice used one I found that mates up to it.

I am hoping I can get some help on the easiest solution.

Option one-
If I can swap out the rear flapper pipe piece with the one that was meant for this manifold assembly. First I'd need to find out what piece this is.

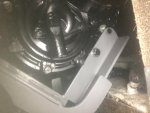
1- will I be able to get to the 2 small bolts to change it out. Maybe If I remove the heat exchanger? Not sure if it is blocked path to bolts. Was 2 bolts and a large O-ring.

2- Will the housing block the proper flapper pipe? The 1987 had a slightly different housing than the 82. I don't recall much difference, other than the lower engine mount holes are different. Mine has the wider hole centers.

Option 2-
Replace the manifold and elbow. Would be kind of a shame to get rid of this nice aluminum manifold. I had the flange face tig welded and machined. The piece is in really good shape, And the elbow is like new.

Thanks for the help, I'll see about getting pictures up.
 

aarons 470

Petty Officer 1st Class
Joined
Aug 29, 2012
Messages
351
Having problems with pictures. When I upload it off of desk top says unknown error. Before I had to use my phone and take a reverse picture to keep the pixels down to upload it. Is there a trick to get it to upload from desktop? There def isn't room for a regular pipe offset, would have to be a custom 1 piece setup or roll up first then back down to rear pipe. Pictures always helps though. I just tried taking a picture at lower quality of my current pics, still says unknown error.

Link to my pipe piece with flapper. Mine seems to be different than the common onees for that period. Here is a link to it when I was looking for the piece on the Forum. 2 were suggested that weren't like mine.
Link
https://forums.iboats.com/forum/eng...ust-elbow-mercruiser-470-flapper-and-retainer
 
Last edited:

aarons 470

Petty Officer 1st Class
Joined
Aug 29, 2012
Messages
351
Picture of my current J tube/ flapper check tube. Part number 72082a2. This is from my engine serial number 6123990.

the manifold and elbow are from a 1987 engine serial number C327066
 

Attachments

  • photo299686.png
    photo299686.png
    546.1 KB · Views: 0
Last edited:
Top