Bravo 3 gimbal ring moves up about 1/8" with swivel shaft. Any easy fix?

wisebob

Seaman
Joined
Aug 29, 2010
Messages
56
I just noticed that if I push my Bravo 3 gimbal ring upwards, I can move it up about 1/8 of an inch. There seems to be a bigger gap between the gimbal ring and the transom assembly than before so if I shoot water at that spot using a water hose, I can see water coming in on the motor box side. There is no side to side play and it the swivel shaft is moving up with the gimbal ring.

Any thoughts on what is going on and what the possible fixes are? Could it be that the swivel shaft nut is loose?

thanks.
 
Last edited:

alldodge

Moderator
Staff member
Joined
Mar 8, 2009
Messages
42,054
Either your ring is worn or the washers which go between them are worn. Should have between 0.001 to 0.010 clearance with the tiller handle tight. To get at the nut you either need to pull the motor or drill holes in the upper section of the transom assembly for access
B3 ring.jpg
 

Bt Doctur

Supreme Mariner
Joined
Aug 29, 2004
Messages
19,291
If your going that far, install the missing grease fitting to prevent premature wear and rust around the pin.
I have a video installing it.
 

wisebob

Seaman
Joined
Aug 29, 2010
Messages
56
Is it possible to tighten the swivel shaft nut from the inside without taking off the motor? I don't think it is a worn gimbal ring because I can see the swivel shaft moving up and down with the gimbal ring and it is tight on it. No left or right play.
 

Bt Doctur

Supreme Mariner
Joined
Aug 29, 2004
Messages
19,291
Actually the transom housing is removed to tighten that part
 

wisebob

Seaman
Joined
Aug 29, 2010
Messages
56
You mean cutting a hole on the transom assembly like the JR marine method?
 

stonyloam

Vice Admiral
Joined
Mar 13, 2009
Messages
5,827
Yes, you need to do two things, first loosen the bolt that clamps the steering arm to the pin, and second turn the nut on the pin. You either need to remove the gimbal housing or cut an access hole(s) to get to the clamping bolt. Your second statement was that when you sprayed water it "came in on the motor box side". Are you saying that the water actually came into the boat? Was this when you sprayed around the upper swivel pin? could be that the upper pin seals are leaking.
 

alldodge

Moderator
Staff member
Joined
Mar 8, 2009
Messages
42,054
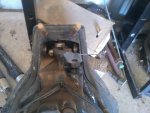
There isn't much room but the motor would need to come out to attempt. Once out you might be able to get away without removing the transom plate, but it would be tight. Here is a Bravo assy without plate.
Photo868.jpg

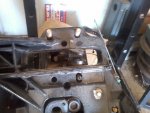
With the transom plate
Photo869.jpg

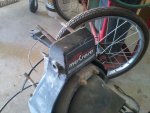
I replaced my pin, bushing and seal on this one years ago and it worked out just fine

Photo871.jpg

My thought is your nut just loosened up, but you need to get at it to find out
 

wisebob

Seaman
Joined
Aug 29, 2010
Messages
56
Yeah, going to do the JR marine method since my friend had an extra cover plate kit laying around.
 

wisebob

Seaman
Joined
Aug 29, 2010
Messages
56
Thoughts/experiences with stainless steel swivel shaft?

Going to try the JR marine method to get access to the swivel shaft. Your thoughts/opinions/experience with the stainless steel shaft from JR marine or Nuwave marine would be appreciated. Seems like it would be better than OEM steel?

Thanks.
 

alldodge

Moderator
Staff member
Joined
Mar 8, 2009
Messages
42,054
Going to try the JR marine method to get access to the swivel shaft. Your thoughts/opinions/experience with the stainless steel shaft from JR marine or Nuwave marine would be appreciated. Seems like it would be better than OEM steel?

Thanks.

When I rebuilt mine, I sent it to a place in Texas which rebuilt the ring and I bought a new pin. The reason mine went bad was because almost the entire transom assembly sets under water, and the boat is in the water the whole season. Reason for this explanation is because my upper shaft seal started leaking. Most boats do not sit as low as mine does and therefore a leak in this area doesn't happen.

The slop you currently have may be fixed by just tightening things up. I also don't think you will normally wear on out without something other like a leak happening which will cause the issue.
 

stonyloam

Vice Admiral
Joined
Mar 13, 2009
Messages
5,827
Going with the JR shaft would be a waste of money because you ALREADY HAVE A PERFECTLY GOOD STAINLESS STEEL UPPER SWIVEL SHAFT. If the ring is tight on the square shaft and all you have is a little up down play the upper shaft should be fine. If all you are doing is trying to reduce the up/down play, I would suggest that you measure exactly how much play you have, then give the folks at JR. a call and see what they think. It may be that you don't need to do ANYTHING. Up down play should not be a safety concern, whereas side to side play of the ring or steering lever on the shaft is. Good luck.
 

wisebob

Seaman
Joined
Aug 29, 2010
Messages
56
No Title

The up and down play is causing the water to come in. Anyhow, I cut the opening this morning -- no fun at all especially when I have a swim step in the way. Don't look too pretty in there. Getting the bolts off is next.
 

Attachments

  • photo235308.jpg
    photo235308.jpg
    8.6 KB · Views: 5

DeepBlue2010

Lieutenant
Joined
Aug 19, 2010
Messages
1,305
I completed this job successfully before the beginning of last season. I did not use the JRMarine swivel shaft as I designed and built mine with built in grease channels. I also did not use their plate. For me, it offered no significant advantage over Me cruiser recommended method. IMHO, Mercruiser recommended method is much better design for so many reasons but one of the most important is that if salt water corroded the 4 screws that holding the JRM holding plate, we are screwed.

This actually happen often and anyone who tried to replace the continuity wires on the gimbal ring knows what I am talking about. Both methods require patience and paying attention to details; JRM method is no magical solution for the problem. I documented the process step by step in a videos but I still did not get a chance to edit them. In short, I would use their swivel; it is fine, but not their method.

You did not mention what is the problem you are trying to solve; steering play or leak or both?
 

wisebob

Seaman
Joined
Aug 29, 2010
Messages
56
Deep blue. Both. I have some up and down play which is causing the seal to fail. From my pic, you can see how bad things look inside.

What about applying the special anti-seize teflon stuff like Tef-Gel or Marelube on the 4 screws before securing? Seems like that would prevent corrosion. Unless you are saying people have experienced screws actually coming off in the water?
 

DeepBlue2010

Lieutenant
Joined
Aug 19, 2010
Messages
1,305
I realize I was already late, we both posted at the same time. I don’t want to scare you but take every precautions when installing these screws and make it part of you yearly or half yearly maintenance to check, clean, lubricate and tighten these things. When I spoke to this guy, I asked the same questions about these concerns and horror stories I read about his methods and I was surprised and frankly disgusted by his absolute lack of care. He actually said it flat out when I kept pressing the issue, he said “I don’t care, fI the gimbal housing is gone, you will need to buy and install another one” he also conveniently and graciously mentioned that they can do this job for me also.

I did not get the feeling that this is a solution that put together by a company who has the customer's long term best interest at heart. Anyways, just be careful.
 
Last edited:

alldodge

Moderator
Staff member
Joined
Mar 8, 2009
Messages
42,054
I as well don't like the JR method, it does allow for more room to do the work but the down side is sealing it back up permanent is the issue. Your getting water/moisture in so you need to seal it up. You never mentioned what year the boat is so no telling how long this has been going on.

Does your top transom assembly sit below the water line.
 

stonyloam

Vice Admiral
Joined
Mar 13, 2009
Messages
5,827
Yeah it does look pretty bad. I used the Merc method, but rather than plugs to seal the hole I epoxied in aluminum backing plates and epoxied (JB Weld) the cutouts back into the holes. Filled with JB, sanded and painted, can' t tell it was ever cut, held up for 6 years, so far. You could do the same and get a new decal, and it would look like new.
 

wisebob

Seaman
Joined
Aug 29, 2010
Messages
56
I just started with JR marine's method but I'm thinking why not put a bead of 4200 around the plate after installation as some sort of additional protection.
 

cdiamond

Petty Officer 3rd Class
Joined
Aug 20, 2008
Messages
94
i just watched the jr removal video

i would say thats a whole lotta work ( read butchering ) and expense

to end up with a cobbled together assembly

which may or may not leak

i suggest bite the bullet - and replace the transom assembly

then you've got something you can rely on

and its under MERCRUISER warranty

as always - what looks like a way to get out cheap , just ends up costing more down the road (or water)

IMHO
 
Last edited:
Top