70 hp Johnson Re-Locating WP Indicator to top of motor?

Bosunsmate

Admiral
Joined
Apr 7, 2012
Messages
6,129
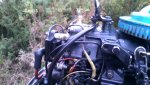
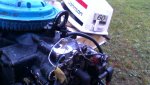
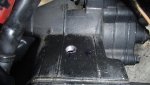
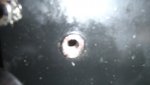
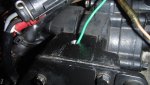
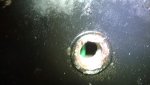
Heres where i did mine, just to starboard of the centre line at the very top of the crankcase not the exhaust chamber housing where it seems drilling is about to take place.
Photos below

The theory on it is it that it evacuates airbubbles so in my opinion the highest part of the watercavity is the best spot. Since the top of the cylinder jacket is higher than the exhaust housing roof i have put mine where they did in the photos on iboats but as i said just off to starboard so i didnt drill into the cylinder wall.

With the old system if there are air bubbles then they are going to begin being trapped at the top of the motor which is above the exhaust housing roof, which means they are then going to be sitting at the top in the crankcase water jacket by the number one cyclinder, exactly the hottest part of the motor and precisely where you want water cooling not stagnant trapped air.

So the moment the boats started up at idle at the wharf the airbubbles will form there at the top and many more if your motor sucks a bit of air as you have it trimmed up as you move out to sea or you ride stern high over a wave.
So im very glad that isnt going to happen to mine when im out on my way fishing in about an hour.
The white stuff to the stern is heat transfer epoxy for the temperature gauge sender i installed in the head
 
Last edited:

Bosunsmate

Admiral
Joined
Apr 7, 2012
Messages
6,129
No Title
 

Attachments

  • photo214878.jpg
    photo214878.jpg
    127.9 KB · Views: 5
  • photo214879.JPG
    photo214879.JPG
    176.8 KB · Views: 5

TwoRivers

Petty Officer 1st Class
Joined
Mar 10, 2010
Messages
344
Bosun, Nice job on that 60. You've got a lot more room on top your motor than I do.
I'd have to take the flywheel and stator ring off to remove the lifting hook. Then I'd have to take the head off to see what I'm drilling into.
I'm just going to tap where I have it marked, then run my hose up over top the motor and then out of the lower cover.
Going to look for a good bit and tap combo today.
thanks
 

bonz_d

Vice Admiral
Joined
Apr 22, 2008
Messages
5,274
Seem to recall this same mod has been suggested for the 2 cylinder loopers also and for the same reason.
 

gm280

Supreme Mariner
Joined
Jun 26, 2011
Messages
14,589
I think yours is in a much better place then the flat on the left side of the engine. Yours is at the top and isn't that the whole idea for reinstalling the pee tube in the first place? I also installed my pee tube at the top. But I had the capability to see inside the engine casing when I was rebuilding it. The bossed area in the top actually did go into the water jack at the very top of my engine and all worked out nicely. I just hate to see anybody drill into their engine and make a mistake. While a threaded plug can fix the mistake, it just seems questionable to be drilling without verification as to exactly where it is to go... I had the ability to see when drilling where it was going to open up into... With what seems like two completely different sides to this story, I'd be hesitant until I could verify for myself where it is suppose to go. But that IS just me...

It could be both locations are into the water jack. But the very top one will do a better job of eliminating air bubbles... JMHO!
 
Last edited:

Faztbullet

Supreme Mariner
Joined
Mar 2, 2008
Messages
15,616
Bosun, Nice job on that 60. You've got a lot more room on top your motor than I do.
As he should as that a 2 cyl 60hp....The TSB measurements are only for 3 cyl motors
 

Quick3201

Petty Officer 2nd Class
Joined
Jul 31, 2011
Messages
150
Not having that particular Johnson engine, i'm curious about the "T". Where does the hose from the other end of the T go? One will go to the pee squirter, other ??? Just curious.
 

Bosunsmate

Admiral
Joined
Apr 7, 2012
Messages
6,129
Seem to recall this same mod has been suggested for the 2 cylinder loopers also and for the same reason.


Yep thats what mine is, i dont know if it was officially recommended but it stopped my overheating alarm going off at idle/low rpm after i had changed the thermostat and put in a whole new water pump to no effect
 

Bosunsmate

Admiral
Joined
Apr 7, 2012
Messages
6,129
As he should as that a 2 cyl 60hp....The TSB measurements are only for 3 cyl motors


Yes mine is a 60hp 1982 2 cylinder looper, as a few of you have said i could work out where to drill as i had the head off as i was cleaning the galleries. Ive no idea what the water cavity looks like on a three cylinder but im sure there would be room up there somewhere as its got to take water supply somehow.
Im about to do it to a mates v4 at the very top and just off centre as theres ample room in there to do it too, i know that as i replaced the head gasket for them a couple of seasons ago.
 

Bosunsmate

Admiral
Joined
Apr 7, 2012
Messages
6,129
Not having that particular Johnson engine, i'm curious about the "T". Where does the hose from the other end of the T go? One will go to the pee squirter, other ??? Just curious.


Its just an elbow connector, so it has the thread on one end to screw into the engine/water cavity and the barb fitting for the hose on the other to the tell tale.
No T or other hose
 

laurentide

Lieutenant Commander
Joined
Jul 24, 2011
Messages
1,869
I'm just tagging along on this thread, so my apologies if this is inappropriate to ask, but would this be a recommended mod on all 3 cylinder loopers that have the manifold cover lower outlet? Thanks (and sorry)!
 

Bosunsmate

Admiral
Joined
Apr 7, 2012
Messages
6,129
I'm just tagging along on this thread, so my apologies if this is inappropriate to ask, but would this be a recommended mod on all 3 cylinder loopers that have the manifold cover lower outlet? Thanks (and sorry)!

Dont know what you a sorry about thats what this forums for, no spelling mistakes either! but i would say yes to all motors with the outlet at a low point, airbubbles work the same on any motor, always rising to the top.
 

laurentide

Lieutenant Commander
Joined
Jul 24, 2011
Messages
1,869
Dont know what you a sorry about thats what this forums for, no spelling mistakes either! but i would say yes to all motors with the outlet at a low point, airbubbles work the same on any motor, always rising to the top.

Thanks! Added to my list of spring projects.
 

bonz_d

Vice Admiral
Joined
Apr 22, 2008
Messages
5,274
As he should as that a 2 cyl 60hp....The TSB measurements are only for 3 cyl motors

The one I'd seen was for the 2 cylinder loopers and was posted on here a couple years ago. I don't recall who the poster was but it was a very complete thread with real life pictures. I think it also addressed the early models that didn't have a tell-tale. Now I'll have to look for it again!
 

TwoRivers

Petty Officer 1st Class
Joined
Mar 10, 2010
Messages
344
No Title

Keeping with the time honored tradition of finishing the thread that I started, I'm back to report that the job is done. Thanks again to all who viewed and commented on this thread. Your help is greatly appreciated.
Delays occurred due to waiting for a tap and bit to arrive by mail as I couldn't source one locally. Another issued occurred when I jammed my finger throwing football with my kid on SuperBowl Sunday. It's still a mess but I needed a break (probably not the right word) from the splint.
I've posted some pictures, sorry they're not the greatest but anybody trying this will get the idea. I believe these are the only pictures with the elbow installed on the top left of the motor (where the service bulletin says to install).
I followed the board members advice and the instructions from the service bulletin and everything seems to have gone well.
For those of you tapping threads for the first time (like I did), I'd suggest finding a piece of scrap aluminum and drilling and tapping a practice hole.
You'll be amazed at how many shavings will result from the drilling.
Best tip from the service bulletin is to dip your drill bit and tap in grease (wheel bearing type). It will catch most of the shavings. Be careful with the rest and you'll have no problems.
In the pictures you'll see that I inserted a piece of 14ga. coated copper wire into the top hole and fed it down through the water jacket to where I could see it through the original factory hole. This gives me a pretty good idea that I'm in the water jacket and things will work out OK once I add fire and water.
Thanks again, it won't be too much longer for we Northerners.
rob
 

Attachments

  • photo215613.jpg
    photo215613.jpg
    52.9 KB · Views: 1
  • photo215614.jpg
    photo215614.jpg
    35.7 KB · Views: 1
  • photo215615.jpg
    photo215615.jpg
    61 KB · Views: 1
  • photo215616.jpg
    photo215616.jpg
    41 KB · Views: 1
  • photo215617.jpg
    photo215617.jpg
    24 KB · Views: 1
  • photo215618.jpg
    photo215618.jpg
    17.6 KB · Views: 1

Bosunsmate

Admiral
Joined
Apr 7, 2012
Messages
6,129
Looking to put something on them. Was going to use Teflon tape or automotive thread sealer.
Any suggestions?


I think i used teflon tape. Remember if you use automotive thread sealer you need one that seals to plastic too
 
Top