70 hp Johnson Re-Locating WP Indicator to top of motor?

TwoRivers

Petty Officer 1st Class
Joined
Mar 10, 2010
Messages
344
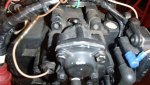
Hello all. Getting close to that time again. Last fall I picked up a 17 ft. Tracker that has the 70 hp three cylinder Johnson/Tracker motor. Model #J70TLCE. From what I've read, this is the series of three cylinder motors that should have the water pump indicator outlet re-located from the side of the motor to the top of the water jacket?
I'm trying to figure out where to drill the hole for the new indicator? There already is a hole drilled and tapped on the top of my motor but it must be for something else because it is too small for the elbow that I received in the OMC kit. Any ideas what that hole is for?
The lift hook is in the way of drilling behind that hole and it seems that the flywheel and stator will need to come off to get the lifting hook off.
Am I looking at this correctly? Any advise / tips greatly appreciated.
I've read a number of threads here and other places and nobody ever mentioned removing the flywheel and I've never seen any pictures of a motor that looks like mine.
thanks in advance.
rob
 

Attachments

  • photo214833.jpg
    photo214833.jpg
    55.1 KB · Views: 3

emdsapmgr

Supreme Mariner
Joined
Dec 9, 2005
Messages
11,551
There is a more simple answer. Run the telltale hose upward from the hose barb-to the top of the engine, loop it over, then back downward to the nozzle in the lower cowl. That way the block will fill before the telltale works.
 

TwoRivers

Petty Officer 1st Class
Joined
Mar 10, 2010
Messages
344
There is a more simple answer. Run the telltale hose upward from the hose barb-to the top of the engine, loop it over, then back downward to the nozzle in the lower cowl. That way the block will fill before the telltale works.

I love simple. That would save me a lot of work.
 

TwoRivers

Petty Officer 1st Class
Joined
Mar 10, 2010
Messages
344
There is a more simple answer. Run the telltale hose upward from the hose barb-to the top of the engine, loop it over, then back downward to the nozzle in the lower cowl. That way the block will fill before the telltale works.

Thanks for the response. Do you know what that hole on top of my motor is for?
 

achris

More fish than mountain goat
Joined
May 19, 2004
Messages
27,468
Without knowing the exact size it could be for a water pressure gauge or a temp gauge....
 

racerone

Supreme Mariner
Joined
Dec 28, 2013
Messages
36,274
Search for and find the service bulletin on this !!!!---------It was posted on one of the forums a few days ago !-------This bulletin came out in 1994 and it is amazing as to how many motors have not been modified as well.----The lift hook is not in the way where the factory tell you to drill.
 

TwoRivers

Petty Officer 1st Class
Joined
Mar 10, 2010
Messages
344
[QUOTE=racerone;n9286342]Search for and find the service bulletin on this !!!!---------It was posted on one of the forums a few days ago !-------This bulletin came out in 1994 and it is amazing as to how many motors have not been modified as well.----The lift hook is not in the way where the factory tell you to drill.[/QUOTE]
Thanks racer. Yeah, I read the thread and quoted below.
I'm not seeing how I can drill a hole on top without removing the hook unless I drill into the head? (Did you look at my picture?)
What do you think of emdsapmgr's idea to run the hose over top the motor?

SB2276R1 dated April 1994 relocated tattle tail nipple from side of block to top of engine to vent air for better cooling at idle. Waterpump kit 432955 has SB 2276R1 in kit, a choice of 2 new pressure relief springs depending on model of engine with cover, and improved impeller.
 
Last edited:

racerone

Supreme Mariner
Joined
Dec 28, 2013
Messages
36,274
I have the service bulletin saved in my favourites.---However I am better with a wrench than computer.-------------------------You do not have to move the lifting bracket to drill for the factory location !!!--------Be patient with this as someone will post this service bulletin....-------Do this modification as per the factory service bulletin and only that way.
 

TwoRivers

Petty Officer 1st Class
Joined
Mar 10, 2010
Messages
344
I have the service bulletin saved in my favourites.---However I am better with a wrench than computer.-------------------------You do not have to move the lifting bracket to drill for the factory location !!!--------Be patient with this as someone will post this service bulletin....-------Do this modification as per the factory service bulletin and only that way.

Racer, thanks for your level headed response. Historically, the word patience and me never collided in the same sentence but I've paid a heavy price and I'm getting a little better. I'll take your advise and think this through a little better. I must be missing something.
Here's a copy of the service bulletin SB2276R1 in case anybody else is looking for it. View attachment service-bulletin.pdf
 

TwoRivers

Petty Officer 1st Class
Joined
Mar 10, 2010
Messages
344
OK, I looked at the service bulletin again and I see where they want me to drill and tap the hole, it's to the left of the lifting hook and this will give me plenty of room to drill without removing the hook.
I'm just a bit curious about what the SB says here: "If the engine does not have a threaded hole located in the top of the cylinder block, please follow the steps below:"

Could they be talking about the threaded hole in the top of my cylinder block that is showing in the picture I posted at the beginning of the thread?
I'm thinking no as I see a similar threaded hole in the picture of the service bulletin.
 

achris

More fish than mountain goat
Joined
May 19, 2004
Messages
27,468
..."If the engine does not have a threaded hole located in the top of the cylinder block, please follow the steps below:"

Could they be talking about the threaded hole in the top of my cylinder block that is showing in the picture I posted at the beginning of the thread?
I'm thinking no as I see a similar threaded hole in the picture of the service bulletin.[/FONT]

Yep... It's the right thread and it's in the top of the block....

Re-reading the SB, and it's all over the place. :facepalm:
It refers to fig 2, as showing where on the top of the block to mark with the centre punch, yet the figure is clearly the exhaust cover, and that thing in his hand is an Allen key, not a centre punch....

You have the right hole in the right place, use that....

Chris......
 

TwoRivers

Petty Officer 1st Class
Joined
Mar 10, 2010
Messages
344
Yep... It's the right thread and it's in the top of the block....

Re-reading the SB, and it's all over the place. :facepalm:
It refers to fig 2, as showing where on the top of the block to mark with the centre punch, yet the figure is clearly the exhaust cover, and that thing in his hand is an Allen key, not a centre punch....

You have the right hole in the right place, use that....

Chris......

Achris, thanks for the response. Seems like the guy with the allen wrench is installing a plug where the original indicator elbow was removed?
This may sound stupid but here goes: If the threaded (empty) hole on top of my motor extended into the water jacket wouldn't water come out of that hole when the motor was running?
 

achris

More fish than mountain goat
Joined
May 19, 2004
Messages
27,468
If there's no plug and it doesn't leak water, it's not into the water jacket, so you're going to need to drill and tap a new hole, just like the SB suggests...
 
Top