1959 10hp Sportwin resurrection issues

ianmoore

Petty Officer 2nd Class
Joined
Jun 5, 2014
Messages
169
Hello,

I posted a topic a couple of days ago related to the points, which i have since resolved. I realized that i had a few related issues, and it would make more sense to keep it in one topic.

Here is the rundown:
I inherited an old engine(sound familiar?) a year ago. I went about looking through it, and did the typical carb rebuild, etc. The 1959 didn't have a fuel pump, so i first tried the fuel pump technique using a cap on one of the check valves. I was discouraged from going this route, so found a bypass cover with the nipple for the fuel pump, as well as a 1960 fuel pump. The pump looked pretty good, i replaced all the gaskets on it and hooked it up. I covered the nipple that goes to the intake manifold with some gasket sealer and a pump cap to temporarily seal it.

Today, after getting the ignition system sorted out, i hooked up a portable tank and tried to start the engine. I was having trouble getting the fuel bulb below the carb to fill up. Gas was leaking from the tank hose connector while only a little bit flowing into the fuel bowl. I disconnected the hose from the carb and fuel flowed pretty easily, so i am assuming the fuel pump is at least somewhat functional, or at least not impeding the flow to the glass bowl.
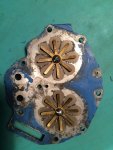
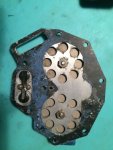
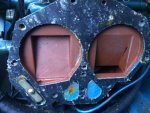
I took the carb and manifold back off, cleaned them up again(compressed air, etc) and reattached, but i'm still having trouble getting the fuel bowl to fill up. Carb looks good and the reed plates and intake valves are in good shape. I put back the check valves after trying to other fuel pump experiement

I guess my first question would be: If i'm able to get fuel out of the hose to the carb, but not into the carb when attached, is there something in the carb/manifold area that would be suspect? How can i bypass fuel pump for now to try to turn it over?

Thanks
Ian
 

F_R

Supreme Mariner
Joined
Jul 7, 2006
Messages
28,195
The obvious thing to suspect would be the sintered metal fuel filter inside the glass bowl. Plugged up??? Some people report success in cleaning them, but they really are intended to be tossed and replaced. Second thing is, are you sure fuel isn't getting into the carburetor? If you are wanting to see the glass bowl fill up, you have a long wait. They run seemingly empty. Don't ask me why, or how, but trust me, it's true. That's just the way it is. Something about capillary action. If you want to see if it is passing fuel, temporally remove it and see if the carb fills & runs. Yeah, you will see gas in the bowl too, while the filter is out.
 

ianmoore

Petty Officer 2nd Class
Joined
Jun 5, 2014
Messages
169
No Title

Thanks F_R.
It seems to be something else. The fuel bowl was filling when i was earlier using the Mikuna pump. I will look into the metal filter, but i'm thinking it isn't there.
I am getting a lot of gas leaking out of the connection between to hose assembly and the engine side fuel connector, while very little gas makes it to the bowl.
When i use this with my other engine(50hp) i get a very small amount of gas leaking, so either the fuel pump is impeding the gas flow enough that the added pressure of the connection to the carb is greater than the pressure at the fuel connector, thus gas leaks there.
I am including a couple of pictures of the manifold reed assembly just to see it. I have disassembled it so many times. All the gaskets are new, at least in terms of use.
Thanks
Ian
 

Attachments

  • photo214081.jpg
    photo214081.jpg
    57.7 KB · Views: 0
  • photo214082.jpg
    photo214082.jpg
    53.9 KB · Views: 0
  • photo214083.jpg
    photo214083.jpg
    72.5 KB · Views: 0

Chinewalker

Fleet Admiral
Joined
Aug 19, 2001
Messages
8,902
You shouldn't be getting ANY gas leaking at the connection. The fact you say the connector leaks on your other motor, too, tells me you need a new connector. Start there... Intake manifold would have nothing to do with fuel flow at the carb.
 

Crosbyman

Vice Admiral
Joined
Nov 5, 2006
Messages
5,015
maybe I missed somthing but did you change the oring on the hose end connector . leaking gas at the connecor as nothing to do with the pump or glass bowl

btw why not try removing the sintered metal fuel filter inside the glass bowl and if need be install an in-line filter from the side
fuel connector to the pump inlet
 
Last edited:

ianmoore

Petty Officer 2nd Class
Joined
Jun 5, 2014
Messages
169
Crosby,
I checked the connector(hose that came with Atwood portable tank-1 yr old) and the O ring seems good. The motor side is a brand new OMC connector from the dealer. I am going to look into replacing the tank side connector to see if that helps.

-today i was able to start the motor by spraying some fuel mix directly into the carb. It would run until the gas ran out.

-I also disconnected the hose from the carb and small amounts of fuel were spurting up in line with the compression cycles, which leads me to believe the fuel pump is working, at least to some degree. Also, when spraying fuel into the carb i could see the bowl fill up a bit. I think the metal filter is still functional

I understand that the coupling of the two connectors shouldn't be leaking, but i am still wondering if there isn't some back pressure that is contributing to the leakage. It seems there is more when the hose is connected to the carb

Thanks again!
Slowly making progress
Ian
 

nwcove

Admiral
Joined
May 16, 2011
Messages
6,293
Crosby,
I checked the connector(hose that came with Atwood portable tank-1 yr old) and the O ring seems good. The motor side is a brand new OMC connector from the dealer. I am going to look into replacing the tank side connector to see if that helps.

-today i was able to start the motor by spraying some fuel mix directly into the carb. It would run until the gas ran out.

-I also disconnected the hose from the carb and small amounts of fuel were spurting up in line with the compression cycles, which leads me to believe the fuel pump is working, at least to some degree. Also, when spraying fuel into the carb i could see the bowl fill up a bit. I think the metal filter is still functional

I understand that the coupling of the two connectors shouldn't be leaking, but i am still wondering if there isn't some back pressure that is contributing to the leakage. It seems there is more when the hose is connected to the carb

Thanks again!
Slowly making progress
Ian

Atwood is the keyword as far as your leak at the connector goes. spring for a genuine omc connector and the leak will go away.
 

64osby

Admiral
Joined
Jul 28, 2009
Messages
6,799
It has spark and the pump appears to work based on what you say. It sounds like you need to take a look at the carb again.

On an old 18 hp I had to go through the carb twice. Was able to get it right the second time.

Did you rebuild the whole carb or just clean it?
 

Crosbyman

Vice Admiral
Joined
Nov 5, 2006
Messages
5,015
start with basics

1- stop the leaking connector
2- retest engine and don't worry about the fuel level in the bowl....and remove the sintered filter for your testing


Sounds like the engine fires ok so fixing the fuel leak should produce results assuming the pump and carb is cleaned
 

ianmoore

Petty Officer 2nd Class
Joined
Jun 5, 2014
Messages
169
I will grab another OMC connector tomorrow. Will run through the testing procedures again.
As far as the carb, I've torn it down a few times. Rebuilt it with all new seals and float, float is adjusted properly. Everything looks spotless. The 2 needles, high speed and low speed, could stand to be replaced. They are both a little away from a perfect cone, but if anything that would create too much fuel, and honestly they look pretty good. I plan on replacing them as well, though they are hard to find and quite expensive. I was hoping to get the engine pretty close and then fine tune it as i can.
Will also remove the sintered filter for good measure
Thanks!
 

ianmoore

Petty Officer 2nd Class
Joined
Jun 5, 2014
Messages
169
update,
Got a OMC connector. Now there is a mild leak at the tank when i pump..Geez!
I was able to get the motor running! Took a bit of squirting gas in the carb and having it quickly die. Finally was able to get it to stick for a bit.
I considered that a temporary success and decided to look closer at the lower unit.
Removed it and the impeller was completely disintegrated! Replaced that and cleaned it up, Bolted it back on.
I noticed that the driveshaft wasn't totally engaging the prop when in gear so i opened up the gear box thinking it was either the clutch dog or the gears themselves.
It turned out that the little key that is on the bottom of the drive shaft was missing!
I ordered a key, new prop nut, as well as 2 new carb needles. I will report back when I get them going
Thanks
Ian
 

AlTn

Commander
Joined
Mar 9, 2010
Messages
2,813
word of advice that I got from the Forum when working on that same year model....with the gear case disassembled and the driveshaft out...inspect the bronze bushing that the driveshaft extends from in the area just above where the pinion gear rides...if this opening is egg shaped or "wallowed" find another housing in better shape....a badly worn one will allow the d/s too much movement and will result in pinion gear premature wear and possible breakage of gear teeth to fwd, rvs, and pinion gears...if it's not worn, consider it a good day and go onto something else
 

ianmoore

Petty Officer 2nd Class
Joined
Jun 5, 2014
Messages
169
Thanks AITn. I will look into the bushing. Did you end up getting a new lower unit? I will look into it when i install the key. The gears seem to be in decent shape, and i know the engine has some hours on it, so here is hoping all is good there
 

AlTn

Commander
Joined
Mar 9, 2010
Messages
2,813
long story on the '59...besides the 2 hose tank still leaking after a rebuild, the carb butterfly would stick due to the throttle shaft wear < note how far from the carb the bell crank on the throttle shaft is on that model >...I found a "60 model with a good lu housing and bought it for $75..
 

ianmoore

Petty Officer 2nd Class
Joined
Jun 5, 2014
Messages
169
Progress Report with question at bottom:
AlTn- the bushing seems to be ok. Installed the key and everything seems to be working as it should. Had some fun with the shift rod coupler(seems to be a weak spot on these engines) but ended up getting a new bolt and tightening it back up.

Replaced the needles in the carb and adjusted the carbs to starting spec. I have new plugs, points, condensors, spark plug wire and boots. Plugs and points are adjusted. Compression is low, but even; about 74 on each cylinder.

I'm able to start the motor relatively easy. my new fuel pump seems to be working well, and i can keep it running as long as i keep my hand on the throttle. It will die if i let my hand off the throttle. The throttle will creep down and eventually the motor dies.
The idle screw is frozen and could stand to come in some. I sprayed some WD40 and will see if i can convince it to work. Otherwise i will have to replace it.

It seems that the next step is to get it out of the barrel and put it in the water

1. How can i get the throttle arm to stay where its at? I don't see where i can adjust it? Obviously the idle screw is the bottom of the throw, but it tends to creep down from wherever i set it

2. My stop button isn't working. In my motor, the wires go to 2 brillo like pads that were sitting underneath my coils. On all of the motors i have read about there should be wires that connect to the points, and when pushed connect them together, and thus ground them. I don't understand how these pad ends are supposed to work.

Thanks
​Ian
 

64osby

Admiral
Joined
Jul 28, 2009
Messages
6,799
All the old motors I've fixed up could be adjusted lean or rich to allow the motor to run when the tiller handle is at its lowest setting. To shut them off the choke had to be pulled or hit the kill switch.

The idle adjustment screw might help with that. All the adjustment screws I have seen have been plastic.

Most people complain that the tiller handle is too stiff or tight.

74 lbs is a little low, at some point you may need to replace the head gasket and resurface the head and top of the cylinder. It's not that hard. Before you do that you might try using Seafoam to clean the pistons and rings. It should bring the numbers up.

This motor was made from scrap parts, at the end of the video you can see how low the idle can be.


click on pic for video
 
Last edited:

Chinewalker

Fleet Admiral
Joined
Aug 19, 2001
Messages
8,902
Inside the tiller handle grip is a spring and bushing arrangement that puts pressure on the throttle to keep it from walking. If that has been removed or is incomplete, it may allow it to slow down due to vibration.

Alternatively, if the coils laminates are contacting the flywheel due to being misadjusted on the mag plate, that, too can cause the throttle to move of its own accord.
 

ianmoore

Petty Officer 2nd Class
Joined
Jun 5, 2014
Messages
169
Thanks for the tips. I am going to grab a new idle screw next time i get to town.
I have never redone a head gasket. Definitely into trying it, though I'd like to continue working through the other parts of the motor for now.
I think the coils are sitting correctly. I checked both of them against the metal sides and they line up perfectly with no lip. I did notice a teeny bit of rubbing on the coil tops, but i don't see anywhere that they could be adjusted better(at least to spec).
I am still wondering how those pads attached to the kill switch(and sitting on the sides of the coils) are supposed to work. I don't see how they could stop the engine as they are currently installed.

I also am finding that it takes some encouragement to get the motor started. Once it has warmed up it starts easily, but until then it is a bit of spraying fuel mixture into the carbs and pulling on the rope. Would this be related to the compression? Again, good spark at the plugs, carb bowl full of gas, Needles seem to be adjusted pretty close to where they should be to start.

Also wanted to say how enjoyable it is to work my way through it. I appreciate the knowledge and the chance to get to know how to do this. Outside of my other outboard, i have zero motor experiencve. Thanks guys!
 

ianmoore

Petty Officer 2nd Class
Joined
Jun 5, 2014
Messages
169
Here is a short movie showing the engine running as i currently have it. You can kind of see the idle screw, which is quite a bit out from its indent even at idle(screw is frozen)
 

ianmoore

Petty Officer 2nd Class
Joined
Jun 5, 2014
Messages
169
Still waiting on the idle screw, but motor seems to be running pretty well.
I do have a question, partially asked before, and researched through the forum. Just asking for opinions based on individual experience:

When i start the motor after having sat a day or so, i have to squirt some gas into the silencer. Otherwise i'm pulling on the starting rope too much. Once it starts, It turns over almost immediately and the motor seems to run pretty well. The cold engine hard starting thing...Would you guys put this to the lower compression(74)? I went back through the carbs again, took off the welch plug. Everything seems perfect, new needles, float adjusted right. I understand that it is an older motor, but where do you look if it is consistently hard starting when cold?
 
Top