blew ignition coil & fried wiring on 1967 evinrude 33hp - runs poorly after repair
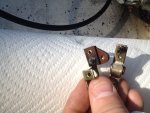
I could really use some help troubleshooting this repair job. Last week I was on the lake adjusting my carbs, and the motor ran great. Foolishly I messed with the electrical and hooked up lights incorrectly to the ignition switch. When I started the motor I fried an ignition coil and some wires in the harness that runs from the junction box under the transom to the motor (see pics). The engine ran poorly (it was only firing 1 cylinder) but I was able to drive it back to the dock. I feel like an idiot, but it’s my first boat so I'll chalk this up to experience. I have since disconnected all the accessories (which the previous owner had hooked up to the ignition switch) and the lights.
To repair this, I first cleaned the entire magneto since it was all crapped up with burnt coil plastic and gunk (looks brand new inside it now). I replaced both ignition coils (kept the non-melted one as a spare) and both condensers. I did not replace the points since they didn’t look to be affected although I checked their gap. The spark plug wires looked OK. The wiring harness that connects from the junction box to the motor was the original wire bundle, so the wires were cracking and brittle to begin with. I made a nice new harness with 14 gauge wires (correct thickness) and hooked it all up between the junction box and the motor. Also, I replaced the spark plugs for the hell of it (same plug, 0.03 gap).
After all these repairs, I took the boat on the water late in the day today (so I only ran it for like 10-15 minutes) and it ran, not great, but it didn't sound like it was running optimally. It was running on both cylinders, but at low rpms it was idling poorly and even stalled out a few times. It also had some trouble starting (starter works normally). At full throttle it sounded like it reached high rpms, but again it didn't sound like it was running as well as it did before I blew the electrical system out and now it has a deeper bass-like sound to it. The wire bundle running from the ignition switch to the junction box looked OK although I can’t inspect the vast majority of it. There is a solenoid switch in the junction box, I’m not sure how to test if that is OK, is it possible I fried that as well and should I replace it? I ran out of daylight so I didn’t have much time to mess with it. Do I need to readjust my carbs to see if I can improve the motors performance? Is there anything else to the electrical system that I should investigate? I think tomorrow I will put the old plugs back in, and try to readjust the carb needles, and run the motor longer.