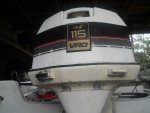
Thermostat replacement on 1990 115 V4 Crossflow

Klink

Petty Officer 1st Class
Joined
May 27, 2013
Messages
254
In testing a 1990 Johnson 115 that I bought recently, I ran the engine three minutes or so at idle with a Temperature Gun Infrared Thermometer W/Laser Sight and got 183 degrees maximum on port side and 104 on the port. I decided to replace the thermostat, and went at today in the evening and am trying to use the method used in this Youtube Johnson Overheat repairs Final - YouTube, at the 2:13 mark, Steps to Replace Thermostats . However, my engine is different, the lower aluminum cover of the engine does not move. I can only remove the plastic rear cover over the thermostat cover. Playing around with different tools I was able to get the middle thermostat housing screw but the other two I don't think will have enough room to come out. I already left one 7/16 combination wrench behind the screw when I pulled it out as far as possible and used the wrench from the backside till it would not grab, then used another from the front.

I'll see how far I can go. Either I remove the power head to be able to work comfortable, or maybe drill some holes in the lower aluminum cover to reach all three screws, and plug them up later with a rubber covers. The holes will have to be big enough to fit a 1/4 socket wrench set extension and the 7/16 socket.

Any advice?
 
Last edited:

Fed

Commander
Joined
Apr 1, 2010
Messages
2,457
Re: Thermostat replacement on 1990 115 V4 Crossflow

You could disconnect the hoses going to the thermostat housing, give it a run on the muffs and check for water flow and see if it still overheats.
That way at least you will know for sure if it's a tstat problem.

I was looking at doing mine (90HP 1988) and put it off because it doesn't look doable without removing the powerhead.
I checked the OEM manual and it only mentions servicing the thermostats when the powerhead is removed, if so it's a crazy design. I'll be drilling holes in the lower pan if I ever have to do them.

Hopefully someone can give you a definitive answer on this.
 

pn

Petty Officer 1st Class
Joined
Apr 20, 2013
Messages
374
Re: Thermostat replacement on 1990 115 V4 Crossflow

nuts try blowing out the hoses with water or compressed air. or a wire
 

Klink

Petty Officer 1st Class
Joined
May 27, 2013
Messages
254
Re: Thermostat replacement on 1990 115 V4 Crossflow

Ok, I got it out. I had to make two holes on the lower aluminum cover to pull the bolts out. I see someone else is going through the same ordeal right now http://forums.iboats.com/johnson-ev...looking-thermostat-job-what-order-614857.html, and a great link was provided there by someone http://forums.iboats.com/johnson-ev...sing-removal-question-576694.html#post3962214. Neither one had to drill to get the thermostat out and back in. In one link, the gentleman that cut out a piece of the aluminum cover has an interesting solution, which I am still considering. It makes the job easy. Many good ideas there.

Both thermostats were stuck slightly open, one more than the other, but they were full of crud, and ants. I boiled them clean with citric acid and they still didn't move.
 
Last edited:

boobie

Supreme Mariner
Joined
Nov 5, 2009
Messages
20,826
Re: Thermostat replacement on 1990 115 V4 Crossflow

Replace them.........
 

Klink

Petty Officer 1st Class
Joined
May 27, 2013
Messages
254
Re: Thermostat replacement on 1990 115 V4 Crossflow

You could disconnect the hoses going to the thermostat housing, give it a run on the muffs and check for water flow .

The thermostats are out and they are no good.

However, I'd like to know more about your suggestion, to use it for another purpose. If I disconnect the hoses going to the thermostat housing and connect a T hose fitting to the hoses and dump the water flow back into a barrel from where the engine water pump draws its water (instead of using a flushete), is there any part from the thermostat and on that would loose its cooling by this bypassing of the thermostat housing and on?

I'm asking because if I can do what you suggest, I would use the technique to clean the engine water passages with a citric acid mix that I've used on 4 cycle fresh water cooled inboard engines.
 
Last edited:

Fed

Commander
Joined
Apr 1, 2010
Messages
2,457
Re: Thermostat replacement on 1990 115 V4 Crossflow

The water cools the exhaust tube so I wouldn't do it for an extended period.

Surely your citric acid wouldn't hurt the thermostats, you can drink it can't you?
 

Klink

Petty Officer 1st Class
Joined
May 27, 2013
Messages
254
Re: Thermostat replacement on 1990 115 V4 Crossflow

How did you answer so quickly, was it just a coincidence that you were online, or do you get email notification of questions? How do I set notifications?

Anyhow, I'm trying to find a way to clean a 2 cycle outboard's cooling passages without degrading the citric acid mix with the exhaust fuel/oil. The exhaust coming out the prop contains scavenged fuel and oil which will neutralize the citric acids effect. The exhaust will just keep adding more and more into the citric acid tank, and I don't think it will clean anything. I need about 20 minutes of running the engine at say 140-190 degrees for the juice to do its work. I've done it with cars, tractors, and inboard FW cooled engines.

I've never drank the stuff, it is 13 oz of food grade citric acid granules diluted per 1 gallon. I've tasted it after flushing it out after the job, to make sure there's done left in the engine water, but never drank it.
 

Klink

Petty Officer 1st Class
Joined
May 27, 2013
Messages
254
Re: Thermostat replacement on 1990 115 V4 Crossflow

The water cools the exhaust tube so I wouldn't do it for an extended period.

Surely your citric acid wouldn't hurt the thermostats, you can drink it can't you?
How did you answer so quickly, was it just a coincidence that you were online, or do you get email notification of questions? How do I set notifications?

Anyhow, I'm trying to find a way to clean a 2 cycle outboard's cooling passages without degrading the citric acid mix with the exhaust fuel/oil. The exhaust coming out the prop contains scavenged fuel and oil which will neutralize the citric acids effect. The exhaust will just keep adding more and more into the citric acid tank, and I don't think it will clean anything. I need about 20 minutes of running the engine at say 140-190 degrees for the juice to do its work. I've done it with cars, tractors, and inboard FW cooled engines.

I've never drank the stuff, it is 13 oz of food grade citric acid granules diluted per 1 gallon. I've tasted it after flushing it out after the job, to make sure there's done left in the engine water, but never drank it.
 

Fed

Commander
Joined
Apr 1, 2010
Messages
2,457
Re: Thermostat replacement on 1990 115 V4 Crossflow

I just happened to be here, you can set your notifications under the thread tools link at the top of the page.
I don't think it would make any difference dumping the used water via the tstats or directly into the tub aside from overheating the exhaust tube etc.
I take your point on diluting the mix but at the end of the day everything goes into the tub no matter which way you do it.
 

Klink

Petty Officer 1st Class
Joined
May 27, 2013
Messages
254
Re: Thermostat replacement on 1990 115 V4 Crossflow

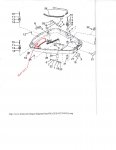
OK, the thermostat parts kit came in with all the parts including the two hoses and I finally decided to cut out a piece of the lower aluminum cover to not have to fight with squeezing the thermostat cover and everything else below the bubbleback. I cut out the lower cover at a minimum so as not to weaken it, and be able to easily fit the thermostat cover and all the inners. See attached diagram for where I did the cutout, I'll have pictures later I hope.
Cover Lower 432923 marked cutout.jpg

I cut it with a Sawzall, I cut the Sawzall blade down to the minimum (with an angle grinder w/cutoff ) lenght so it would not hit anything behind. I cut the two vertical lines on the lower cover, then I started the horizontal line with the angle grinder cutoff, then did the job with the Sawzall, being careful not to damage the anything behind. It came out very clean, and since I cut in an area that almost can't be seen from behind, it should not be too visible (it is a 1990 engine, not exactly brand new). Doing the cutout made the installation a piece of cake. I intend to mount the cutout piece back in a way the it will reinforce the cover, seal it, and be removable for future work.
 
Last edited:

Klink

Petty Officer 1st Class
Joined
May 27, 2013
Messages
254
Re: Thermostat replacement on 1990 115 V4 Crossflow

I did learn a quick lesson in the installation of the complete thermostat kit (the kit consisted of #3,5,6,7,8,9, and the two hoses not in the diagram)
Thermostat parts.jpg

Don't put grease on part #5. I put grease on it, to make it go on better, and the pressure of the spring at installation knocked part 5 and 6 out and into thermostat cover part #2. I went back and cleaned all the grease on part #5, and re-installed everything without a problem. The spring #9 (the kit was from Sierra Supply) had much more coils per inch that the old one it replaced. The spring puts a lot of pressure on the part #6, much more than the spring it replaced. Kind of scary that it can pop part 5 and 6 into the thermostat cover part #2! Maybe it can do it again any time?. I'd say it might even be good to put an adhesive gasket sealer on the part #5 where it joins part #4?

Perhaps others with experience can chime in my observation.
 
Last edited:

Klink

Petty Officer 1st Class
Joined
May 27, 2013
Messages
254
Re: Thermostat replacement on 1990 115 V4 Crossflow

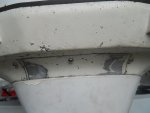
Here's the pictures of the lower cover cutout. I still have to paint it. Initially I made two holes to get the thermostat cover screws out from the two sides. I later cutout the piece that you see of the lower cover, so that I could scrape the gasket from the exhaust housing adapter, and easily re-install everything. I used JB Weld on an aluminum 1" sq sheet to the back of the screw holes as a backer, then I filled in the two screw holes on the face. Those are the dark spots you see on either end of the cutout. I'll later sand, caulk and paint the whole repair.

Next time I have to work on the thermostat, I just have to remove the two outside nuts and the plate comes off. From there it's a piece of cake, next time.

Before
DSCN2485.jpg

After
DSCN2509.jpgDSCN2510.jpg

The two outside vertical lines are just magic marker lines that I did not use.
 
Last edited:

phillnjack2

Ensign
Joined
Apr 30, 2011
Messages
918
Re: Thermostat replacement on 1990 115 V4 Crossflow

Wow klink, that is a nice neat job you done there and it will always be so easy to do those stats in future


great job

shame omc didnt think of it


phill
 

Klink

Petty Officer 1st Class
Joined
May 27, 2013
Messages
254
Re: Thermostat replacement on 1990 115 V4 Crossflow

Thanks. When I cut out the piece from the lower cover intending to put it back in a way that it could be easily removed, I realized that it has threes curves going on at the same time, which made it very difficult to line it up again with a bracket behind. OMC could have easily cast the lower engine cover with a flat spot there, and put in a removable piece. I've had boats for 45 years now (very few outboards), and I know that I'll have to go back again for one reason or another, and I didn't want to go through squeezing in there every time. My method in the end may have taken just as long as squeezing it back in there like others did, however, my work will pay off all of the other times I'll have to go in there.
 
Last edited:

Klink

Petty Officer 1st Class
Joined
May 27, 2013
Messages
254
In a private message today, a member asked me to clarify some things concerning the cut-out of the lower cowling that I did, as he is going top have a machine shop do the cut-out for him, this will answer his questions:
Pretty much everything is there in the link as far as cutting it out, the only thing I would not do is to cut the two holes which I initially cut to access the thermostat housing mounting bolts. The holes were done before I came to the conclusion to cut out the lower cowling section. On the other hand, the method of re-mounting the cut out plate is not explained as it is difficult to photograph. All I did was to attach aluminum sheet wings to the inside of the cut out plate with the screws in the picture, that hold the wings and the cutout plate. A shop can figure that out, that key is that you don't want the piece to fall out in the water, while at the same time, you want to be able to remove it easily in the future when you change the thermostat again. They could also make a cover out of plastic and not even use the cut out piece. There's more than one way to skin that cat, I just thought my method was the simplest.
As far as pictures after it was painted. The boat itself was soon after discovered to have major fiberglass problems (work which I hate!) and I have been procrastinating for years on it, buying two boats since then. When I finish the glass work, I will paint the engine. I did however use the engine many times with the lower cowling cutout as pictured and described, before I discovered the need for the extensive fiberglass repairs.


Plus, there is now a YouTube video out that shows the lower cowling cutout for another engine, though not a bubbleback like mine, this is the video :
 
Last edited:
Top