1964 Johnson Seahorse 3hp only idle

andrewm10

Cadet
Joined
Mar 4, 2012
Messages
7
hey guys, new to outboards and just cannot figure out this issue I'm having with it. It starts up just fine and will idle, but when i move the throttle to the fast position it doesn't nothing. It sounds like it wants to go but just doesn't. This is where it gets a little weird. When I will shut the fuel valve all the way off, it doesn't change for few seconds then right before it shuts off it will run right up like it should. Any ideas? I did a quick clean on the carb, got new plugs, and a new fuel line.
 

nwcove

Admiral
Joined
May 16, 2011
Messages
6,293
Re: 1964 Johnson Seahorse 3hp only idle

you need to do a complete job on the carb, pull the welch plugs, put a pipe cleaner through all the passageways, soak etc. what you are seeing when you shut the fuel valve off is the motor leaning out ( starving for fuel) and running fast in a lean condition. all two strokes will rev up when you run them out of fuel.
 

F_R

Supreme Mariner
Joined
Jul 7, 2006
Messages
28,195
Re: 1964 Johnson Seahorse 3hp only idle

Probably running on one cylinder. Disconnect and ground one spark plug wire and see how it runs. Then repeat with the other one. Chances are, one will make no difference, but it won't run at all with the other one grounded----that is the good one. Your next job is figuring out what is wrong with the bad one.

Check compression
If ok, then pull the flywheel and see what's wrong with the ignition.

It probably is NOT the carburetor. It feeds both cylinders equally.
 

andrewm10

Cadet
Joined
Mar 4, 2012
Messages
7
Re: 1964 Johnson Seahorse 3hp only idle

hey so i was gonna do a compression test so i went to autozone and rented one out, turns out it didn't work. So I pulled the flywheel off and ohmed out the coils they seemed good and had to have been replaced at some point. points and contacts seemed in alright and im getting good spark. don't know where to go from here. wondering if there was anything else i could do while i had the flywheel off.
 

nwcove

Admiral
Joined
May 16, 2011
Messages
6,293
Re: 1964 Johnson Seahorse 3hp only idle

if you are sure the points are clean, and opening and closing , and you're sure of good spark ( top secret file at the beginning of this forum) and both coils are good, check the coil position in relation to the mounting bosses....again the top secret file. jmo, if the carb is feeding both cyls the wrong a/f ratio it will cause issues. a carb kit is cheap, and should be done anyway on the motor, but make sure to do it right, pull the welch plugs, soak it, clean it. that way you can rule out the carb. but as mentioned......do a compression test before you spend any money/time...you could be beating a dead horse.
 

F_R

Supreme Mariner
Joined
Jul 7, 2006
Messages
28,195
Re: 1964 Johnson Seahorse 3hp only idle

Did you do what I told you to do? Did you try running the motor with one plug wire disconnected and grounded? If not, don't you want to know what is wrong with the motor before "fixing" it? That test and the compression test are the two most important first things to check.
 

andrewm10

Cadet
Joined
Mar 4, 2012
Messages
7
Re: 1964 Johnson Seahorse 3hp only idle

I just got done doing a compression test and it seems a bit low. right around 70 psi. How much would a new head gasket help? I saw on youtube of a guy with almost the same motor, he just cleaned it up from the rust inside and it was running pretty good. But i have found out that it is running only one plug. I already ohmed out the coil, but im going to check it one more time. It seems like its got good spark though. what would be the next thing to do? carb kit and tune up kit?
 

bbstacker1

Petty Officer 2nd Class
Joined
Mar 7, 2010
Messages
163
Re: 1964 Johnson Seahorse 3hp only idle

Now that you have done the basics, established compression and fire, let's go from there. 70 psi on that engine should run fine, I have one that has around that and it purrs like a kitten. You can change the head gasket if you want but you should leave that for latter we know it will run with 70 psi. You said it is only running on one plug time to figure out why.
 

bktheking

Vice Admiral
Joined
Jul 29, 2008
Messages
5,057
Re: 1964 Johnson Seahorse 3hp only idle

Pull the flywheel and look, f_r has already given you the key. Probably a cracked coil, they do that over time. Clean up the points if they aren't bad, adjust the gap and retest it, it should run ok with 70 psi.
 

andrewm10

Cadet
Joined
Mar 4, 2012
Messages
7
Re: 1964 Johnson Seahorse 3hp only idle

I pulled the flywheel again check the coils, have new sparkplugs swapped them just to double check, checked the spark plug wires, lightly sand points and contacts and checked spacing. Still ran the same, I think the only thing I can do is a carb kit?
 

cajuncook1

Chief Petty Officer
Joined
Sep 3, 2009
Messages
559
Re: 1964 Johnson Seahorse 3hp only idle

Andrew, those little 3hp Johnson/Evinrude motors are great motors and are easy to fix and maintain. But you you have use a systematic approach.

C = compression
S = Spark (ignition)
F = Fuel delivery


Ok, you stated:

C = 70psi on both cylinder (just fine)
S = You stated that you have spark

** Did you use a spark checker and got a snappy blue spark with at least 1/4 inch gap on the spark checker on both wire coming from the coils??? The reason I ask is that some just see make a spark by grounding again the motor, but it has to at least make a good 1/4 jump on spark checker to be sure that it good and strong enough under compression to ignite the fuel gases.


F = probably would be a good idea to get a carburetor kit with the new style alcohol resistant float. Clean that carburetor like the others have mentioned by removing the core plugs and doing a good job.

***Fuel flow can be impeded by a clogged filter in the tank. The metal fuel line going from the tank to the carburetor might be partially occluded with slug and old oil or varnish, so

- remove the metal fuel line from the tank along the filter screw up in the tank and cleaned them in carb cleaner then pass some pipe cleaners through as well to insure good fuel delivery.

*** The obstructed filter or partially obstructed fuel line to carburetor can definitely cause a fuel delivery issue.


Here is parts diagram for your motor:

http://www.marineengine.com/parts/v...ntage-evinrude-johnson/380044/38004400001.htm


Here is some information that will help with diagnosing ignition issues:


Your going to need to inspect your point, condenser and coils. They are located under the flywheel. Hopefully all you need to do is clean and regap your points and you might be in business. Still check your coils and condensers and plug wires.


Here is how to pop your flywheel off and it gives you information about re-torquing you flywheel nut.

http://forums.iboats.com/showthread.php?t=294072


Here are two link to show you how to test your coils and condensers.

http://www.youtube.com/watch?v=KT8rk5QWgS0

http://www.youtube.com/watch?v=l6eSXYmENDY&feature=mfu_in_order&list=UL


How to replace your coils, points and condenser. Please take digital pictures as you go, so it will help you return everything back in the right order. Keep cheap zip lock bags available to put your parts in so you don't lose them. They are small.

If your coils are good, but your points and or condensers are bad, then you can certainly order a set of points and condenser here from iboats. Easy breezy.

Here is some information I put together for a guy on another forum, but the information should help you out just the same.


Here is a diagram of a generic OMC (Johnson/Evinrudle/Gale) ignition assembly. You will have to remove the coil designated for the top cylinder and put the oil wicker in. It should be already be coated with a very light oil. (not grease). The purpose of the oil wicker is to lightly lubricate the outside riding surface of the cam so the point shoes do not prematurely wear. If you look at the points they have little shoes that ride along the cam. Please make sure the (breaker)points cam is on the correct side or the ignition will be out of timing. It should have the word [highlight]top[/highlight] machine written on the side facing up.

Ignitionplateandoilwick.jpg


FYI: You can only set(gap) one set of points at a time. Put the flywheel nut back on(turn with a wrench or ratchet clockwise) to allow you turn the crankshaft. (Please remove both spark plugs to make it easier to turn the crankshaft and prevent accidental starting)

You gap the point to 0.020 when the point shoes is at the top(high point of the cam). It should have a mark along with the word top. Then you will turn clockwise to the next set of point 180 degrees and set those points the same way. You will notice that the point of the previous set will be closed and when you come around again they will open up. *** When they are open no current is allow through. This is how you set your timing with the points.***

When you go to set the point's gap. Very gently snug the anchor screw, then adjust the gap with adjusting screw and the feeler gauge until the feeler gauge is sliding through with slight resistance only. Then tighten the anchor screw. Repeat procedure with second set of points. Please make sure your hands are clean and the feeler gauge is clean, because oil on the points can foul them up and create resistance....poor or no no spark. ALways use a spark check to evaluate spark. It should jump minimum 1/4 inch. Blue sharp snappy spark.

Here is a picture of a spark check...Cheap $6

sparktesterpic.jpg


Here is a picture of how to tell which wire is going to the correct cylinder. Thanks to Garry for providing the picture on other post.


TopCyl.jpg


If your using the existing wires then cut about 1/4 inch of end going the coil, so you have clean un-oxidized copper contacting the spiking in the coil. Twist the end of the spark plug wire onto the coil spike. If you have replaced the wires, make sure they are 7mm copper metal core and not the automobile stuff.

***** Please make sure two things*****

1.) Make sure all the wires are tucked away under the flywheel and not rubbing up against the cam or crank, because with will eventually get damage and create a short, then no spark!!

2.) Make sure the coil heels (ends) are evenly lined up with the mounting boss.

Here are some pictures. (Compliments of JBJennings..nice fella)

wrongcoilmount.jpg


rightwaytomountcoil.jpg


Lining up the coil heel with the mounting boss prevent damage of the coils and the flywheel magnet, prevent rubbing as the flywheel turns.

[highlight]*** Make sure the throttle is advanced to that start position***[/highlight]


Here is another picture that Garry (thanks Garry!!) supplied on another post with some modification.

OMC_Stdwithwirecolors.jpg


Both diagrams, should answer your questions.
 

cajuncook1

Chief Petty Officer
Joined
Sep 3, 2009
Messages
559
Re: 1964 Johnson Seahorse 3hp only idle

Couple of suggestions about your carburetor. Here is a diagram to reference to:

38004400005im.jpg


- Please get a carburetor kit and do a proper job, so you know that it has been done and correctly.

***Please note: Parts numbers 7, 27, 33, 34, (35 if you do not have alcohol resistant float), 36, 37, and 43 (all these parts get changed with a carburetor rebuild and are found in a new carb kit). With the new carburetor kit they have a little hinge pin to keep the float number (#33) from get stuck. See the carb picture at the bottom of this post.

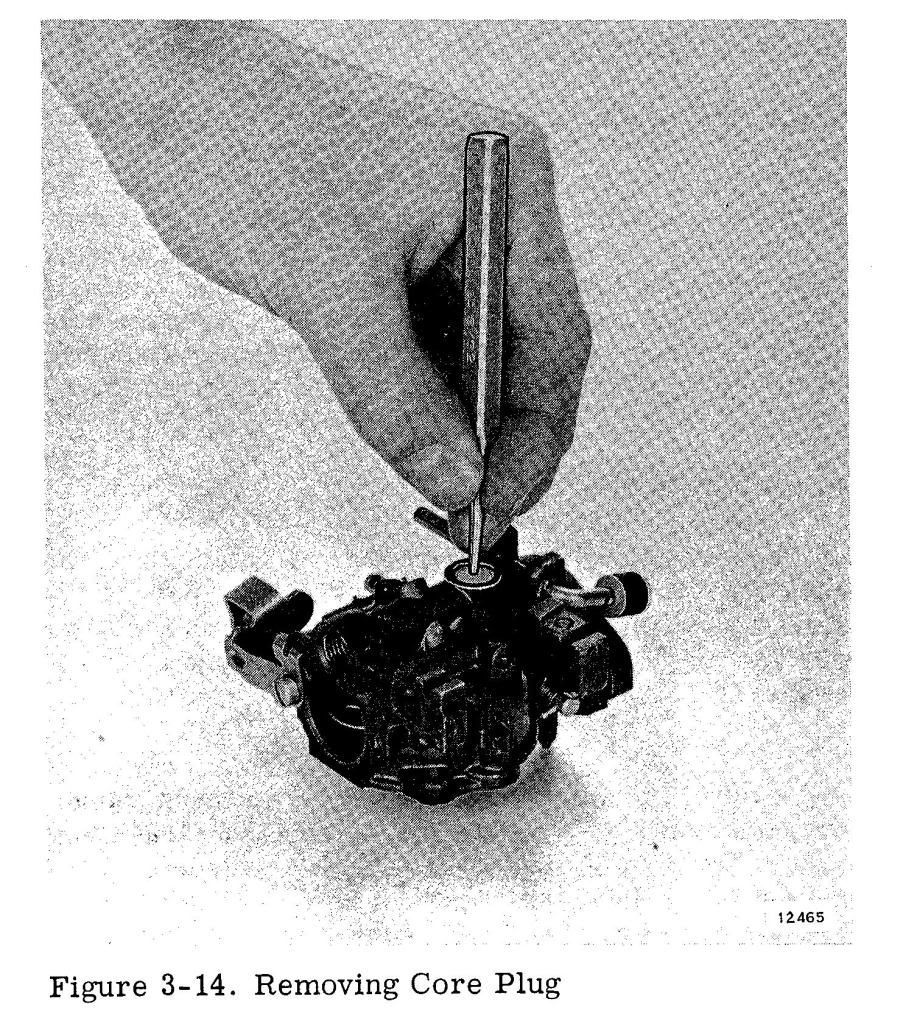
- Look at part diagram... part # 7 (core plug/welch plug), it need to be removed, clean and replace with a new plug.

The only way to properly clean the carburetor is to remove part#7 (core plug/welch plug) and make sure it does not have junk in there. This can affect your engine running and idling at low speeds. *** Also removed the old slow needle valve packing (parts number 27 in the diagram) and replace with the one the come in the new kit.


- After the core/expansion plug (item #7) is removed, make sure that the mixing chamber is free of trash or slug and the three little at it's base is clear and clean. (This step is the one people forget or don't think about and it bites you in the butt sometimes.)

- Blow all the passages with compressed air after the carburetor dip?


Here is a procedure for removing the expansion/core plug for cleaning.


Nonremoval of that core or expansion plug to do a complete carburetor cleaning is probably the one issue that plagues a lot of us. It is also a source of frustration because the trash and goo that is in that pocket can't always be cleaned with carb clean or blown out. In the future if when you get a carburetor kit and do a complete carburetor cleaning, always remove the core or expansion plug and replace with a new plug.

I am going to supply some diagrams for better explanation.


Be very careful if you put the carburetor body in a vise, so you don't damage the linkages or body with the vise.

You can use a punch or a drill to [highlight]carefully[/highlight] puncture a hole so you can remove the core plug. I have used a machine screw to puncture the core plug and used a pair of piers grasp the screw head and pop the core plug out, but be very careful not to go too deep with the drill, punch or screw. You don't want damage the chamber.

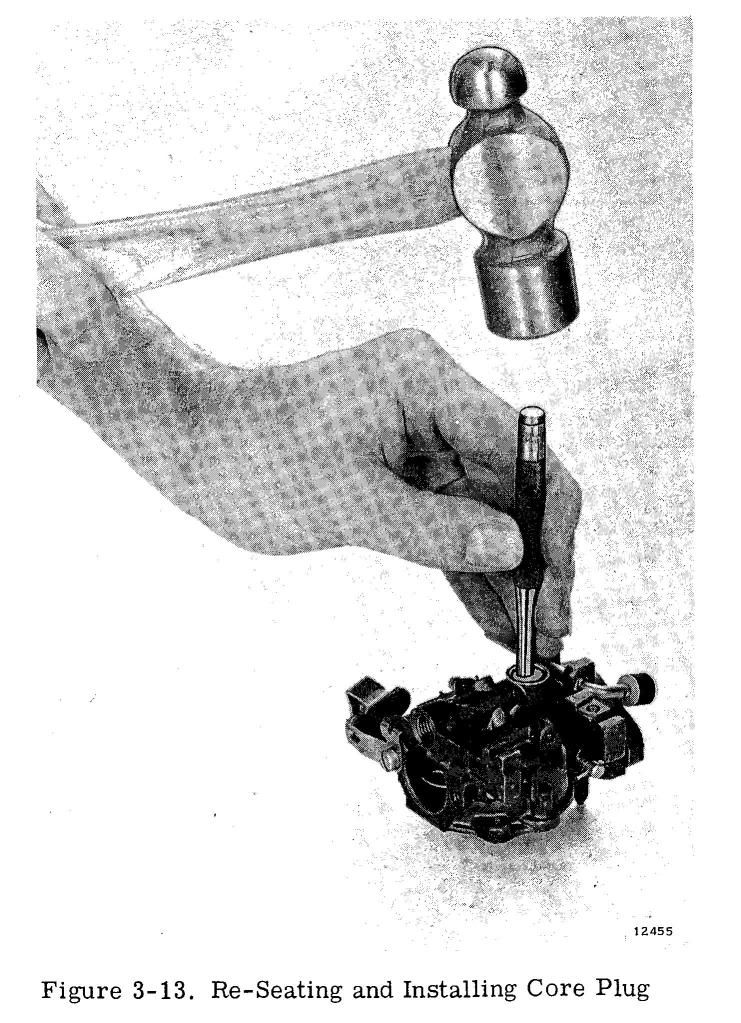
Once you have carefully cleaned the chamber, the little holes at the bottom and the needle passage to the mixing chamber then apply the core plug with the convext side up (the rounded side facing the sky).

[highlight]Try not to use wire to scrub out the holes or the needle passage way to the mixing chamber are you could damage or widen the hole and cause mixing problems. Spray carb cleaner or compressed air.[/highlight]

If you do not have a air compressor, then walmart sells compressed air cans with the straws that can be used. $3 or $4 dollars(you have seen the cans of compressed air that we use to clean are computer keyboards and equipment).[highlight]Also remember to disassemble your carb of all plastic and gaskets prior to using carburetor cleaner or dip( that stuff eats gaskets and plastic)[/highlight]. Blow it all out with compressed air.


Then take a wide punch or a 3/8 or 1/2 extension from a socket set (it has a wide flat base) and carefully tap(with a hammer and wide punch or extension piece) the core plug replacement in place. The convex (rounded portion) should be somewhat flat when done.


removalofcoreplugorexpansionplug.jpg


seatinganewcoreorexpansionplug.jpg


Well, that's how I do it, maybe someone will have other methods.


[highlight]Make sure these are your beginning carburetor settings:[/highlight]

These are going to be the initial settings for the carburetor for starting purposes. Your will later fine tune the settings.

Facing the carburetor you will notice slow speed and idle knob.

- Top needle is your slow idle needle. You will gently turn in (clockwise) until the needle is gently seated..please don't force. Once seated, you will turn out (counter clockwise) the slow idle needle 1 1/2 turns. Leave it there for the time being.

- You do not have a high speed needle. You have fix high speed jet. Please, after soaking the carburetor, blow this jet (part# 35 in the diagram) out with compress air.


(Carburetor Adjustment - Single S/S Adjustable Needle Valve)
(J. Reeves)

Initial setting is: Slow speed = seat gently(turn in clockwise), then open 1-1/2 turns(turn out counter clockwise). Do not tighten or force the slow idle needle shut or it may damage the needle.

Start engine and set the rpms to where it just stays running. In segments of 1/8 turns, start to turn the S/S needle valve in (clockwise). Wait a few seconds (10 to 15 sec) for the engine to respond. As you turn the valve in(clockwise), the rpms will increase. Lower the rpms again (turn your throttle slightly slower) to where the engine will just stay running.

Eventually you'll hit the point where the engine wants to die out or it will spit back (sounds like a mild backfire). At that point, back out(turn out counter clockwise) the valve 1/4 turn. Within that 1/4 turn, you'll find the smoothest slow speed setting.

When you have finished the above adjustment, you will have no reason to move them again unless the carburetor fouls/gums up from sitting, in which case you would be required to remove, clean, and rebuild the carburetor anyway.


Couple of things you can try if you are still having some running or idling issues after you completed your carburetor cleaning and kit.


1.) Make sure the fuel cap air vent is open. If closed it will not allow the fuel to flow properly from the tank.

2.) Make sure you have fresh mix of gas 87 octane and twc-3 2cycle oil mixed at a ratio of 24:1. Old fuel mix in tank can accumulate water and cause very poor running indeed.


I hope this helps you out. In the secret file link, there is a description how to properly set your float for your carburetor, but I will included a picture just in case.

levelfloatandclipinformation.jpg


Oh please don't for get about the fuel line and the filter in the tank. (parts 2 and 5 in the diagram below)

38004400002im.jpg
 

F_R

Supreme Mariner
Joined
Jul 7, 2006
Messages
28,195
Re: 1964 Johnson Seahorse 3hp only idle

I pulled the flywheel again check the coils, have new sparkplugs swapped them just to double check, checked the spark plug wires, lightly sand points and contacts and checked spacing. Still ran the same, I think the only thing I can do is a carb kit?

You might as well get a carb kit and get that out of your system. But a carburetor won't make it run on one cylinder. But run too lean on both cylinders, yes. It is possible that something has gotten under one of the reeds, which will make it run on one cylinder. You have to pull the carburetor to find out. So go ahead and do the kit if you want to. Check that high speed orifice plug (jet) if you do. It must be absolutely CLEAN with no trace of any dirt or varnish in it.
 

bbstacker1

Petty Officer 2nd Class
Joined
Mar 7, 2010
Messages
163
Re: 1964 Johnson Seahorse 3hp only idle

Concur with F_R, you can do the carb kit, and it may need it, but that will not cause it to not have fire on one cylinder. Check the coil wires real good, I had one that had a small spot rubbed bare on it causing it to misfire.
 

F_R

Supreme Mariner
Joined
Jul 7, 2006
Messages
28,195
Re: 1964 Johnson Seahorse 3hp only idle

One of the spark plug wires often arcs through where it is clamped to the bottom of the armature plate. It will still have spark when it does that, but the old "path of least resistance" rule comes into play. If the arc to the clamp offers less resistance than the spark plug gap, that is where the spark goes.
 

cajuncook1

Chief Petty Officer
Joined
Sep 3, 2009
Messages
559
Re: 1964 Johnson Seahorse 3hp only idle


I think I scared him off with all my diagrams and step by step instructions. Maybe too overwhelming!!! :redface:


andrewm10

Cadet
Joined
Mar 4, 2012
Messages
7
Re: 1964 Johnson Seahorse 3hp only idle

Nope still here but waiting for carb kit to come in
 

andrewm10

Cadet
Joined
Mar 4, 2012
Messages
7
Re: 1964 Johnson Seahorse 3hp only idle

Finally had time to do the carb kit and no fix. I wanted to double check the spark so i swapped everything under the flywheel and spark plug wires. Still only running off the top cylinder. I'm really confused and don't know what to do now
 

kfa4303

Banned
Joined
Sep 17, 2010
Messages
6,094
Re: 1964 Johnson Seahorse 3hp only idle

Hi andrew. The first thing to remember is to be systematic. Fix one thing at a time, check to see that it works then move to the next issue. I generally start at the top and work my way down a motor. Follow the previous links to the letter and you can't go wrong. Here are a couple more that have lots of color photos and a bit more detail. The first is for and ignition rebuild. Your motor uses the much beloved OMC universal magneto. It's super simple and very reliable. Best of all once you can fix your little 3 hp, you'll be able to do the same job on all OMC motors of virtually any hp from that era. I would highly recommend a new "Tune up" kit which consists of 2 brand new sets of points and condensers. They only cost about $20 and you can order them hear, or get them at your local NAPA auto parts store. Some new 7mm COPPER core spark plug wires are a very good idea too. Many auto parts stores will sell it for a couple bucks a foot. Assuming your coils are good, with these few components you will have an entirely new ignition system for under $30. Here's the link:

http://www.outboard-boat-motor-repa...on 3 HP 1952-1967 Ignition System Tune-up.htm

Here's a link to an entire carb rebuild from start to finish. It's for a slightly different model than yours, but all of the steps are virtually the same.

http://www.outboard-boat-motor-repa...hnson 5.5 HP 1954-1964 Carburetor Tune-UP.htm


Each spark plug wire should/will produce a strong, snapping, blue spark that will jump a 1/2" gap. Once you have this nailed down move on to the carb. Once the carb is good to go, should be able to fire her up. Here's a link to help dial in the carb when the time comes.
Follow the steps in these posts/links and you can't go wrong. Good luck. Holler if you get stuck.

http://forums.iboats.com/showthread.php?t=167352
 
Top