How to Test coils on 1972 9.5 Evinrude

John Drew

Seaman
Joined
May 24, 2008
Messages
68
I followed the suggestions on another post to test the electrical system.
I got lost in some of the checking of ohms on the coils. I did a test by holding the spark plug and got a jolt on one but nothing on the other.

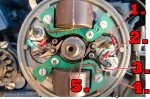
To test the coil with an ohms meter, what wires should I do the test on? The plate is item (4).

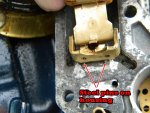
Also I found one wire with a bad connection at the sparkplug and removed 1/4" from both wires and reconnected. I was wanting to check the sparkplug wires under the plate but don't know how to get the plate off. There are two philips screws near the points are these the ones to remove the plate?

On the top coil does it correspond to the wires to the right?

How do you test the condensor?


(see attached)
 

Attachments

  • points.jpg
    points.jpg
    154.2 KB · Views: 1
Last edited:

lindy46

Captain
Joined
Nov 27, 2008
Messages
3,886
Re: How to Test coils on 1972 9.5 Evinrude

The 4 Phillips head bolts hold the armature plate on (2 bolts pass through the coils). Using a Ohm Meter test the continuity of the primary windings of the coil. There should be continuity between the coil leads. There should be about .9 ohm resistance between the leads. Next test the secondary windings of the coil by measuring the resistance between the Black lead (ground) and the spike for the spark plug wire. You should get about 6000-8000 ohms resistance.
 

John Drew

Seaman
Joined
May 24, 2008
Messages
68
Re: How to Test coils on 1972 9.5 Evinrude

I tested the ohms on the coil and got total continunity.

The second test, I got lost. Where do place my test tips? From the picture what item numbers?


While removing the plate, I may have found the problem, the "kill" swithch wires were touching due to old age of the insulation around the wires where they were connected to the frame. How does the "kill" switch work?When I took off the carburator top to remove the plate I noticed the float mounting bracking was not attached to the carburator housing frame. (see attached)
The steel pins have rusted away. What would you suggest to glue it back in place?Would J.B. Weld hold up to the gas?

I did test the float attachment pin to see if it is easily removed in case the float goes bad and has to be replaced. I found it removed easily. Also i determined the glue can't get close to the needle valve housing.
 

Attachments

  • float pins.jpg
    float pins.jpg
    145.3 KB · Views: 1

lindy46

Captain
Joined
Nov 27, 2008
Messages
3,886
Re: How to Test coils on 1972 9.5 Evinrude

You really need to remove the coils to test properly. You should get 0.9ohm resistance between the two leads on the coil. You should get 6000-8000ohms between the ground wire on the coil and the pin or spike on the coil where the plug wire pushes in. I'm not familiar with that carb and the problem you have. Maybe someone else can chime in.
 

John Drew

Seaman
Joined
May 24, 2008
Messages
68
Re: How to Test coils on 1972 9.5 Evinrude

Thanks that explained where the spike is located.

I cleaned the carburator housing and bracket with contact cleaner. Used the JB Weld on the float bracket and housing and worked great.

I opened up the kill switch and found it is a simple normally open switch and pushing it makes contact to stop the motor. I did not know if it was a normally closed to allow the current to go thru. For now I am using a simple single pole, single throw toggle switch until the new one arrives.

Since I now have off the plate, I will follow the suggestion to replace the wires and test the coils.

Thanks for your usual support.
 

John Drew

Seaman
Joined
May 24, 2008
Messages
68
Re: How to Test coils on 1972 9.5 Evinrude

The hardest part was getting my wife to hold the sparkplug wire to see if "fire" came out of her eyes!

When I reinstalled the plate, I may have hooked up something wrong. When I turn the Tiller handle to give it gas, it turns about 1/4 of the way increasing the gas, then there is a space 1/2 turn when nothing happens, then the last 1/4 it give is gas again.

There is an adjusting screw on the outside of the handle about the size of a silver dollar. I have adjusted it in and out but does not help the dead space only moves a cylinder in and out causing the arm to move closer or farther from the the netural stop pin. This is used to set the max gas when starting in netural.

Could the cylinder be what is causing the problem? It might have turned a 1/2 turn.
 

boobie

Supreme Mariner
Joined
Nov 5, 2009
Messages
20,826
Re: How to Test coils on 1972 9.5 Evinrude

The best way still is to to take the coil/s into a shop that's got a coil load tester. They can see when it fires and check for any high voltage leaks.
 
Top