1977 Johnson 140 Leave the thermostats and poppets out?

Status
Not open for further replies.

AntiqueTbird

Cadet
Joined
Jul 1, 2012
Messages
29
Does anyone have actual IRL experience with this on a 4v x-flow?
I spoke on the phone with a big distributor here in Florida that also happens to work on a lot of motors .
The old timer OMC mechanic said that when ever he got a Central-South Florida x-flow 4v in that was having any major work done on it the first thing he did was take the thermostat housing off and put the outer cover back on without the plastic valvebody, tstats, and poppets. He's worked on hundreds of of v4 x-flows and did this to most of them. The reasoning was that operating the engine in south Florida and central west Florida the water isn't cold enough to need them. The engine will run a touch cold but with proper piston to bore clearance and a warm up on cold starts it will never over heat or cold seize. He said the x-flows were known for running hot on the high (starboard) side and the only thing to do with them was to have all of the thermostat housing open and just let the water flow. He said that if the motor was going to be run up north on a lake with .125" of ice still on top the tstats are needed but down here where the water doesn't go much below 70f they just overheat. He said that if I let the engine idle for 5-10 minutes after start up it will be perfectly fine. If I drop in and just stab it and go for WOT after starting it will probably not be.

I know that Thermostats are at the center of many "heated" debates. I was of the impression that they are absolutely necessary on 2-stroke O/B motors. I can say that in my experience here in south Florida I have gotten into the habit of removing the tstat from my truck during the summer. The engine still gets to operating temp in less than 5 minutes and the A/C works alot better. Winter or a trip up north after about august and I put the tstat back in the truck so the heater works better sooner.

If anyone on here has tried this in the warmer subtropical climates please let me know how it worked out. I'm getting ready to put this thing back together and would like it to work better and last longer between teardowns and avoid completely another piston seizure and have more reasonable temps.

Thanks ya'll.
 

F_R

Supreme Mariner
Joined
Jul 7, 2006
Messages
28,195
Personally, I don't give a hoot if you want to leave that stuff out. However, advising such would encourage people with older motors to do the same--i.e. 1976 and older. Those had thermostat controlled recirculating cooling systems. Leaving the return poppet out causes all sorts of cooling problems in those.

P.S. I live in Florida too.
 

Joe Reeves

Supreme Mariner
Joined
Feb 24, 2002
Messages
13,262
And for what it's worth, I also live in central west Florida, the Tampa Bay area... quite hot at the present time. I'm a serious minded Evinrude/Johnson technician who started out when all OMC had to offer was straight mechanical shift engines powered via magneto (1960), learning each improvement as the years went by... and understanding why various improvements existed.

Your write up on this "Old Timer OMC Mechanic" indicates that he would obviously be aware of the improvements... BUT... it also indicates that he has no idea why such improvements were incorporated. I've encountered such "mechanics" and their tactics..... overheating? = remove the thermostat.... nylon bushing froze = melt it with a torch, etc etc.... instead of doing a proper repair the first time. We, in the trade call their daily performances "Patch-Work!"

Now, pertaining to the "mechanic's" view on engine cooling, thermostats, etc.... read on.

********************
(Thermostat Purpose)
(J. Reeves)

Many engines are considered high performance engines and demand a thermostat(s), and many smaller hp engines also require a thermostat for the following reason. The pistons actually distort/twist off round when running. The thermostat is required to keep the outer wall surrounding the steel cylinder, and the cylinder wall itself at a temperature to compensate for the distortion.

With the thermostat removed, the difference in temperature between the inside the cylinder and the water jacket quickly reaches a point whereas (in effect) you have a oblong piston running up and down a round cylinder, or vice versa. Bottom line is without the thermostat, the piston and cylinder wall could be damaged in a short period of time.

The thermostat in your car isn't there simply to have the heater function properly..... think about it.
 

AntiqueTbird

Cadet
Joined
Jul 1, 2012
Messages
29
Thanks for those replies guys.

Joe please if you can give me your thoughts on this.

Considering the engine was torn down completely 5 years ago. two Re-sleeves a .020 os bore on all 4, New bearings from top to bottom crank to wristpins. New exhaust horn fabricated carbs, torn down new 65C mains and 27C idles, new leadshots, new floats, new timerbase, new chariging circuit, new reg rec, new spark plugs,new seals from prop to timerbase, new gaskets, Complete sparkling cleanout of all water passages, new fuel tank and all components from tank to cowl, flush with real bonafide saltaway after each use, New impeller, fuel pump filter and spark plugs each year for piece of mind etc... etc...

Why would I get an overheat on the Starboard side? considering all the work done this thing should run properly for another 30 years. Instead The starboard side ran hot, seized, and upon teardown everything looks in order except the #1 piston being scored and leaving behind a lot of aluminum on the cylinder wall. #3 piston and bore are pristine.

I then replaced deflectors with a70 .375" silicone cord stock cut to the right lengths based off of the replacement deflector i bought at the shop. gently with acid and a q-tip cleaned up the bore. check all water passages, tested tstats, triple checked tstat housing gaskets tstats and poppets were being installed correctly per FSM. Ran her in a barrel for 15 minutes SB was warmer than port but not much at idle in the barrel. took her out to breakin the new piston properly idled 15 more minutes, then up to 1500 for 10-15 sec then idle for about 45 minutes then to 2000 for 1-15 seconds and back to idle repeated for about 45 minutes, got to 6000 for 2 seconds and back to 5000 and seizure, this was after about 5 hours of running the motor though these cycles, and this time the seizure was more severe in damage to piston skirts and left a lot more aluminum behind on the cyl wall, the starboard side was too hot to touch and the port side was fine for 10+ second hold. This time I tore it all down. From foot to top cowl. The water tube is good, passages all flow well and have maybe .0001 of crusty build up. Carbs are good, pin gauged the jets they are good, pulled leadshots nothing behind them but air, the new silicone deflectors were in their homes and not misshapen, The water paths didn't have anything occluding them, I was very careful during disassembly to watch for anything that may have been in a water path or exhaust path to fall out during disassembly. The heads just came back from the machine shop where the bores were honed, hatched, and opened another .0001" block was dye checked with no cracks.

I'm at my wits end. My wits are short when it comes to 38 year old two stroke outboards. Given your experience and knowledge and understanding of changes made and reasoning behind those changes What would you think would be the cause of this what would be a reasonable solution? I've torn it down myself twice now, plus the shop that went completely though it 5 years ago, I know third times the charm and all but I'd really rather not get to the third tear-down in two weeks.
 

Joe Reeves

Supreme Mariner
Joined
Feb 24, 2002
Messages
13,262
1977 140hp Johnson...... This was a good well designed engine, and if it's first tear down was the one performed 5 years ago, that indicates that the crankcase was fine up to that point... a period of 35 years... However........................

Why was it torn down 5 years ago?...... What caused that problem?...... What cylinders were re-sleeved?...... Are those sleeves still positioned properly?...... Has this present problem existed since 2012 (5 years ago)?...... Was a .020 oversize piston provided to the machine shop so as to accurately obtain the proper piston to sleeve clearance?......

I've read your post through thoroughly and find you've pretty well covered all bases so to speak, but obviously something is not as it should be, hence the above questions.

At first glance, one would consider that due to age, the crankcase/block may have developed a blockage at some hidden point or had a piece of the block to corrode away resulting in a stalemate scenario.... however, ignoring this possibility and assuming that all is well excepting this starboard bank overheating situation.................

That leads one to suspect the water deflectors (at least one) is not seated properly. I use a small diameter rat tail file similar to what is used to sharpen the cutters of a chain saw to clean out the retaining areas of the deflectors. I insert a small diameter dowel to mark and gauge the depth of that retaining area, then after installing each deflector, I use a scribe with a hook to slide down the side of that deflector to make sure that it is absolutely seated. Any deflector NOT seated is prone to having water flow in two directions which in turn results in a stalemate and the water just sits there and cooks.

(Water Deflectors)
(J. Reeves)

Water deflectors are actually lengths of 3/8" outside diameter rubber hose, installed between the top cylinder and any cylinder beneath it, and also between the bottom cylinder and the block. The purpose of the deflectors is to have the water follow a definite path around the cylinder walls. Unfortunately the deflectors between the cylinders will at times swell sideways due to either a previous bad overheating problem, or simply due to age and salt corrosion. This causes a water flow restriction which usually allows the water to cool sufficiently at low rpms but not at the higher rpms.

This hose material can be purchased reasonably at any automotive parts type store if you care to make your own, or you can purchase individual deflectors at any Evinrude/Johnson dealership at a somewhat higher cost.

Removing and installing them can be a hassle at times, but not always. I use a sharply pointed scribe with about 1/4" of the tip bent at a right angle whereas I can reach in, jab the tip sideways into the rubber, then yank it out. It's necessary to clean the seating surfaces where the rubber contacts the block with a small rat tail file to eliminate salt deposits etc. When installing the new rubber deflector, coat the deflector and the metal surfaces with WD40 which will act as lubrication to allow it to go in as easily as possible.

Make sure that you insert something into that deflector area before cutting and installing the deflectors if you make your own so that you will be certain that they are the right length and also that they will be seated properly. Usually a very small amount will be left extending above the block sealing area..... simply cut the excess off with a single edge razor blade.
 

interalian

Commander
Joined
Jul 23, 2009
Messages
2,105
All other comments aside, the thermostat in your truck/car is not just there to make the engine warm up more quickly. It's there to provide an engineered restriction in the cooling circuit. Without the restriction, the waterpump doesn't build the pressure it would otherwise and you can have uneven cooling as a result. A 195 degree thermostat and a good radiator and everything should be peachy, even in the sub-tropics. If you really don't want a thermostat in there, fit an old one with its guts removed at a minimum - but even that would be too open.

I really do hope you solve your issue.
 

V153

Lieutenant Commander
Joined
Apr 16, 2011
Messages
1,764
I haven't run tstats in these motors for years. (SWFL here too.) You will need to restrict the flow. As interalian said, one way is to chop the guts off an old thermostat. Or personally I like to use stainless 1/4" fender washers. Do NOT remove the poppet valves.
 

Faztbullet

Supreme Mariner
Joined
Mar 2, 2008
Messages
15,618
Post a pic of the piston.....did it seize exhaust side? intake? 360? If the starboard side got hot enough for #1 to seize #3 will be scuffed also.. As for the t-stats/poppets crossflows need all the heat they can keep in cylinders to prevent ring coking so keep em in place.
 
Last edited:

Roberthill

Petty Officer 1st Class
Joined
Dec 3, 2012
Messages
317
Taking t'stats out of a truck engine is not good , water runs thru fast , back two cylinders are HOT due to hardly no water movement.
 

AntiqueTbird

Cadet
Joined
Jul 1, 2012
Messages
29
Got her back together. #2#3#4 Were all perfect. No scoring. They are Vertex V1320. these pistons come with a patch of skirt coating perpendicular to the wristpin. Those three looked about the same with a good bit of the coating still left on them. The new one is also a vertex v1320. The old one was rubbed raw on two sides of the wristpin one on intake one on exhaust. the new one was rubbed raw on three spots really badly either side of the wristpin and on spot not so bad.

Here's the head scratcher for ya. now the port side runs hot. got to 200f at idle with a temp gun and shut her down. Nothing from the blubber holes so tstats didn't even open. I'm about at the point of giveup and rag in the gas tank. I am a meticulous person by nature and I work in the nuclear power industry on the really big expensive spinning parts so I have that "take your time and do it right the first time" thing down pat. I got into the exhaust housing completely had to tig weld nuts onto the rusty old bolts and all. Turns out the shop lied to me about having gotten into the exhaust housing and having an exhaust horn fabricated. The one in there was the original cast aluminum part.

I went through everything on this motor . triple checked everything. triple ringed everything for torque. tore the impeller down again since the foot was off. everything checks out. I'm stumped.
 

AntiqueTbird

Cadet
Joined
Jul 1, 2012
Messages
29
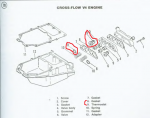
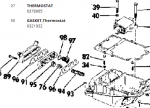
Just pulled the tstats out and checked them in a pot. Started to open at 145 fully open at about 150. The cork gaskets however brand spanking new as of three weeks ago along with the complete tstat assembly . The corks were messed up. On the parts diagrams it shows them between the valve body and the tstat. I just looked at the fsm and it shows the opposite. Cover -> gasket -> Valve body -> stat -> gasket -> cork -> exhaust housing. Which is right? The tstats ate the cork. Kind of explains them not opening.

FSM FSM.png


Parts Diagram Diagram.png
 
Last edited:

AntiqueTbird

Cadet
Joined
Jul 1, 2012
Messages
29
No Title

Here are the corks in their condition after being removed. Looks like the parts diagrams are certainly wrong. If the thermostat grabs and distorts the corks like that and fails to open the engine will certainly overheat at idle.
 

Attachments

  • photo272360.jpg
    photo272360.jpg
    159.9 KB · Views: 2

interalian

Commander
Joined
Jul 23, 2009
Messages
2,105
The cork rings wont interfere with the 'stat opening as the valve portion is tiny. If they're out of place, you'll just get water past them and the 'stats become less effective.

I put my 'stats in the plastic housing first, then the rings around the 'hat' portion of the side facing the motor, then the gasket.
 

AntiqueTbird

Cadet
Joined
Jul 1, 2012
Messages
29
Sure thing interalian. Totally makes sense now that I've found the ultimate problem. Which was the cork was sucked in/ stuffed in between the spring of the thermostat.

But look at the difference between what the FSM shows Vs. What the Exploded Parts diagram shows.
I'll note as well that several parts suppliers have confirmed that these exploded parts diagrams were supplied by OMC/BRP.

I may be deserted on an island here in thinking this but I would think that an exploded parts diagram would be accurate. It would seem much simpler to use one universal diagram to show assembly order and parts vs. Using two different diagrams. Especially since one of those had a fatal engine blowing flaw.

Maybe it was on purpose maybe it was just negligent. Either way its very sucky.

I have a feeling that the outboard shop that worked on it for me also followed the exploded parts diagram 5 years ago because when I put them together I meticulously pulled the old one apart and put the new one together in the same order expecting it to have been done right by a well regarded shop.
 

PhilSch

Cadet
Joined
Oct 31, 2019
Messages
22
Just read your three year old post about the overheating problems you had with your crossflow. Your last posts talked about the thermostat gaskets being in the wrong place. Did putting them in properly fix the problem long term? I had starboard cylinders immediately overheat on first startup of a new V4 crossflow rebuild. Found a little rock/pebble stuck in the little( 1/16") vent hole in the phenolic block/thermostat body. Took the rock out and it fixed the problem.
 
Status
Not open for further replies.
Top