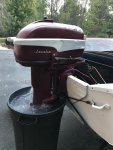
1956 Johnson Javelin starter

KathyD19

Petty Officer 1st Class
Joined
Jul 17, 2012
Messages
350
HighTrim, in your new diagram for my motor, what does it mean when you've written "points" coming off the "stop switch"? Where do I connect it to (as the lines your wrote "points" on don't go anywhere?) Sorry, I'm absolutely electrical-system-challenged.
 

lindy46

Captain
Joined
Nov 27, 2008
Messages
3,886
HighTrim, in your new diagram for my motor, what does it mean when you've written "points" coming off the "stop switch"? Where do I connect it to (as the lines your wrote "points" on don't go anywhere?) Sorry, I'm absolutely electrical-system-challenged.

The two black wires from the stop switch connect directly to the points - one wire to each set of points. Then, when you press the button, it grounds the points together to kill the engine.
 

KathyD19

Petty Officer 1st Class
Joined
Jul 17, 2012
Messages
350
No Title

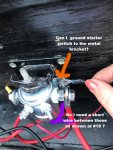
Ok thank you Lindy46! I'm almost there, I just have two questions left: as seen in this picture can I ground the start button to the metal bracket that holds the solenoid to the boat? Or do I have to ground it to the motor itself? Diagram says "engine ground".
I'm not really that familiar with how particular grounding must be so will this do? Also the diagram shows a short wire from the right small post to the right large post. Is that needed or should I leave the small post empty? As soon as I get the answer to these I'll finish up and give it a whirl. Time to rock and roll!
 

Attachments

  • photo277892.jpg
    photo277892.jpg
    128.4 KB · Views: 0

jbuote

Lieutenant Junior Grade
Joined
Aug 17, 2016
Messages
1,001
Hey Kathy...

Been following your post for a while now.. lol

​Not an expert here, but I think I know the answer to those 2 anyway..
​Yes, you'll need the little jumper as shown at #16. That gives power to one of the small posts from the battery positive.
​Of course as the diagram shows, the other small terminal goes to the start button, which when pressed should complete the circuit to ground. This activates the solenoid and allows the starter to spin.

​No, pretty sure you can't use the solenoid casing as the ground. Reason is, the solenoid is not mounted on the engine, so the casing has no connection to the battery negative terminal.

​You'll need to use the engine ground (which has a connection to battery negative), or worst case, run it to the battery negative terminal.

​Does that make sense?
 

KathyD19

Petty Officer 1st Class
Joined
Jul 17, 2012
Messages
350
If I can run it to the battery negative terminal that would be better. Otherwise I'm going to need to start over with a longer wire. Would the small wire I'm using now (forgot the gauge but you can see the red and black in to pics) work for the little jumper between the small and large posts?
 

jbuote

Lieutenant Junior Grade
Joined
Aug 17, 2016
Messages
1,001
The smaller gauge red and black in your picture look good to use as the jumper..
​Should be able to wire the start button ground wire right to battery negative.
Engine ground goes to negative battery terminal, so the end result is the same..
​The advantage of running it to engine ground would be so you don't have to attach it each time you put the battery in..
 

KathyD19

Petty Officer 1st Class
Joined
Jul 17, 2012
Messages
350
Thank you for the quick reply jbuote! I'm going to go out and do that right now. I can always rewire that to the engine ground later knowing that. My battery has the two large posts and two accessory posts so that's no trouble to attach to the negative accessory post! I'm thinking this just might actually work!
 

KathyD19

Petty Officer 1st Class
Joined
Jul 17, 2012
Messages
350
No Title

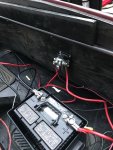
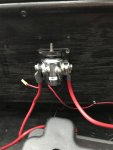
IT WORKS!!!!! OH MY GOSH....thank you all SOOOOO MUCH!!! I want to thank everyone for sticking with me, reading my posts and not giving up on me when I'd already given up on myself. I could never have gotten this going again without help from all of you, especially Willyclay (my biggest cheerleader!) and HighTrim for rewriting my wiring diagram for me!! At the risk of sounding too "girly" I wish I could give you all a huge hug!! It started right up with my only glitch being that I had wired the kill switch backwards (pushed in is on and pulled out is off)..it was a 50/50 chance I took that can be easily remedied. I really can't believe it's working again! The starter is fine, the wiring to the front is fine, it leapt to life the second I pushed the start button! Damn, you really can't kill these old motors, can you?? :) I wish I knew how to upload a 10 second video because I took one when I crossed my fingers and attempted to start it! I actually cried I was so happy! THANK YOU AGAIN EVERYONE!!!
 

Attachments

  • photo277955.jpg
    photo277955.jpg
    105.1 KB · Views: 0
  • photo277956.jpg
    photo277956.jpg
    122.3 KB · Views: 0
  • photo277957.jpg
    photo277957.jpg
    83.9 KB · Views: 0

jbuote

Lieutenant Junior Grade
Joined
Aug 17, 2016
Messages
1,001
That's AWESOME Kathy!!
​You deserve it after all the frustrations!

​Nice Job!!!

​(By the way.. you can upload a video to youtube, and then link it here if you really wanted to show willclay and hightrim the vid!) :D:triumphant:
 

KathyD19

Petty Officer 1st Class
Joined
Jul 17, 2012
Messages
350
No Title

This is me, in case you wondered. Not all blondes are dumb! :)
 

Attachments

  • photo277961.jpg
    photo277961.jpg
    67.1 KB · Views: 0

Willyclay

Captain
Joined
Sep 8, 2006
Messages
3,240
Attagirl, I knew you could do it! This forum continues to prove it is the single best resource for recreational boaters. Very happy for you. Bill
 

Willyclay

Captain
Joined
Sep 8, 2006
Messages
3,240
...my only glitch being that I had wired the kill switch backwards (pushed in is on and pulled out is off)..it was a 50/50 chance I took that can be easily remedied.

Recommend you leave the kill switch wired exactly the way it is! That will prevent it killing the motor if someone accidently bumps the switch while you are zipping around the lake. Any comments from other members?
 

jbuote

Lieutenant Junior Grade
Joined
Aug 17, 2016
Messages
1,001
Quick thoughts, are I kind of like that idea with the way it's set up.
​It would take an intentional act (pulling on the switch) to kill the engine.. It wouldn't shut off by and accidental action.
In fact, that makes it almost an intuitive thing.. Push forward to "Go" (engine runs..), pull back to "Stop" (Kills engine)..

Only concern, would be an accidental push to "ON" when on shore, so engine could be started.
​Which would be worse? Accidentally killing the engine under way, or Accidentally allowing it to start unexpectedly?
Not really sure on that one..

Perhaps in the future, replace the push pull with a lanyard type kill switch, but as it is, I think I agree with leaving it as is.
​Still pretty new, but that's my thoughts on it..
:)
 
Last edited:

KathyD19

Petty Officer 1st Class
Joined
Jul 17, 2012
Messages
350
The PO had wired it backwards as well so I was used to the kill switch that way; I had it in my mind that "in was on". I like the points you guys brought up for leaving it as is. Anything that keeps me from having to tinker with it again is good enough for me! Hoping to get it on the lake Monday!
 

Willyclay

Captain
Joined
Sep 8, 2006
Messages
3,240
Here are the procedures recommended by forum guru Joe Reeves in his FAQ thread for adjusting your single carburetor with two needle valves:

----------------------------------------------------------------
(Carburetor Adjustments - Two Adjustable N/Vs)
(J. Reeves)

Initial settings are: Bottom high speed = seat gently, then open 1 turn out. Top slow speed = seat gently, then open 1-1/2 turns.

Setting the high and low needle valves properly:

NOTE: For engines that DO NOT have a shift selection, obviously there is no NEUTRAL position. Simply lower the rpms to the lowest setting to obtain the low speed needle valve adjustment.

(High Speed) Start engine (it will run pretty rough), shift into forward gear, take up to full throttle. In segments of 1/8 turn, waiting for the engine to respond between turns, start turning in the bottom high speed needle valve. You'll reach a point whereas the engine will either start to die out or spit back (sounds like a mild backfire). At that point, back out the needle valve 1/4 turn. Within that 1/4 turn, you'll find the smoothest setting.

(Low Speed) Slow the engine down to where it just stays running. Shift into neutral. Again in segments of 1/8 turns, start to turn the top needle valve in. Wait a few seconds for the engine to respond. As you turn the valve in, the rpms will increase. Lower the rpms again to where the engine will just stay running. Eventually you'll hit the point where the engine wants to die out or it will spit back. Again, at that point, back out the valve 1/4 turn. Within that 1/4 turn, you'll find the smoothest slow speed setting.

When you have finished the above adjustments, you will have no reason to move them again unless the carburetor fouls/gums up from sitting, in which case you would be required to remove, clean, and rebuild the carburetor anyway.
-----------------------------------------------------------------------------------------------

Good luck!
 

HighTrim

Supreme Mariner
Joined
Jun 21, 2007
Messages
10,486
Hey that is great Kathy!

Glad she is on the water, now have fun!
 
Top