Removing steering bracket?

Alex.L

Cadet
Joined
Dec 3, 2016
Messages
28
So, it turned from "Remove steering bracket" to "remove absolutely everything BUT the steering bracket".
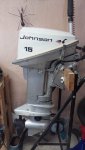
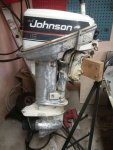
The outboard is in pieces and the only thing I can't separate is the exhaust housing and the steering bracket. The screws on the outside of the exhaust housing holding the mount in the picture does not want to move at all.

1172016153346.jpg
 
Last edited:

flyingscott

Fleet Admiral
Joined
Apr 8, 2014
Messages
7,988
That might be a big problem. You can heat up where the bolts screw into the steering bracket you can see the prongs where they screw into,just make sure you move all the rubber out of the way. But you will run the risk of wrecking those motor mounts which to replace new are about $90 apiece american.
 

racerone

Supreme Mariner
Joined
Dec 28, 2013
Messages
36,272
Pour boiling hot water on those mounts and use an impact screwdriver to get those out.
 

bob johnson

Rear Admiral
Joined
Feb 25, 2009
Messages
4,304
for a general usefull site for these smaller motors and especially the 9.9/15 HP versions leroys ramblings is a great place.... I know its a link to another site, but I hope its ok...this is a great place, as this guy has gone through these motors for years and he has lots of tips and advice.


http://leeroysramblings.com/
 

Alex.L

Cadet
Joined
Dec 3, 2016
Messages
28
Thanks for your replys once more.
Yeah, I've been spending som time on those screws and so far they will not budge. I don't have a welding torch, but other than that I've tried everything I can think of. So right now, I'll probably leave it like it is and work around it. Really don't want to break something at this point.
 

bob johnson

Rear Admiral
Joined
Feb 25, 2009
Messages
4,304
Thanks for your replys once more.
Yeah, I've been spending som time on those screws and so far they will not budge. I don't have a welding torch, but other than that I've tried everything I can think of. So right now, I'll probably leave it like it is and work around it. Really don't want to break something at this point.

be careful with the welding torch!!! you don't want to melt the material.. and with aluminum you wont know its melting till its too late. use map gas to heat part if needed.........

bob
 

Alex.L

Cadet
Joined
Dec 3, 2016
Messages
28
be careful with the welding torch!!! you don't want to melt the material.. and with aluminum you wont know its melting till its too late. use map gas to heat part if needed.........

bob

Thanks bob,

Don't have access to welding torch atm, and will probably not even try it.
It's frustrating to be so close to full disassemble, and it's really hard to clean out the area at top where the two "teeth" fits into the exhaust housing from the bracket. But still, I'd rather have a working outboard than breaking something just to clean/paint it.

Also, thanks for the brilliant link! Strange I haven't stumbled across it when googling.
He talks a bit about the screws I'm having problems with and it seems his solution is to drill or bore (spelling?) them out.
 

Alex.L

Cadet
Joined
Dec 3, 2016
Messages
28
So, followup question.
Does anyone know how to remove the marine grease I have everywhere, before painting?
​The previous owner was very liberal with the grease... On accessible surfaces it isn't a problem, but in the crevices between parts that I can't separate it's almost impossible.
 

bob johnson

Rear Admiral
Joined
Feb 25, 2009
Messages
4,304
engine cleaner and a power washer?.... I have used brake cleaner prior to painting.....
 

oldboat1

Fleet Admiral
Joined
Apr 3, 2002
Messages
9,607
want to try out the least aggressive stuff first, then work up to the heavier duty stuff. I'm not sure where brake cleaner fits in the scheme of things (probably similar to carb spray -- effective but pretty aggressive). I use glass cleaner pretty often, maybe a little ammonia in water if you want to go that route. Mineral spirits work too (good for making up a tack cloth as well). If you get some fish eye in the paint, it means there is some surface contamination. Let it dry and sand out, then degrease again.

For taping, get your hands on some automotive detailing tape -- use a putty knife to get a good tape edge, and run a razor or x-acto knife lightly along the edge when it comes time to pull off the tape (pull the tape back against itself when removing to minimize chances of tearing paint.) You can carefully clean up a straight edge using a putty knife, some cloth stretched over the blade edge and dampened with mineral spirits or possibly lacquer thinner (latter is very aggressive, so would dampen the cloth, not soak it).

(and.....show some pics when done!)
 

Alex.L

Cadet
Joined
Dec 3, 2016
Messages
28
No Title

Thank you oldboat1 for your detailed tips!

Uploading some photos of the worst problem areas.

photo256521.jpg
photo256520.jpg
photo256519.jpg

Also, here's the state of the engine. I'm unsure if I need to do something about it.

1113201693313.jpg
 

racerone

Supreme Mariner
Joined
Dec 28, 2013
Messages
36,272
It runs " great " after recovery from submersion.----But are you sure that there is no corrosion inside the engine on the bearings ?-----How long between recovery and motor start up ?-----Salt water involved ?
 

Alex.L

Cadet
Joined
Dec 3, 2016
Messages
28
It runs " great " after recovery from submersion.----But are you sure that there is no corrosion inside the engine on the bearings ?-----How long between recovery and motor start up ?-----Salt water involved ?


It's been professionally services last year ($6-700, by previous owner). Whilst I still haven't gotten the service papers, the problems should be only cosmetical.
No clue how long between recovery and startup, no salt water involved.
 

Alex.L

Cadet
Joined
Dec 3, 2016
Messages
28
On the second photo above in my "before" post, you can see the screws on the outside of the exhaust housing that won't budge. I'm starting to get quite annoyed with them. I've tried the boiling water and impact screwdriver as well and it's to no avail 🙁

Edit: I'm starting to think about drilling them out. Good or bad? The aluminum is so soft.
 
Last edited:

oldboat1

Fleet Admiral
Joined
Apr 3, 2002
Messages
9,607
Well, paint prepping or dismantling both start with a wire brush, IMO. (Your pic of the block shows some work needed.)

On removing bolts that you've cleaned up, soak in penetrating oil and use a box wrench to loosen. Tap the end of the wrench back and forth a bit with a small mallet or hammer, after a couple of raps on the bolt head. See if you get some success with that (automatic transmission fluid is a good penetrating oil).
 

Alex.L

Cadet
Joined
Dec 3, 2016
Messages
28
Well, paint prepping or dismantling both start with a wire brush, IMO. (Your pic of the block shows some work needed.)

On removing bolts that you've cleaned up, soak in penetrating oil and use a box wrench to loosen. Tap the end of the wrench back and forth a bit with a small mallet or hammer, after a couple of raps on the bolt head. See if you get some success with that (automatic transmission fluid is a good penetrating oil).

Thanks once again!
Yes, it still requires a lot of work. Unfortunately I can only work on it for short periods of time due to my sickness.
Bolts aren't really a problem here, it's mainly the philips head screws on the side of tthe exhaust housing. I doubt the oil will make it down to the threads, but I will try nevertheless.
 

Alex.L

Cadet
Joined
Dec 3, 2016
Messages
28
No Title

Ok, so it took a while to complete the restoration. I still think that I need to clean out the carburetor, but it runs well enough for use this summer. The silver paint wasn't optimal, but it works fine (didn't realize until it was finished).


Attachments

  • photo266654.jpg
    photo266654.jpg
    138.6 KB · Views: 0
  • photo266655.jpg
    photo266655.jpg
    135.1 KB · Views: 0
Top