Vintage 57' Evinrude 7.5 High-Speed quitting...

lindy46

Captain
Joined
Nov 27, 2008
Messages
3,886
Check to make sure fuel lines are connected properly to the sediment bowl housing. I had one recently (5.5hp) which wouldn't run properly and the sediment bowl was always full, which surprised me. I checked and the fuel lines were connected backwards. Switched them and the motor ran fine.
 

frustratedboater

Chief Petty Officer
Joined
Jul 10, 2007
Messages
413
lindy46/64osby- the lines are pretty new and the rubber has that soft feel to it. I know what you mean by mixing up the air and the fuel lines, and I am certain that they are in place correctly (Just due to the fact that it runs real smooth on lower speeds and starts in like a half a pull).

I am going to take a good look at the pressure tank just to make sure it is all cleaned out and that the air/fuel runs well as it passes through the handle. That pickup screen looked completely clean, with no debris on it at all, then work my way up towards the engine...
 

oldboat1

Fleet Admiral
Joined
Apr 3, 2002
Messages
9,607
Discussion has gone by carb cleaning and rebuild issues -- have been assuming you pulled out the h.s. nozzle and really cleaned it (should be part of the disassembly, prior to cleaning with a solvent of your choice.) I soak everything metal in lacquer thinner, then go after everything with fine wire and a can of carb cleaner. Some soak and clean with detergent, then blow with compressed air. Reread your first post, and use of compressed air alone isn't likely enough. If you didn't pull out the nozzle (maybe what you refer to as a fixed jet, or a center bowl jet), you may still have a blockage in the little ports. And...you need that boss gasket, if it's not there. Think there might be other problems with the motor, but you may still have a carb issue or two. You probably need a new bowl gasket (the one you describe) -- need an airtight seal. That gasket is different from the boss gasket on that center nozzle, and you need both. That's in addition to a clear sintered filter.

When it starts to stall, are you able to keep it running by adjusting the high speed needle? The motor should be sensitive to normal needle setting and adjustment if the carb is working right.
 

frustratedboater

Chief Petty Officer
Joined
Jul 10, 2007
Messages
413
Yes, I did clean out (not solvent, but just gas) the old L/H speed needle packing then blew it all out, visibly checked, and replace it with new packing, and installed the needles again. I will double check all of that to be sure everything is clear/cleaned. I have unscrewed the center bowl 'stick' jet (with the two micro holes in the side) and, surprisingly, that has always been clean as well as the general fuel bowl. I never saw any physical dirt anywhere.

Other than compressed air, I am not really sure how to get all the internal passageways that are not seen, cleaned. When I am using air, the exiting air is coming out with force. The low-speed cavity at the top, where the low-speed needle seats is clean as well and also the high-speed. I will check again and go through it real slowly and hope something surfaces.

Your question: "...When it starts to stall, are you able to keep it running by adjusting the high speed needle?.." Is a good one, no. I am, however able to keep it going, or from stalling, by pulling the choke, when I was under power. That, on paper, would lead to a clogged jet, but I can't see it. You stated:"...I soak everything metal in lacquer thinner, then go after everything with fine wire and a can of carb cleaner..." I will do the same and hope for promising results!!
 

racerone

Supreme Mariner
Joined
Dec 28, 2013
Messages
36,306
Post pictures identifying the high speed needle and the low speed needle.---Needles out of the carburetor.-----And have you opened the bottom needle to anything other than say 3/4 turn out from gently seated ??
 
Last edited:

F_R

Supreme Mariner
Joined
Jul 7, 2006
Messages
28,195
There is another possibility that has not been suggested yet. The tank may not be pressurizing enough. Yeah, I know, you said it hisses when you loosen the cap. But is it enough pressure? Memory says it is supposed to be 4-5 psi. Perhaps you are running like 2?? The pressurizing valves in the intake manifold may be shot. They are very reliable, but hey, they are over 50 years old. Back in the day, OMC sold a gauge tool to check the tank pressure.
 

64osby

Admiral
Joined
Jul 28, 2009
Messages
6,799
^^^ Along those lines, could the low compression be effecting the pressurization of the tank?
 

F_R

Supreme Mariner
Joined
Jul 7, 2006
Messages
28,195
Well in theory, I suppose so. But I'd be surprised that it starts and runs at slow speed if the compression is that much of a problem.
 

bspeth

Senior Chief Petty Officer
Joined
Aug 30, 2013
Messages
756
Related question: do you guys always replace the diaphragm when replacing the tank gasket?
 

frustratedboater

Chief Petty Officer
Joined
Jul 10, 2007
Messages
413
I had cleaned the carb and have checked all the areas that was spoken about and nothing was obvious. I am thinking that it could be contributing to tank pressure and the compression I'm experiencing, but that is not confirmed. I should have the tank gasket in tomorrow and will start to rebuild that. I was looking for a set of rings, but I am having a hard time finding some for that motor.

On another note, I went to my old resource (Hilton Marine) where I used to get all the Evinrude gaskets and seals and all the GOOD STUFF, and they not only changed over to carrying Honda motors, but no longer stock the older vintage parts... That took the wind right out of me! The excitement of looking up the number in the binder and seeing that cardboard bin sliding out from the back, and my 'prize' taken out, really made it fun and worth while!

Technology stinks, and want the good ole' days back!
 
Last edited:

HighTrim

Supreme Mariner
Joined
Jun 21, 2007
Messages
10,486
For parts, ask in the classifieds at AOMCI.org. MANY great members there sell parts for VERY reasonable.

For your motor, I still don't see that you took that fuel filter out and tried again. Just temp run it without it. Humour us.
 

frustratedboater

Chief Petty Officer
Joined
Jul 10, 2007
Messages
413
Thank you for that resource and will create an account and contact them! That's a great site..

Regarding the engine, I will run the motor without the filter, after all, that is how it came to me when I purchased the motor, and I'm curious! (It was not there when I bought the motor). I still have to repair the 5-gal tank that I was using, but while I'm waiting for the kit to arrive, then I'll try it. I want to clean my other 3-gal pressure tank just to try another one and check for any varying results before I rip it down.

I have a compression tester that is fairly new and trust it. It threads into the plug socket, so I know it was set up correctly. I had pulled it over a few times and got that reading and was surprised, due the the fact that it idled and ran slow to mid-power quite well. but will add some oil to the cly's. and check for an increase in pressure. I will be confident then if I see a significant rise in pressure.

I saw my same model engine running on YouTube at full speed and I am definitely missing that wide open, top-end throttle, sound. Mine struggles to break plane on my 'light' LOWE duck boat. It should have more than what it is putting out...

I will run it without the filter and use both tanks, but I am betting the compression is partly to blame... Just my hunch... BUT, yes..., I will run it with our the filter and report my findings...!

Thank you (all) for helping with this.
 

oldboat1

Fleet Admiral
Joined
Apr 3, 2002
Messages
9,607
I once had some running issues at an AOMCI wet meet, and turned out to be a simple fix -- jam nut wasn't tight, and needle was vibrating out of adjustment. But missed my chance to show off (twice, really -- show motor didn't run right, and then I was too late in finding the obvious fix.)

After the needle is initially set, tighten the jam nut enough so it will secure the needle (snug enough to hold it in place, but still able to make final adjustments). Initial setting is about 3/4 out. Need to be sure it's the right needle, undamaged, and seated correctly. The sharp pointed one goes on top, the blunt one on the bottom (h.s.). Pics of the needles out of the engine would be good on this end (see Racerone's post).

I think High Trim and others would like to know what you have as an initial setting, and what setting you use when running (likely different). You might need a little richer h.s. setting at the top end, for example. You can hear it when it's right, like what you are picking up in that YouTube. But in any case, needs to be dialed in (1/8 turn or so at a time, not whipped back and forth as shown in some of the YouTube videos).
 

frustratedboater

Chief Petty Officer
Joined
Jul 10, 2007
Messages
413
My needles are to spec, meaning the low-speed is about a turn, to a turn and a half. The high speed is about one turn out. I think, within a fraction of a turn, each motor is slightly different than the other. I understand what your saying about the packing nut, not being snug/tight, as I experienced the same thing. After all the carb tear-downs, I forgot the snug down the high-speed and.... yeah, my "frustratedboater" in me surfaced! No pun intended...

I had set my low speed needle 1-1/2 and ran it and I would fine tune it just to clear the blue smoke but out enough past the coughing of the motor when fuel was starved and same with the high...

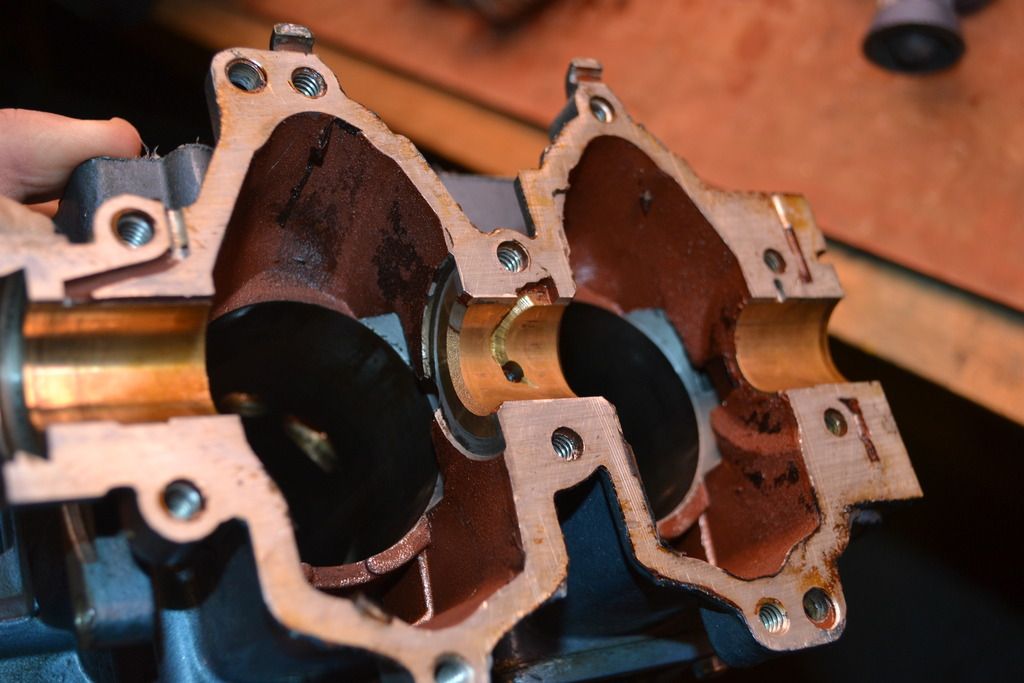
On another note, while I tore the powerhead completely apart, I discovered some interesting things that I never came across before. Check it out:

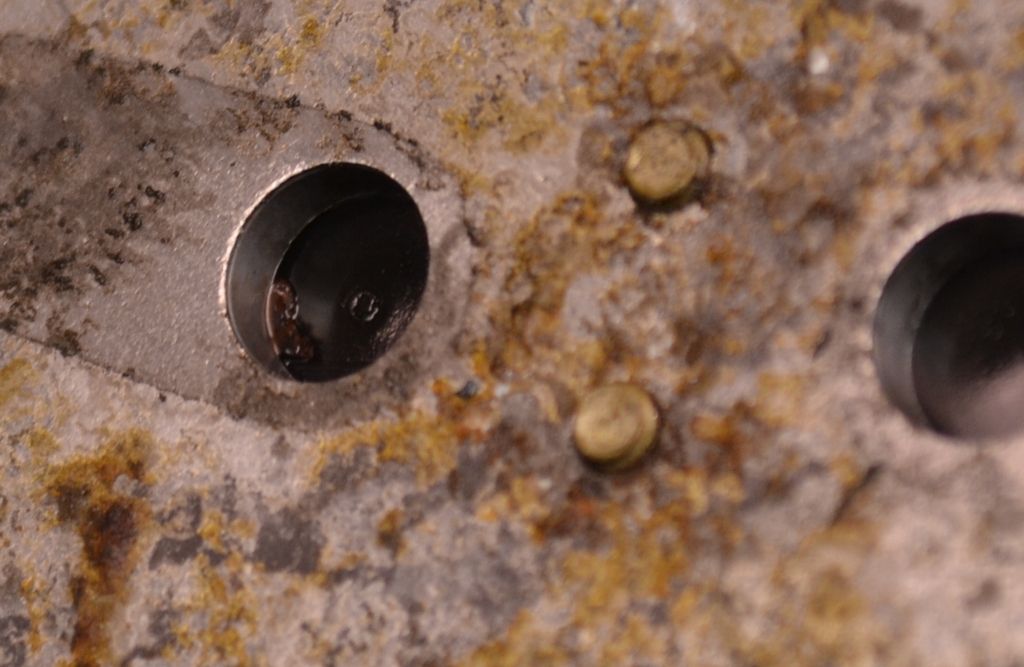
Look at the rubber pressure reed from the inside view (left one), there is small piece of gasket sealer between the seating of the damper, thus, perhaps, not providing me the pressure I need for the tank/or motor? Do you see it sitting there?
302f983a-4c82-4d30-99b8-3c5ba7f75e86.jpg


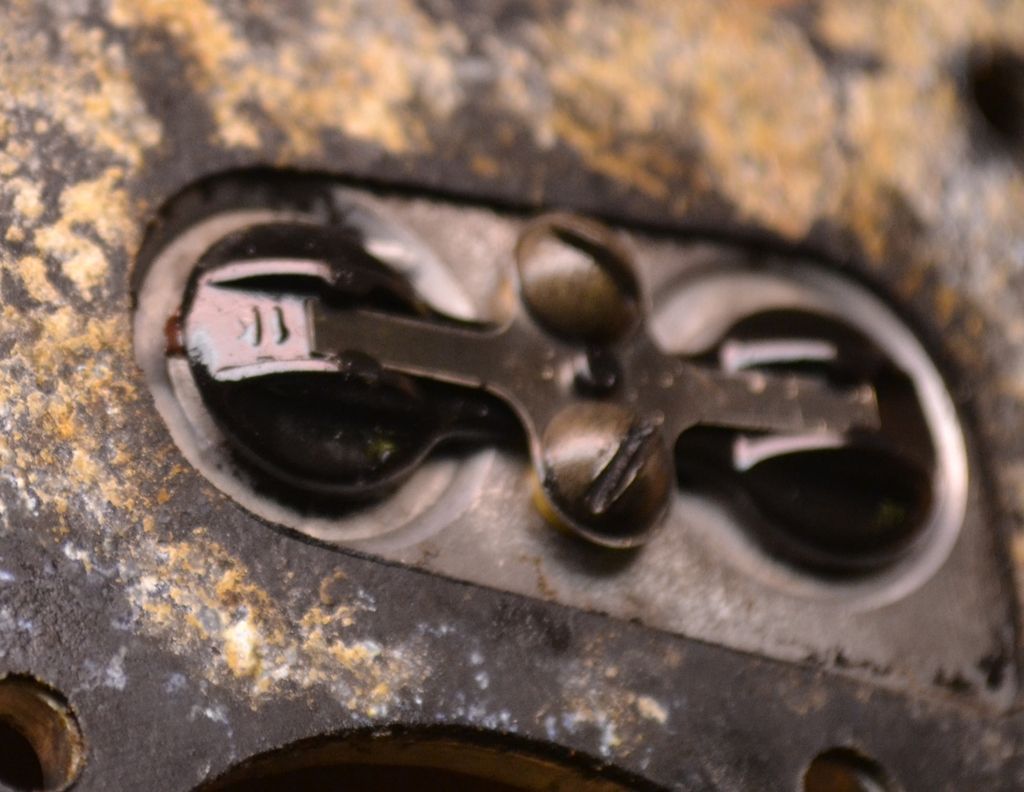
The other side of the damper: (do you see it on the left? That little piece sticking out?
1198d320-3652-48cc-9409-77b53ad2bfb7.jpg


Also all the extra gasket sealer all throughout the mid-block section:
DSC_1023.jpg


I'm sure there are other minor issues all contributing to this, but the sun shone a little brighter for me this morning when I saw that!

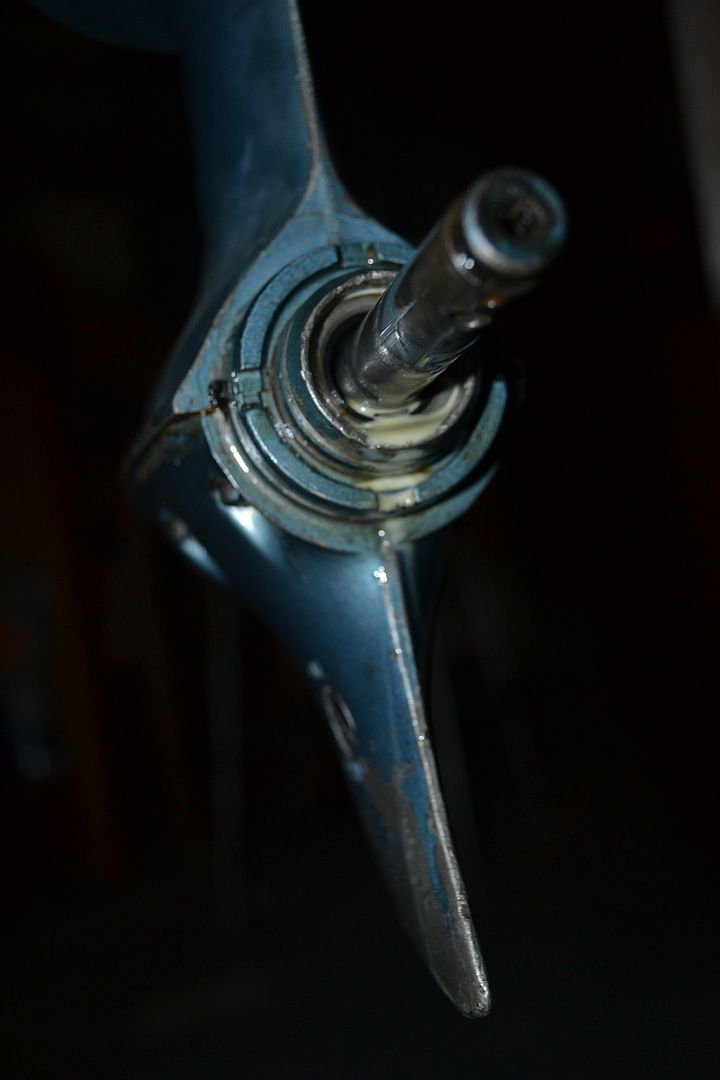
I didn't take a picture of the pistons, but they looked really good with no visible signs of butter wear. but the rings did look tired. I will seat them in their cylinder and take a measurement just to see. Also, after the complete tear down, my cork gasket directly under the crank, wasn't seated properly and was slightly hung up on the base gasket, so I'm glad to have caught that! One real bummer, is that I noticed a milky drip from the lower unit.... yup! (after I just replaced all the seals and spaghetti seal...... GRRRRR!).

Work to be done..., Ohh but it is GOOD work!
 
Last edited:

HighTrim

Supreme Mariner
Joined
Jun 21, 2007
Messages
10,486
That will do it! Those are check valves. They allow pressure, but not vacuum, to the tank. With it blocked open like that, the vacuum produced in the crank case would counter the pressure it supplied to the tank.
 

F_R

Supreme Mariner
Joined
Jul 7, 2006
Messages
28,195
Ah, that makes me feel better. No bragging intended, but I suggested possible low tank pressure. Just glad you found SOMETHING.

Don't get all upset about that drainage. That probably is an emulsion of the oil that you put in the gas, which has done its job and gone out the exhaust and mixed with the spent cooling water. Absolutely normal.
 

HighTrim

Supreme Mariner
Joined
Jun 21, 2007
Messages
10,486
That issue that you see is likely a fault where the spaghetti seal abuts the prop shaft seal housing. Sometimes, if the spaghetti is cut too long, it buckles, and you get a leak. OR, if it is cut too short, you will obviously get a leak.

About a 1/16" overhang, AFTER you push the spaghetti seal to the outside edge of the groove, is about what you want. And the ends need to be square cut.

I put the 3M847 in the groove, after cleaning with acetone. Drop the spaghetti seal in, don't cut to length yet. Push it to the outside of the groove, so that it cannot shrink anymore. Let the 3M harden some. Then trim it to 1/16" overhang, and ensure end cut is square. Put a bead on the other side of the gearcase, then drop the skeg half on, ensuring the spaghetti seal does not buckle as you lower it down. Put sealer on screws before installing them. Torque to spec.

Also ensure there is sealer on the inside of the groove, before you put the oring on the prop shaft seal housing, then on the outer edge of o ring as well, before you drop the prop shaft assembly down into gearcase.
 
Top